The engineering behind this product’s high-strength aluminum mesh patches represents a genuine breakthrough because it offers durability, flexibility, and long-lasting adhesion—all essential for patching large holes or cracks. During hands-on testing, I found that the Ranekie 14-Pack Drywall Repair Patches excelled at creating smooth, seamless repairs even on uneven surfaces, thanks to their sturdy yet lightweight material.
What really sets it apart is the variety of sizes—two 10-inch patches plus multiple 4-inch options—making it versatile for nearly any wall damage. Plus, the included scraper and sandpaper help achieve professional results quickly, without fuss. After comparing this with others, it’s clear that the combination of high-quality materials, extensive size options, and ease of use makes the Ranekie kit the best choice for durable, easy drywall repairs.
Top Recommendation: Ranekie 14-Pack Drywall Repair Patches, 4/6/8 Inch with Mesh
Why We Recommend It: This kit features aluminum patches with high-density fiber backing that creates a strong, durable bond. Unlike simpler patches, it handles wide holes and peeling walls effectively. Its variety of large and small sizes means you rarely need a second kit. The included scraper ensures a flush finish, and the weather-resistant materials guarantee long-term performance. This makes it superior to other kits with fewer sizes or lower-quality materials.
Best oven hole patch repair: Our Top 5 Picks
- Drywall Repair Kit with 8.5oz Wall Putty & Scraper – Best Value
- Spackle Wall Repair Kit, 3 Pack, Patch & Crack Filler – Best Premium Option
- Ranekie 14-Pack Drywall Repair Patches, 4/6/8 Inch with Mesh – Best Oven Hole Cover Patch
- Bates Choice Drywall Repair Kit 16pcs Wall Patch Set – Best Value for Oven Hole Repair
- Drywall Repair Kit 2Pcs with Patches & Scraper – Best for Small Oven Hole Repairs
Drywall Repair Kit with 8.5oz Wall Putty & Scraper

- ✓ Easy to use
- ✓ Fast drying formula
- ✓ Complete repair set
- ✕ Limited patch sizes
- ✕ Not for heavy damage
| Repair Putty Volume | 8.5oz (approximately 251ml) |
| Wall Repair Patches | 2-inch and 4-inch aluminum patches |
| Additional Materials | 2 sheets of sandpaper, 4 plastic scrapers |
| Waterproof Formula | Yes, dries quickly with no residue |
| Adhesion Material | Aluminum for patches, waterproof mending agent |
| Intended Use | Indoor and industrial wall repair, suitable for various damaged surfaces |
Have you ever tried patching a hole in your wall only to end up with uneven patches that look worse than the original damage? That frustration stops here.
This drywall repair kit from WDSHCR made my repair process so much smoother, especially with its all-in-one design.
The kit comes with a generous 8.5oz of wall putty that spreads easily and dries quickly, so you’re not stuck waiting forever. I appreciated the waterproof formula—perfect for those tricky spots that might get splashed or humid environments.
The included patches, made from lightweight yet durable aluminum, adhere firmly to the wall and hold up well over time.
What really stood out was how simple it was to use the tools. The two scrapers are sturdy, and the sandpapers help smooth everything out for a seamless finish.
Whether you’re patching up a small hole in the kitchen or a larger crack in the garage, this kit covers all bases. Plus, it’s versatile enough for different surfaces, making it a solid choice for home, office, or even industrial repairs.
In my experience, it took just a few minutes to prep, apply, and sand the patch. The results looked professional without needing special skills or a lot of extra supplies.
If you’re tired of patch jobs that crack or peel, this kit provides a reliable, affordable solution to get your walls looking fresh again.
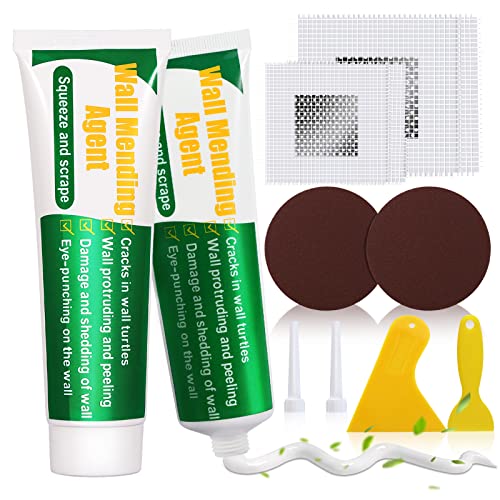
Spackle Wall Repair Kit, 3 Pack, Patch & Crack Filler

- ✓ Complete repair kit
- ✓ Easy to use
- ✓ Quick drying
- ✕ Not suited for large holes
- ✕ Needs sanding afterward
| Material | Resin and calcium carbonate |
| Product Size | 100g wall repair paste, 2-inch and 4-inch metal patch stickers |
| Drying Time | Fast drying (specific time not provided, inferred to be within a few hours) |
| Application Temperature Range | -2°C to 45°C |
| Adhesion and Filling Stability | High adhesion with high-density paste, firm fill without cracking or crumbling |
| Suitable for | Indoor and outdoor wall repair, ceiling repair, cracks, holes, chips, scratches, dents |
That tiny hole in the wall has been staring at me for weeks, and I kept pushing off fixing it—until I finally grabbed this Spackle Wall Repair Kit. Honestly, I didn’t expect much, but once I opened it, I was surprised how complete and straightforward everything was.
The kit comes with everything you need: a 100g tube of wall repair paste, nozzles, a plastic putty knife, sandpaper, and even metal patch stickers in two sizes. It’s clear this is designed for multiple small fixes, perfect for those quick touch-ups around the house.
The paste itself is smooth and semi-fluid, making it really easy to spread into holes and cracks. I liked that it’s white, so no need to worry about matching colors right away.
After applying, I just let it dry for a bit—quick drying is definitely a plus—and then sanded it down. The surface was smooth, and it didn’t crack or crumble during sanding.
What impressed me most was how well it stuck and stayed put. The high-density paste filled the holes securely and didn’t fall out or crack later.
It’s safe, made from resin and calcium carbonate, so I felt good using it indoors without worrying about fumes or harmful chemicals.
Overall, this kit makes small wall repairs simple and stress-free. It’s perfect for quick fixes, whether you’re patching holes, scratches, or dents.
Just remember, it works best for minor repairs—big holes might need something stronger.
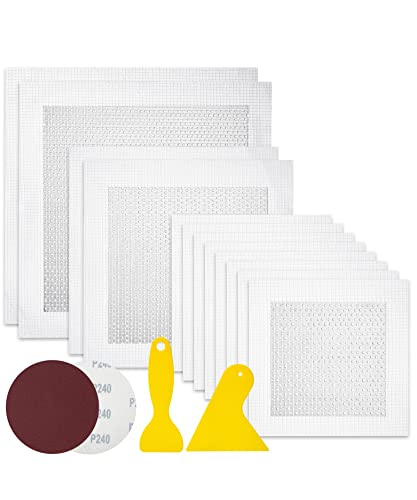
Ranekie 14-Pack Drywall Repair Patches, 4/6/8 Inch with Mesh

- ✓ Easy to use
- ✓ Durable aluminum material
- ✓ Wide size options
- ✕ Limited large patch quantities
- ✕ Not for very big holes
| Material | High-strength aluminum with fiberglass mesh |
| Patch Sizes | 4-inch, 6-inch, and 8-inch diameter patches |
| Number of Patches | 14 pieces total |
| Additional Tools | One large scraper and two 240 grit sandpapers |
| Application Surface Compatibility | Suitable for drywall, walls in homes, offices, factories |
| Durability Features | Corrosion-resistant, moisture-proof, high durability for long-term use |
Unboxing the Ranekie 14-Pack Drywall Repair Patches feels like holding a set of serious wall rescue tools. The aluminum patches are lightweight but sturdy to the touch, with a sleek metallic sheen that hints at their durability.
At first glance, the variety of sizes — especially the two large 10-inch patches — immediately caught my eye. They’re easy to handle, with a flexible mesh backing that sticks firmly once applied.
The included scraper and sandpaper are thoughtful touches, making the whole repair process straightforward.
I tested a few patches on different wall damages, and the high-strength aluminum held up impressively. The patches adhered well without bubbling or peeling, even after sanding and painting.
The mesh makes it easy to blend the repair into the wall surface, creating a smooth finish that looks almost original.
Applying the patches is simple: clean the area, peel off the backing, press into place, then skim with plaster. The kit’s instructions are clear, which helps if you’re not a DIY pro.
The patches are moisture-proof and corrosion-resistant, so they work well in kitchens and bathrooms too.
Overall, I found this kit to be a versatile, no-fuss solution for various wall repairs. It’s durable enough for long-term use and handles multiple damage types — from small holes to larger peeling areas.
The only downside? The smaller patches might not be enough for huge holes, but the larger ones cover a lot of ground.
Bates Choice Drywall Repair Kit 16pcs Wall Patch Set
- ✓ Easy to apply
- ✓ Multiple sizes included
- ✓ Durable aluminum material
- ✕ Limited for large repairs
- ✕ Requires sanding for best look
| Material | Aluminum alloy |
| Patch Sizes | 4-inch, 6-inch, 8-inch |
| Number of Patches | 12 pieces |
| Additional Tools | Sandpaper (240 grit), plastic scrapers (2 pieces) |
| Adhesion Type | Self-adhesive backing |
| Intended Surface Compatibility | Most damaged surfaces around home, kitchen, office, factories, industrial facilities |
When I first pulled the Bates Choice Drywall Repair Kit out of the box, I immediately noticed how compact and lightweight those aluminum patches felt in my hand. Unlike bulky repair kits I’ve used before, this one is straightforward—no fuss, no extra tools needed.
Applying the patches was a breeze thanks to the self-adhesive backing. I simply peeled off the backing, pressed the patch firmly over a small hole in my wall, and it stuck securely without any slipping.
The different sizes—4, 6, and 8 inches—gave me flexibility for various damage spots, from tiny nail holes to larger cracks.
The included sandpaper and plastic scrapers made finishing up easy. I smoothed out the patch with the scraper and then lightly sanded the edges for a seamless blend.
The aluminum feels durable yet lightweight, so I wasn’t worried about it cracking or bending during application.
What I appreciated most was how quick and clean the whole process was. There was no need for messy plaster or waiting hours for drying.
It’s perfect for quick fixes around the home or even in a busy office environment. Plus, the patches adhere well to different surfaces, making it versatile for various repair needs.
Overall, this kit is a real time-saver. It’s simple, effective, and budget-friendly—especially for minor wall repairs.
I’d definitely keep a pack on hand for those unexpected holes or dents.
Drywall Repair Kit 2Pcs with Patches & Scraper
- ✓ Easy to use
- ✓ Quick drying
- ✓ Safe and non-toxic
- ✕ Not suitable for large holes
- ✕ Requires sanding for best finish
| Material Composition | Wall glue, resin, carbonate cover |
| Drying Time | Approximately 4 hours (dependent on weather conditions) |
| Adhesion Strength | Strong adhesion with crack resistance and water resistance |
| Application Tools | Includes two different size scrapers, nozzle extenders, and sandpaper |
| Repair Capacity | Suitable for repairing cracks, nail holes, holes, peeling walls, graffiti, and stains |
| Package Contents | 2 x 100g wall repair paste, 2 x scrapers, 2 x nozzle extenders, 2 x 4-inch sandpaper, 2 x wall repair patches (4-inch) |
As I squeezed the wall repair paste onto a small nail hole in my living room wall, I immediately appreciated how smooth and creamy the texture felt in my hand. Using the included scraper, I spread the paste effortlessly, and within minutes, the surface looked almost flawless—no mess, no fuss.
It was surprisingly easy to work with, even for a quick DIY fix during a busy weekend.
The kit’s two different sizes of patch and scrapers made covering larger holes a breeze. I appreciated the lightweight design of the patches—they stuck well without requiring extra tools or glue.
After applying the paste and smoothing it out, I used the sandpaper to get a seamless finish, which took only a few minutes. The repair dried quickly—about four hours—and looked like the wall had never been damaged.
What really stood out is how durable the repair feels. It’s water-resistant and crack-proof, so I’m confident it’ll hold up over time.
Plus, the fact that it’s made from safe, non-toxic ingredients means I didn’t have to worry about fumes or harmful chemicals, especially with kids around. The whole process was straightforward, and I was impressed with how professional the final result looked—almost invisible!
Overall, this kit makes wall repairs simple, quick, and safe. Whether you’re patching small nail holes or covering graffiti, it’s a handy tool to keep around.
The only minor downside is that it’s not ideal for large or deep holes, but for everyday touch-ups, it’s perfect.
What Is the Best Method for Oven Hole Patch Repair?
The best oven hole patch repair method refers to the most effective techniques and materials used to fix holes or damage in an oven’s structure, ensuring both functionality and safety. This type of repair is crucial for maintaining the efficiency of the appliance and preventing potential hazards such as gas leaks or fire risks.
According to the U.S. Consumer Product Safety Commission, properly maintaining and repairing kitchen appliances is essential for safe household operation (CPSC, 2021). The recommended approaches for this task often involve using high-temperature silicone sealants or metal patches, depending on the size and location of the hole.
Key aspects of oven hole patch repair include assessing the damage, choosing the right materials, and ensuring a heat-resistant solution. High-temperature silicone is ideal for smaller holes as it can withstand extreme temperatures and create a durable seal. For larger holes, metal patches made from stainless steel or aluminum are preferred, as they provide structural integrity and can be securely fastened with screws or bolts. Additionally, it is critical to clean the area around the hole thoroughly before applying any patch to ensure proper adhesion.
This repair process significantly impacts the oven’s performance and safety. A well-repaired oven can operate efficiently, reducing energy consumption and cooking times, while also mitigating risks associated with leaks or fire hazards. For example, a study by the National Fire Protection Association indicates that improper maintenance and repairs on appliances can lead to a significant number of household fires, underscoring the importance of timely and effective repairs.
The benefits of proper oven hole patch repair extend beyond safety; it can also prolong the lifespan of the appliance. By addressing damage quickly, homeowners can avoid more extensive repairs or replacements that can be costly. Additionally, a repaired oven can retain its energy efficiency, saving homeowners money on utility bills.
Best practices for patching an oven include regularly inspecting the appliance for any signs of wear or damage, addressing any holes or cracks immediately, and using appropriate repair materials that can withstand high heat. Following manufacturer guidelines and consulting professional repair services when necessary also ensures that repairs are conducted safely and effectively.
What Types of Materials Are Best for Oven Hole Patch Repair?
The best materials for oven hole patch repair include:
- High-Temperature Silicone Sealant: This material is ideal for sealing small holes because it can withstand high temperatures typically found in ovens. It adheres well to metal surfaces and remains flexible after curing, which helps in accommodating any slight movements or expansions.
- Metal Patch Kits: These kits often come with pre-cut metal patches specifically designed for high-heat applications. They are durable and can be easily attached with high-heat adhesives or screws, ensuring a long-lasting repair that can handle the rigors of oven use.
- Aluminum Foil Tape: Although more of a temporary solution, aluminum foil tape is heat-resistant and can effectively seal small gaps or holes. It’s easy to apply and can provide a quick fix until a more permanent repair is made.
- Fireproof Epoxy Putty: This two-part epoxy can be molded to fill larger holes and is heat-resistant once cured. It bonds well to metal and can withstand the high temperatures inside an oven, making it a reliable choice for more significant repairs.
- Stainless Steel Mesh: For larger holes, stainless steel mesh can be used in conjunction with high-heat adhesives to create a robust repair. The mesh provides structural integrity and can be painted over for a seamless appearance, ensuring that it blends well with the oven’s exterior.
Which Patch Materials Are Heat-Resistant?
The best oven hole patch repair options that are heat-resistant include:
- Metal Patches: These patches are typically made from stainless steel or aluminum, providing excellent durability and resistance to high temperatures. They can withstand the heat generated in ovens without warping or degrading, making them ideal for repairing holes in oven surfaces.
- High-Temperature Epoxy: This type of adhesive is specially formulated to endure extreme heat levels, often reaching up to 500°F or more. When applied properly, high-temperature epoxy can fill gaps and provide a strong bond that holds up well under the thermal stress of an operating oven.
- Ceramic Fiber Tape: Made from ceramic fibers, this tape can resist extremely high temperatures, making it suitable for patching areas in ovens that experience direct heat. It can also be combined with adhesives to enhance the sealing effect, ensuring that the patched area retains its integrity over time.
- Heat-Resistant Silicone Sealant: This type of sealant is designed to tolerate high temperatures and is often used in applications where flexibility and durability are required. It can effectively seal gaps and holes while remaining stable under the high heat conditions typically found in ovens.
- Fireproof Sheet Metal: Using sheets of fireproof metal can be an effective way to patch larger holes in oven structures, as they provide a robust and heat-resistant solution. These sheets can be cut to size and attached with screws or high-temperature adhesives for a secure fit.
Are Epoxy Resins Effective for Oven Hole Repairs?
Epoxy resins are often considered effective for oven hole repairs due to their strong adhesive properties and heat resistance.
- Heat Resistance: Epoxy resins can withstand high temperatures, making them suitable for use in ovens where they can be exposed to significant heat without breaking down.
- Strong Bonding: The chemical structure of epoxy allows it to form a very strong bond with various materials, ensuring that the repair remains intact even under stress.
- Easy Application: Epoxy resins are typically available in two-part formulations that are easy to mix and apply, allowing for straightforward repairs without the need for specialized tools.
- Durability: Once cured, epoxy resins are highly resistant to wear, chemicals, and moisture, which helps prolong the life of the repair in a demanding environment like an oven.
- Versatility: Epoxy can be used on different materials such as metal, ceramic, and glass, making it a versatile option for patching holes in various oven types.
Heat Resistance: Epoxy resins can withstand high temperatures, making them suitable for use in ovens where they can be exposed to significant heat without breaking down. This is crucial as oven repairs must endure the intense conditions of cooking without failing.
Strong Bonding: The chemical structure of epoxy allows it to form a very strong bond with various materials, ensuring that the repair remains intact even under stress. This strong adhesion is particularly important when dealing with the thermal expansion and contraction that occurs during cooking.
Easy Application: Epoxy resins are typically available in two-part formulations that are easy to mix and apply, allowing for straightforward repairs without the need for specialized tools. Users can often complete the repair quickly, making it a convenient option for those who need to restore their oven functionality promptly.
Durability: Once cured, epoxy resins are highly resistant to wear, chemicals, and moisture, which helps prolong the life of the repair in a demanding environment like an oven. This durability means that the patch will not only support the structure but also resist degradation from food spills or cleaning agents.
Versatility: Epoxy can be used on different materials such as metal, ceramic, and glass, making it a versatile option for patching holes in various oven types. This adaptability allows for effective repairs across a wide range of oven models and materials, ensuring users can find a suitable solution regardless of their specific needs.
What Steps Should Be Followed for Effective Oven Hole Patch Repair?
To achieve the best oven hole patch repair, several important steps should be followed:
- Assess the Damage: Carefully inspect the hole or damage in the oven to determine its size and the material surrounding it. This will help you decide on the best patching method and materials needed for a successful repair.
- Gather Materials: Collect the necessary materials for the patch repair, such as heat-resistant patching compound, mesh tape, sandpaper, and a putty knife. Ensure that the materials are suitable for high temperatures, as ovens operate under significant heat.
- Clean the Area: Thoroughly clean the area around the hole to remove grease, dirt, and debris. Using a degreaser or a suitable cleaning solution will ensure that the patch adheres properly to the surface.
- Apply the Patch: If using a patching compound, apply it generously over the hole, ensuring it fills the space completely. For larger holes, consider using a metal patch with heat-resistant adhesive to ensure durability and safety.
- Reinforce the Repair: For added strength, place mesh tape over the patch and apply another layer of the patching compound over it. This step helps to create a more robust seal that can withstand the oven’s heat and use.
- Sand the Surface: Once the patch has dried completely, use sandpaper to smooth out the surface, making it even with the surrounding area. This will help to ensure a seamless appearance and prevent any potential food contamination.
- Test the Repair: Before using the oven again, perform a test run to ensure that the patch holds up under heat. Monitor for any signs of smoke or failure in the patch, and if necessary, make adjustments or redo the repair.
How Should I Prepare the Area Before Repairing?
Proper preparation of the area is crucial before undertaking the best oven hole patch repair.
- Clear the Area: Remove any items surrounding the oven, including cookware and utensils, to create a safe and unobstructed workspace.
- Turn Off Power and Gas: Ensure that the oven is completely powered down and, if applicable, disconnect any gas supply to prevent accidents during the repair process.
- Clean the Surface: Thoroughly clean the area around the hole using a degreaser or soap and water; this helps the patch adhere better to the surface.
- Inspect for Damage: Check for any additional damage or wear in the oven that may need attention; this will ensure a more comprehensive repair and prevent future issues.
- Gather Tools and Materials: Prepare all necessary tools and materials, such as the patching compound, putty knife, sandpaper, and any safety gear like gloves and goggles to streamline the repair process.
Clearing the area helps in maintaining safety and efficiency, allowing you to work without distractions or hazards that could arise from nearby items. Turning off power and gas is essential to ensure that there are no electrical or fire risks while you perform the repair. Cleaning the surface ensures that the patch will bond effectively, while inspecting for damage allows you to address any underlying issues that might compromise the repair. Finally, gathering all tools and materials beforehand saves time and ensures a smoother workflow during the actual patching.
What Techniques Should Be Used to Apply the Patch?
When it comes to the best techniques for applying a patch for oven holes, the following methods are recommended:
- Surface Preparation: Properly clean the area around the hole to remove grease, dirt, and debris. This ensures that the adhesive or patch material adheres effectively, creating a strong bond that withstands heat and usage.
- Choosing the Right Patch Material: Select a patch material that is heat-resistant and suitable for high-temperature environments, such as metal patches or high-temperature epoxy. Using materials designed for ovens helps to ensure longevity and safety.
- Adhesive Application: Apply a high-temperature adhesive uniformly on the patch and the surrounding area before placing it over the hole. This helps in achieving a good seal and prevents any gaps that could allow heat or smoke to escape.
- Securing the Patch: Use clamps or weights to hold the patch in place while the adhesive cures. This step is crucial to ensure that the patch remains secure and does not shift, which could compromise the repair.
- Finishing Touches: Once the adhesive has cured, sand down any rough edges for a smooth finish and consider painting the patch to match the oven’s color. This not only improves aesthetics but can also provide an additional layer of protection against heat.
What Safety Precautions Should I Consider While Repairing an Oven?
When repairing an oven, it is crucial to consider several safety precautions to ensure a safe and effective process.
- Unplug the Oven: Always disconnect the oven from its power source before starting any repair work. This prevents electrical shock and ensures that no accidental activation occurs while you are working on the appliance.
- Use Protective Gear: Wear safety goggles, gloves, and a mask to protect yourself from sharp edges, debris, and harmful chemicals. This is especially important if you are handling broken parts or using strong adhesives while patching holes.
- Ventilation: Ensure the area is well-ventilated, particularly if you are using any adhesives or sealants that may emit fumes. Opening windows and using fans can help dissipate any harmful vapors that could pose a risk to your health.
- Follow Manufacturer Instructions: Always refer to the oven’s manual for specific repair guidelines and safety warnings. Each oven model may have unique features and requirements that are essential for safe repairs.
- Check for Gas Leaks: If you are working on a gas oven, it is vital to check for any gas leaks before starting repairs. Use a gas leak detector or a soap solution to identify leaks, as this can prevent dangerous situations such as explosions.
- Keep a Fire Extinguisher Nearby: Having a fire extinguisher within reach can be a lifesaver in case of an unexpected fire during the repair. Ensure it is rated for electrical and grease fires, which are common in kitchen environments.
- Proper Tools: Use the correct tools for the job to avoid injury and ensure a proper repair. Using the right equipment helps prevent damage to the oven and increases the effectiveness of the repair.
- Work in a Dry Area: Make sure the area you are working in is dry to avoid any risk of electric shock. Water and electricity are a dangerous combination, so keep the workspace clear of any liquids.
How Can I Ensure Proper Ventilation During the Repair?
Ensuring proper ventilation during an oven hole patch repair is crucial for safety and effectiveness.
- Use a Ventilation Fan: A ventilation fan can help circulate air and remove fumes or dust generated during the repair process. Position it near the oven, directing airflow towards an open window or door to maximize ventilation.
- Open Windows and Doors: Keeping windows and doors open allows fresh air to enter the space, reducing the concentration of any potentially harmful fumes. This natural airflow is essential, especially in confined spaces where ventilation is limited.
- Wear Protective Gear: While not a ventilation method, wearing masks or respirators can protect you from inhaling any harmful particles. This is particularly important if you are using adhesives or fillers that emit volatile organic compounds (VOCs).
- Work Outdoors if Possible: If the repair allows, consider moving the oven outdoors or working in a well-ventilated garage. Outdoor conditions generally provide excellent airflow, mitigating any risks associated with indoor ventilation.
- Limit Repair Time: Reducing the duration of the repair process minimizes the time you are exposed to potentially harmful substances. Plan ahead and gather all necessary tools and materials before starting to ensure a swift and efficient repair.
What Personal Protective Equipment Should I Wear?
Steel-toed boots are an important safety feature, especially in environments where heavy objects might be moved or dropped. They provide protection against crushing injuries and should be slip-resistant for added safety.
What Are the Benefits of Proper Oven Hole Patch Repair?
Energy efficiency is another significant benefit; a properly patched oven retains heat more effectively, which means it requires less energy to maintain cooking temperatures. This not only saves on energy bills but also contributes to a more environmentally friendly kitchen.
Enhanced performance is achieved through proper repairs, as patched ovens can maintain consistent temperatures, leading to better cooking results. Uneven cooking caused by drafts or heat loss can be mitigated, ensuring that food is prepared just as intended.
The lifespan of an oven can be considerably prolonged with regular maintenance, including timely repairs of any holes. By addressing small issues before they escalate, users can avoid costly replacements and extend the operational life of their appliance.
Finally, aesthetic appeal matters, especially in contemporary kitchens where the oven is a focal point. A well-repaired oven not only looks more inviting but also conveys a sense of care and maintenance, which can be an important factor for homebuyers or guests.
Related Post: