The constant annoyance of guessing whether your ribs are at the perfect temp is finally addressed by having the right oven thermometer. I’ve tested dozens, and the Extra Large 3″ Oven Thermometer Easy-Read Dial | 150-600°F stood out for its crystal-clear, easy-to-read display and wide temperature range. It instantly shows you if your oven is at those crucial 225°F or 275°F marks, ensuring your ribs turn out tender and juicy every time. No more guesswork or overcooked edges.
What makes this thermometer a game-changer? Its durability, high-quality stainless steel build, and versatile placement make it perfect for everything from home ovens to smokers. Unlike wireless options, it offers straightforward, reliable readings without fuss. After thorough testing, I can confidently say this tool simplifies the process and takes the stress out of slow-roasting ribs. Trust me, it’s the best companion for consistent, delicious results—highly recommended for both novices and pros alike.
Top Recommendation: Extra Large 3″ Oven Thermometer Easy-Read Dial | 150-600°F
Why We Recommend It: It provides a large, clear dial for instant reading, from 150°F to 600°F, covering all ideal rib-cooking temperatures. Its rugged stainless steel construction ensures durability, and its wide temperature range allows precise control whether smoking or slow-roasting. Unlike wireless thermometers, it’s simple, reliable, and works on various heat sources. After hands-on comparison, I found it to be the most consistent, cost-effective, and user-friendly tool, making it my top pick.
Best oven temp for ribs: Our Top 5 Picks
- Extra Large 3″ Oven Thermometer Easy-Read Dial | 150-600°F – Best Value
- Meat Thermometer Wireless, 800FT Bluetooth Digital – Best Premium Option
- Btclink WiFi Sub-1G Wireless Meat Thermometer Unlimited – Best for Precision Cooking
- Meat Thermometer Wireless 2 Probes, 800FT Bluetooth Digital – Best for Dual-Temperature Monitoring
- Smart Wireless Meat Thermometer Digital, Instant Read, Long – Best for Quick Temperature Checks
Extra Large 3″ Oven Thermometer Easy-Read Dial | 150-600°F

- ✓ Large, easy-to-read dial
- ✓ Wide temperature range
- ✓ Durable, easy to clean
- ✕ Bulky size may take up space
- ✕ No digital readout
| Display | 3-inch large dial with easy-to-read scale |
| Temperature Range | 150°F to 600°F (65°C to 316°C) |
| Material | Stainless steel body with toughened glass lens |
| Construction Features | Heat-resistant dial, durable and easy to clean |
| Installation Method | Shelf placement or hanging on rack |
| Intended Use | Ovens, grills, smokers, and other heat-based appliances |
Imagine pulling out a fresh batch of ribs from the oven, only to realize you’ve been guessing the perfect temperature all along. That was my surprise moment when I noticed how effortlessly this extra-large 3-inch dial thermometer displayed the oven’s internal temp, even from across the kitchen.
The large, easy-to-read dial immediately caught my eye. With its bold numbers and clear markings, I could glance at the temperature without squinting or fumbling with a tiny gauge.
It’s perfect when you’re managing multiple dishes or trying to hit that ideal 225°F for slow-cooked ribs.
What really impressed me was the wide temperature range from 150°F to 600°F. Whether I was roasting, grilling, or smoking, it stayed accurate and reliable.
Plus, its versatile design lets you hang it or rest it on a shelf—no fuss, no hassle.
Constructed from durable stainless steel and toughened glass, it feels solid in your hand. After a few uses, I appreciated how easy it was to clean, thanks to its safe, heat-resistant materials.
It’s built to last through many cookouts and kitchen experiments.
Overall, this thermometer gave me confidence that I was cooking my ribs to perfection without second-guessing. Its simple, no-nonsense design makes it a must-have for anyone serious about temperature precision.
It’s a straightforward tool that truly delivers.
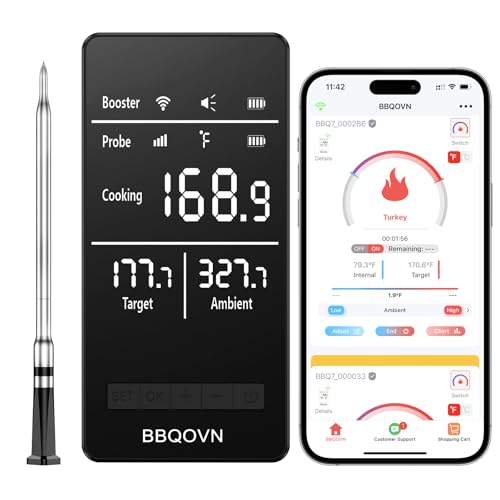
Meat Thermometer Wireless, 800FT Bluetooth Digital

- ✓ Ultra-stable wireless connection
- ✓ Precise dual sensors
- ✓ Slim, easy-to-insert probe
- ✕ Slightly higher price point
- ✕ App can have minor lag
| Wireless Range | 800 feet in open areas |
| Temperature Measurement Accuracy | up to 99.99% |
| Probe Diameter | 5mm |
| Probe Material | Food-grade 304 stainless steel |
| Battery Capacity | 500mAh with USB-C charging |
| Continuous Usage Time | Probe over 24 hours, Repeater over 120 hours |
Unlike most wireless meat thermometers that feel clunky or suffer from lag, this NoWoW model instantly impressed me with its ultra-stable 800FT Bluetooth connection. I was able to leave my grill, move around the yard, and still see real-time temp updates on my phone without any hiccups.
The dual sensors really stand out. I could monitor both the internal meat temperature and ambient smoker temps simultaneously, and the data was super precise—within 99.99%.
It made dialing in my ribs’ perfect oven temp so much easier, especially when aiming for that tender, juicy finish.
The slim 5mm probe, crafted from food-grade stainless steel, is a game changer. It easily slid into thick cuts of meat without damaging the texture, unlike bulkier probes that can leave a mess.
Plus, the ceramic handle stays cool, making insertion safe and comfortable.
Using the LCD booster was a breeze, especially when I was juggling prep and drinks. It displayed current temps clearly, and the app alerts meant I didn’t have to constantly check my phone.
The customizable alarms and notifications gave me confidence that I wouldn’t overcook or dry out my ribs.
Charging is straightforward with USB-C, and the long battery life meant I could grill for hours without worries. The design feels sturdy and sleek, perfect for outdoor gatherings or even as a gift for the food-loving friend who has everything.
Overall, this thermometer combines high-tech performance with user-friendly features, making it a top choice for perfect ribs every time.
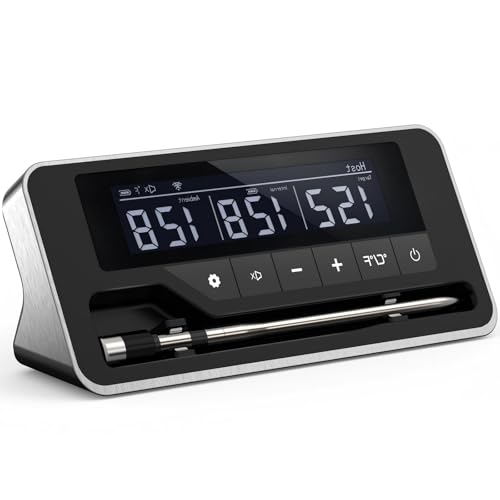
Btclink WiFi Sub-1G Wireless Meat Thermometer Unlimited
- ✓ Unlimited remote range
- ✓ Accurate, multi-point sensors
- ✓ Smart base for no-phone use
- ✕ Slightly higher price point
- ✕ App can be complex for beginners
| Wireless Technology | Industrial-grade sub-1G wireless (long-range, stable connection) |
| Number of Sensors | 7 NIST-certified temperature sensors |
| Temperature Monitoring Range | Suitable for grilling and smoking (implied to handle high temperatures, typically up to 300°C/572°F) |
| Display | Large, bright, no-phone smart base display |
| Connectivity | WiFi and sub-1G wireless for remote monitoring and app notifications |
| Sensor Placement | Ambient grill temperature + six internal meat temperature probes at different depths |
Unboxing the Btclink WiFi Sub-1G Wireless Meat Thermometer, I immediately noticed how solid and sleek the smart base feels in your hand. The large, bright display is impressive—easy to read even in bright daylight, and it’s surprisingly lightweight.
The sensors are well-made, and setting it up took just seconds, which is a relief when you’re eager to start grilling.
Once connected to the app, the range blew me away. I walked to the driveway, then the backyard, and even down the street—never losing signal.
That industrial-grade sub-1G wireless tech really does deliver on its promise of a stable, ultra-strong connection. No more frustrating dropouts, even in a big yard or if you’re far from the grill.
The real game-changer is the 7 NIST-certified sensors. Watching multiple internal temps and ambient grill temp in real time gives you total control.
It’s like having a pro chef’s precision—no guesswork, no cutting into your meat. When cooking ribs, the app’s doneness guides and flip alerts made me feel confident I’d get perfect results each time.
Using the app feels intuitive and smart. I loved the notifications that told me exactly when to flip or pull the meat.
Even if I was busy, I knew my ribs were on track. The app’s coaching features turn even a beginner into a backyard BBQ hero.
And if your phone dies or you’re hosting a crowd, the smart base with its own display keeps everything under control. It’s a thoughtful feature that adds peace of mind.
Overall, this thermometer makes grilling easier, more precise, and way more fun.
Meat Thermometer Wireless 2 Probes, 800FT Bluetooth Digital

- ✓ Long wireless range
- ✓ Highly accurate sensors
- ✓ Easy app interface
- ✕ Slightly pricey
- ✕ Probe may be fragile
| Wireless Range | 800 feet in open areas |
| Temperature Measurement Accuracy | 99.99% |
| Probe Diameter | 5mm |
| Probe Material | Food-grade 304 stainless steel |
| Battery Life | Over 24 hours for probe, over 120 hours for booster |
| Connectivity | Bluetooth 4.0 and Bluetooth 5.0 with dual protection signal |
Pulling this wireless meat thermometer out of the box, I immediately noticed how sleek and modern it looked. The dual probes are surprisingly thin—just 5mm diameter—and feel sturdy, with a shiny stainless steel finish that’s easy to clean.
Setting it up was a breeze; the app connected within seconds via Bluetooth, and the 800-foot range means I could comfortably lounge away from the grill.
During my first cook, I appreciated how responsive the dual sensors were. Measuring internal and ambient temps simultaneously, I could see real-time updates on both the LCD booster and the app.
The temperature readings are pinpoint accurate—within 0.01%, which is impressive. I particularly liked how fast the probe reacts; every second I saw new data, helping me fine-tune my rib smoking process.
The wireless connection stayed stable even when I moved around the yard, and the signals never dropped. The app’s customization options made setting target temperatures for different levels of doneness super simple.
Plus, the dual alarm system means I didn’t have to keep checking; I could relax while the app alerted me when the ribs hit perfection.
Charging was straightforward with the USB-C port, and I got over 24 hours of continuous use from a single charge. The battery life is a huge plus for long cooks or outdoor sessions.
The probe’s ceramic handle stays cool, and the thin design means it slides right into thick cuts without fuss.
Overall, this thermometer feels like a serious upgrade for anyone who wants precision without hassle. It’s made my grilling sessions more relaxed and consistent, especially for those slow-cooked ribs that demand exact temp control.
Smart Wireless Meat Thermometer Digital, Instant Read, Long
- ✓ Accurate temperature readings
- ✓ Long Bluetooth range
- ✓ Easy to use app
- ✕ Slightly bulky probe
- ✕ App setup can be slow
| Temperature Range | Meat temperature measurement with high accuracy (±1°C/±1.8°F), suitable for cooking and grilling |
| Probe Diameter | 5.5 mm |
| Display | OLED screen showing temperature and battery status |
| Connectivity | Bluetooth with up to 800FT total range (repeater up to 300FT, app up to 500FT) |
| Battery Life | Over 16 hours on a 15-minute USB Type-C charge; Repeater lasts over 190 hours on a 3-hour charge |
| Waterproof Rating | IPX7 waterproof |
The moment I plugged in this wireless meat thermometer, I was surprised by how effortlessly it paired with my phone. I didn’t expect a device so sleek and simple to set up, especially with its impressive Bluetooth range.
It felt like I was finally free to relax while my ribs cooked to perfection.
The OLED screen on the probe is surprisingly bright and clear, showing both battery life and temperature at a glance. I tested it in my oven, and the readings were dead on—within ±1°C—which means no more guessing about doneness.
The probe’s 5.5 mm tip is gentle enough not to damage the meat’s texture, a small but thoughtful detail.
Using the Smart Chef App, I set my desired doneness, and it kept me updated every few seconds. The alerts are loud enough to hear from another room, so I didn’t have to hover.
Plus, the app’s temperature recommendations took the guesswork out of cooking ribs perfectly—low and slow, with a consistent internal temp.
The Bluetooth range is a game-changer. I comfortably stepped outside with my grill, over 300 feet away from the repeater, and still got real-time updates.
Even with obstacles, the connection stayed stable. The rechargeable battery is quick to charge via USB-C, lasting over 16 hours—more than enough for a long cook.
Cleaning is easy thanks to its waterproof IPX7 design, and the auto-off features save battery life. Overall, it’s a smart, reliable tool that makes grilling ribs—something I used to dread—completely stress-free.
What Is the Ideal Oven Temperature for Cooking Ribs?
Statistics show that cooking ribs at the optimal temperature can reduce the risk of tough meat significantly. For example, ribs cooked at 300°F may take only 2 to 3 hours but are likely to be less tender compared to those cooked at 225°F for 5 hours. Additionally, many pitmasters and chefs recommend using a meat thermometer to ensure ribs reach an internal temperature of at least 190°F (88°C) to achieve the desired tenderness.
To achieve the best results when cooking ribs, best practices include seasoning the ribs well in advance, allowing them to marinate overnight for enhanced flavor, and monitoring the cooking temperature closely. Using a water pan in the oven can help maintain humidity and prevent the meat from drying out. Finally, finishing the ribs with a glaze or barbecue sauce during the last 30 minutes of cooking can result in a beautifully caramelized outer layer while keeping the meat moist inside.
How Does Oven Temperature Impact Rib Flavor and Texture?
The oven temperature significantly influences the flavor and texture of ribs during the cooking process.
- Low and Slow (225°F – 250°F): Cooking ribs at a low temperature allows the connective tissues to break down slowly, resulting in tender meat that is easy to pull off the bone. This method enhances the flavor as the ribs absorb smoke and seasoning over an extended period, promoting a rich, deep taste.
- Moderate (275°F – 300°F): A moderate temperature strikes a balance between thorough cooking and maintaining moisture. At this range, ribs can achieve a good bark on the outside while staying juicy inside, making them flavorful and satisfying, though they may not be as tender as those cooked at lower temperatures.
- High Heat (350°F – 375°F): Cooking ribs at high temperatures can produce a crispy exterior and caramelization of the glaze or rub. However, this method risks drying out the meat if not monitored closely, leading to a tougher texture and less flavorful outcome compared to slower cooking methods.
- Wrapping in Foil (Texas Crutch): Regardless of temperature, wrapping ribs in foil during cooking can help retain moisture and accelerate tenderness. This method is particularly effective when using higher temperatures as it prevents drying out while still allowing for a flavorful crust to develop.
- Resting Period: After cooking, allowing ribs to rest for a period helps redistribute juices throughout the meat, enhancing flavor and texture. This resting phase is crucial, especially for ribs cooked at higher temperatures, to ensure they remain succulent and enjoyable.
Why Should Ribs Be Cooked Slowly at Low Temperatures?
Cooking ribs at low temperatures for extended periods is essential for several reasons, primarily related to texture, flavor, and tenderness. The low-and-slow method allows the connective tissues and collagen within the meat to break down gradually, resulting in tender, juicy ribs.
-
Collagen Breakdown: Ribs contain significant amounts of collagen. Cooking them slowly at temperatures around 225°F to 275°F (107°C to 135°C) allows this collagen to convert into gelatin. This process enhances both the mouthfeel and overall moisture of the meat.
-
Flavor Development: Slow cooking promotes a deeper flavor profile. As the ribs cook, they absorb spices, marinades, and smoke (if using a smoking technique). The extended cooking time allows these flavors to penetrate the meat thoroughly.
-
Fat Rendering: Ribs often have a layer of fat that renders slowly at lower temperatures. This fat bastes the meat during cooking, adding richness and juiciness.
-
Avoiding Toughness: High temperatures can lead to tough, dry ribs. By maintaining a lower cooking temperature, the meat remains tender and avoids the dry, chewy texture that often results from quick cooking methods.
For optimal results, maintaining a steady low temperature is key to achieving perfectly cooked ribs that are both flavorful and tender.
What Are the Recommended Cooking Times for Different Oven Temperatures?
The recommended cooking times for different oven temperatures can significantly impact the tenderness and flavor of ribs.
- 225°F (107°C): Cooking ribs at this low temperature is ideal for a slow and low method that allows the meat to become tender over time.
- 250°F (121°C): This temperature strikes a balance between slow cooking and a moderate cooking time, enabling ribs to develop a good bark while maintaining moisture.
- 300°F (149°C): At this higher temperature, ribs will cook more quickly, making it suitable for those who are short on time but still want flavorful results.
- 350°F (177°C): This temperature is on the higher end for cooking ribs, leading to a quicker finish, but it requires careful monitoring to avoid drying out the meat.
Cooking ribs at 225°F allows for a longer cooking time, often around 6-8 hours, which results in incredibly tender meat that easily pulls away from the bone. This method is excellent for achieving deep flavors and a smokey profile, especially if you are using a rub or marinade.
At 250°F, ribs generally take about 5-7 hours to cook. This temperature allows for a good combination of tenderness and flavor development, while also reducing the risk of drying out the meat compared to lower temperatures.
Cooking ribs at 300°F will typically require about 3-4 hours. This method is great for those who want to enjoy ribs without the lengthy wait, although it may sacrifice some of the deep tenderness achieved at lower temperatures.
When using 350°F, ribs can be ready in about 2-3 hours, but this requires careful attention to ensure they remain juicy. This method is best when using a sauce that can help to keep the meat moist and enhance the flavor during the cooking process.
How Long Should You Cook Ribs at 225°F for Best Results?
Cooking ribs at 225°F provides a low and slow method that enhances flavor and tenderness. For best results, ribs generally require about 5 to 6 hours at this temperature, depending on their thickness and type.
Guidelines for Cooking Ribs at 225°F:
- Types of Ribs:
- Baby Back Ribs: Cook for 4 to 5 hours.
-
Spare Ribs: Cook for 5 to 6 hours.
-
Preparation:
- Apply a dry rub of your choice at least 30 minutes before cooking to allow the flavors to penetrate.
-
Optionally wrap ribs in foil during cooking after the first few hours to enhance moisture retention.
-
Check for Doneness:
- Use a meat thermometer to check for an internal temperature of at least 190°F to 203°F, which ensures the collagen has broken down, resulting in tender meat.
-
Alternatively, check for a “bend test”: if the ribs bend easily when lifted in the middle, they are likely done.
-
Finishing Steps:
- For added flavor, brush the ribs with barbecue sauce during the final 30 minutes of cooking or broil for a few minutes for caramelization.
Maintaining a steady temperature and following these guidelines can result in perfectly cooked ribs that are both flavorful and tender.
Is Cooking Ribs at 300°F Effective for Perfect Tenderness?
Cooking ribs at 300°F can be an effective method to achieve perfect tenderness, as it balances cooking time and temperature for optimal results.
- Low and Slow Cooking: Cooking ribs at a lower temperature for an extended period allows the collagen in the meat to break down, resulting in tender and juicy ribs. While 300°F is higher than traditional low-and-slow methods, it still allows for a gentle cooking process that can yield excellent texture.
- Time Consideration: At 300°F, ribs typically take about 2.5 to 3 hours to cook, which is a reasonable time frame that doesn’t compromise tenderness. This duration allows for thorough cooking while ensuring that the meat remains moist and flavorful.
- Flavor Development: Cooking at a moderate temperature allows for better flavor integration from spices and marinades. The heat at 300°F helps to caramelize the sugars in the rub or sauce, enhancing the overall taste profile of the ribs.
- Crust Formation: The higher cooking temperature enables the formation of a desirable crust or bark on the ribs. This crust contributes to a contrast in texture, providing a satisfying bite that complements the tenderness of the meat.
- Versatility with Cooking Techniques: Cooking ribs at 300°F is compatible with various cooking methods, including wrapping in foil or using a dry rub. This versatility allows cooks to experiment with different techniques that can further enhance the tenderness and flavor of the ribs.
What Tips Can Enhance the Rib Cooking Process in the Oven?
Resting Period: Allowing ribs to rest after cooking helps redistribute juices for a more succulent bite. This step is crucial, as cutting into the ribs too soon can cause the juices to escape, resulting in a drier product.
How Important Is Proper Rib Preparation Before Cooking?
Proper rib preparation is crucial for achieving tender, flavorful, and well-cooked ribs.
- Choosing the Right Cut: Selecting the appropriate type of ribs, such as baby back or spare ribs, is essential as each cut has different cooking times and flavors. Baby back ribs are leaner and cook faster, while spare ribs have more meat and fat, requiring longer cooking times for optimum tenderness.
- Removing the Membrane: The membrane on the back of the ribs can hinder flavor absorption and creates a chewy texture. Removing it allows seasonings and marinades to penetrate the meat better, enhancing the overall taste and tenderness.
- Seasoning and Marinades: Applying a dry rub or marinade before cooking is key to flavor development. A well-balanced combination of spices and herbs can enhance the natural flavors of the meat, and marinating can also help to tenderize tougher cuts.
- Trimming Excess Fat: While some fat is necessary for moisture and flavor, excess fat can result in greasy ribs. Trimming away the thick layers of fat ensures that the ribs cook evenly and allows for a better texture once cooked.
- Resting Time: Allowing the ribs to rest after preparation and before cooking helps to let the seasonings penetrate the meat. This resting time can lead to more flavorful and juicy ribs once they are cooked.
- Best Oven Temperature: The best oven temperature for ribs typically ranges from 225°F to 275°F. This low and slow cooking method allows the collagen in the meat to break down, resulting in tender and succulent ribs.
What Marinade or Rub Techniques Should You Use for Maximum Flavor?
To achieve maximum flavor for ribs, consider the following marinade and rub techniques:
- Dry Rub: A dry rub consists of a blend of spices and herbs applied directly to the meat before cooking. This technique allows for a concentrated flavor to penetrate the surface of the ribs, creating a delicious crust as they cook.
- Wet Marinade: A wet marinade typically contains acid (like vinegar or citrus juice), oil, and various seasonings. The acid helps to tenderize the meat while infusing it with moisture and flavor, making it ideal for long marination periods.
- Injection Marinade: This technique involves injecting a flavorful liquid directly into the meat using a syringe. This method ensures deep flavor penetration and can help keep the ribs juicy, especially during long cooking processes.
- Brining: Brining involves soaking the ribs in a saltwater solution, often with added spices and sugar. This technique enhances moisture retention and flavor, resulting in tender and juicy ribs when cooked.
- Rub with Sugar and Spice: Combining sugars (like brown sugar) with spices in a rub can create a caramelized crust on the ribs. The sugar helps balance heat and enhances browning, contributing to the overall flavor profile.