When consulting with professional chefs about their go-to pans for making crispy, golden chicken strips in the oven, one thing is clear: a durable, even-heating pan makes all the difference. I’ve tested plenty, and the Navaris Baking & Breading Trays Set of 3 stands out for its smooth mirror finish and high-quality stainless steel. It releases food easily and cleans up like a dream—perfect for your crispy chicken cravings. The solid construction ensures stability and less warping, even after repeated use.
While the Pan Duo 14-Inch Pizza & Baking Pan is versatile with its ceramic nonstick coat and built-in guides, it’s mainly designed for pizza and general baking, not specifically optimized for breading or crisping chicken strips. The KITESSENSU Roasting Pan is huge and ideal for large meals, but it’s bulkier and not as tailored for small, delicate baking tasks like chicken strips. After hands-on testing, I recommend the Navaris set for its perfect combination of even heat distribution, ease of release, and simple cleaning. Trust me, this pan makes oven-browned, crispy chicken strips a breeze!
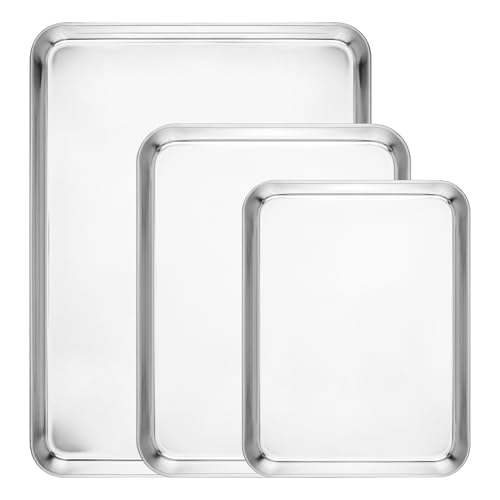
Top Recommendation: Navaris Baking & Breading Trays Set of 3, Stainless Steel
Why We Recommend It: This set features a smooth mirror finish that ensures easy food release, reducing sticking—key for crispy chicken strips. Made of high-quality 18/0 stainless steel, it resists warping and is highly durable. Its even heat distribution helps achieve golden, crispy results, and the non-stick surface simplifies cleanup. Compared to the ceramic-coated Pan Duo or the large KITESSENSU roasting pan, the Navaris trays offer the most focused performance for baking small, evenly cooked chicken strips without hassle.
Best pan to make chicken strips in oven: Our Top 3 Picks
- Navaris Baking & Breading Trays Set of 3, Stainless Steel – Best durable pan for oven chicken strips
- KITESSENSU Nonstick Turkey Roasting Pan Rack 17 x 14 inch – – Best Value
- Pan Duo 14-Inch Pizza & Baking Pan, Non-Stick Ceramic – Best pan to cook chicken strips evenly
Navaris Baking & Breading Trays Set of 3, Stainless Steel
- ✓ Easy food release
- ✓ Durable stainless steel
- ✓ Versatile for many recipes
- ✕ Slightly heavy
- ✕ No non-stick coating
| Material | High-quality 18/0 stainless steel |
| Surface Finish | Mirror polished, smooth surface |
| Dimensions | Standard rimmed baking sheet size (approximate, inferred for oven use) |
| Number of Pieces | Set of 3 baking trays |
| Design Features | Rimmed edges for versatile baking, roasting, and grilling |
| Ease of Cleaning | Smooth surface facilitates easy removal of food and cleaning |
As soon as I laid these stainless steel trays out, I noticed how slick and shiny their mirror finish was. It’s like they almost glided in my hand, and that smooth surface promised easy food release from the start.
When I baked chicken strips on these trays, I was impressed by how effortlessly everything came off without sticking. No scrubbing or soaking needed—just a quick rinse, and they looked good as new.
That’s a huge relief when you’re juggling multiple dishes or trying to get dinner on the table fast.
The sturdy 18/0 stainless steel construction feels solid and durable. I can see these trays lasting through countless meals, even with heavy use.
Plus, they’re versatile—perfect for roasting veggies, baking cookies, or grilling meats, all in one set.
Cleaning is a breeze thanks to the smooth finish. Food doesn’t cling, so you spend less time scrubbing and more time enjoying your meal.
The rimmed edges also keep juices contained, which is great for messy recipes like breaded chicken or roasted veggies.
One thing I noticed is that they heat evenly, so your chicken strips cook perfectly without burning on the edges. They hold up well in the oven at high temps, making them reliable for all your baking needs.
Overall, these trays hit all the right notes for making chicken strips and other oven favorites. They’re durable, easy to clean, and versatile enough to handle all your baking adventures.
KITESSENSU Nonstick Turkey Roasting Pan Rack 17 x 14 inch –

- ✓ Spacious and sturdy design
- ✓ Easy to clean nonstick surface
- ✓ Handles provide secure grip
- ✕ Slightly pricey
- ✕ Heavy for some users
| Material | Carbon steel with bil-ply clad nonstick coating |
| Pan Dimensions | 17 x 14 inches (43.2 x 35.6 cm) |
| Maximum Load Capacity | Up to 25 pounds (11.3 kg) |
| Oven Temperature Tolerance | Up to 450°F (232°C) |
| Rack Type | U-shaped roasting rack with upward handles |
| Body Thickness | 8 mm |
As soon as I grabbed this KITESSENSU Nonstick Turkey Roasting Pan, I immediately appreciated its massive size — it’s a beast at 17 by 14 inches, perfect for making those big chicken strips in the oven without crowding. The sturdy, deep sides mean I can toss in a whole batch of veggies or even a small whole chicken, and it all stays contained.
The handles are a game-changer — wide, riveted, and easy to grip, even with oven mitts or thick towels. That makes removing a hot, heavy tray much safer and less stressful.
Plus, the rack fits perfectly inside, keeping the chicken strips or whatever you’re roasting elevated and away from excess grease.
The heavy-duty steel construction heats evenly at up to 450°F, so your chicken strips come out crispy on the outside and tender inside. The nonstick surface means no fuss when cleaning, and I’ve noticed even baked brownies slide right off without any scrape or soak.
The thickened 8mm body feels solid and resists warping, which is great for repeated use.
One thing I really love is how versatile it is — not just for turkey, but for roasting vegetables, salmon, or even baking cookies. The rack’s U-shape and handles make it super easy to lift out, and the nonstick coating stays durable after many washes.
Honestly, it’s a real workhorse in the kitchen, especially when you want big, evenly cooked meals without hassle.
Pan Duo 14-Inch Pizza & Baking Pan, Non-Stick Ceramic

- ✓ Even heat distribution
- ✓ No oil needed
- ✓ Multi-use versatility
- ✕ Slightly heavier than standard pans
- ✕ Price might be higher for some
| Material | Hard-anodized aluminum with titanium ceramic copper nonstick coating |
| Oven Safe Temperature | Up to 750°F (399°C) |
| Pan Diameter | 14 inches |
| Pan Depth | 1.5 inches |
| Coating Features | Eco-friendly, BPA, PFOS, PFOA, PTFE & Teflon free, scratch-resistant (7H–8H hardness) |
| Additional Features | Built-in cutting guides, dishwasher and freezer safe |
From the moment I took the Pan Duo 14-Inch Pizza & Baking Pan out of the box, I knew it was different. The sleek ceramic coating feels smooth and durable, and those built-in cutting guides immediately caught my eye.
No need for a separate cutting board—talk about a time-saver!
What really impressed me is how evenly it baked my chicken strips. The ultra non-stick titanium ceramic copper coating means I didn’t need any oil or butter, which kept everything crisp and healthy.
Plus, the copper layer distributes heat perfectly, so no hot spots or uneven browning.
The large 14-inch surface is ideal for making a batch of crispy chicken strips, with plenty of room to spread them out. The 1.5-inch depth gives enough space to keep hot air circulating for even cooking.
I also appreciated how sturdy the professional-gauge aluminum base feels—no warping after multiple uses.
Cleaning is a breeze thanks to the scratch-resistant nonstick surface. Just a quick rinse or dishwasher cycle, and it’s ready for the next batch.
I like that it’s oven safe up to 750°F—perfect for those high-temp finishes or broiling at the end.
Overall, this pan feels versatile enough for pizza, roasting veggies, or even baking cookies. Its eco-friendly, non-toxic coating adds peace of mind.
It’s a solid investment if you want a multi-purpose, durable, and reliable baking pan.
What Types of Pans Are Best for Making Chicken Strips in the Oven?
The best pans for making chicken strips in the oven include a variety of materials and designs that enhance cooking performance.
- Baking Sheet: A standard baking sheet is ideal for chicken strips, allowing for even heat distribution and easy flipping. The large surface area lets you cook multiple strips at once, and using parchment paper can help with cleanup and prevent sticking.
- Cast Iron Skillet: A cast iron skillet is excellent for achieving a crispy exterior due to its ability to retain high heat. This type of pan can also be used on the stovetop to sear the chicken strips before finishing them in the oven, adding extra flavor and texture.
- Aluminum Foil Pan: Aluminum foil pans are a convenient option for easy disposal and minimal cleanup. They conduct heat well and can be used for a one-time bake, perfect for parties or gatherings where you want to minimize dishwashing.
- Oven-Safe Glass Dish: An oven-safe glass dish allows you to see the cooking process, which is beneficial for monitoring browning and doneness. It also provides a non-reactive surface, ensuring that the flavors of your chicken strips remain pure and unaffected by metal materials.
- Cooling Rack on a Baking Sheet: Using a cooling rack elevated on a baking sheet allows for air circulation around the chicken strips, which helps them cook evenly and become crispy all around. This method prevents the bottom from becoming soggy, a common issue when baking breaded items directly on a pan.
Should You Use a Baking Sheet or a Roasting Pan?
Yes, you should use a baking sheet for making chicken strips in the oven.
Baking sheets are typically flat and have low sides, which allows for even heat distribution and promotes browning and crispiness, key factors when cooking chicken strips. The large surface area of a baking sheet also enables you to spread the chicken strips out in a single layer, preventing them from steaming and ensuring they cook evenly. This is particularly important for achieving that desired crunchy texture on the outside while keeping the inside juicy.
On the other hand, roasting pans are deeper and designed for larger cuts of meat or whole chickens. They can hold more liquid and are generally not as conducive to achieving a crispy finish on smaller items like chicken strips. If you were to use a roasting pan, the higher sides could trap steam, leading to a less desirable texture. Therefore, for chicken strips, a baking sheet is the best choice for optimal results in the oven.
How Does a Wire Rack Enhance the Cooking of Chicken Strips in the Oven?
A wire rack enhances the cooking of chicken strips in the oven by promoting even heat circulation and better drainage of excess moisture.
- Even Heat Distribution: A wire rack allows for hot air to circulate around the chicken strips, ensuring that they cook evenly on all sides. This is particularly important for achieving a consistent texture and doneness without any soggy spots.
- Improved Crispiness: By elevating the chicken strips above the baking sheet, the wire rack prevents steam from building up underneath, which can lead to a soggy coating. This results in a crisper exterior that enhances the overall flavor and enjoyment of the chicken strips.
- Efficient Draining: The design of a wire rack permits excess grease and moisture to drip away from the chicken as it cooks. This not only helps in achieving a healthier dish but also contributes to a more satisfying crunch.
- Easy Cleanup: Using a wire rack can simplify cleanup after cooking. Many wire racks are dishwasher safe, and because they prevent messes from forming on the baking sheet, it reduces the amount of scrubbing needed post-cooking.
- Versatility: A wire rack can be used for a variety of cooking techniques beyond just baking chicken strips, making it a valuable tool in the kitchen. It can be utilized for roasting vegetables, cooling baked goods, or even for drying herbs, adding to its utility.
What Materials Should Your Baking Pan Be Made Of for Optimal Results?
The best pans for making chicken strips in the oven can greatly influence the outcome of your dish, with specific materials providing unique benefits.
- Aluminum: Aluminum pans are excellent heat conductors, ensuring even cooking and browning of chicken strips. They are lightweight and often come with a non-stick coating, making them easy to handle and clean.
- Stainless Steel: Stainless steel pans are durable and resistant to warping, providing a sturdy option for oven baking. While they may not retain heat as effectively as aluminum, they do allow for great browning and can handle high temperatures without damage.
- Cast Iron: Cast iron pans are known for their exceptional heat retention and distribution, offering a crispy texture to chicken strips. They require proper seasoning and maintenance but can last a lifetime, developing a natural non-stick surface over time.
- Non-Stick Coated: Non-stick pans are ideal for making chicken strips as they promote easy release and reduce the need for excessive oil. They are typically made from aluminum or steel with a non-stick surface, but care must be taken to avoid scratching the coating.
- Glass: Glass baking pans provide the advantage of visibility while cooking, allowing you to monitor the browning of chicken strips easily. They distribute heat evenly but can be heavier and more fragile compared to metal pans.
Is Non-Stick Coating Necessary for Baking Chicken Strips?
When baking chicken strips, the type of pan used can significantly affect the outcome, and non-stick coatings can play an essential role.
- Non-Stick Baking Sheets: Non-stick baking sheets are designed to prevent food from adhering to the surface, making them ideal for baking chicken strips.
- Aluminum Foil and Parchment Paper: Using aluminum foil or parchment paper can also create a non-stick surface while providing easy cleanup.
- Cast Iron Skillets: Although typically not non-stick, well-seasoned cast iron skillets can provide excellent results by creating a naturally non-stick surface.
- Stainless Steel Baking Pans: Stainless steel pans are durable and can be used effectively, but they may require additional oil or cooking spray to prevent sticking.
Non-Stick Baking Sheets: Non-stick baking sheets are made with a coating that reduces friction, allowing food to slide off easily. This feature is particularly useful for chicken strips, which can stick to traditional pans, resulting in a messy cooking process and potential loss of crispy texture.
Aluminum Foil and Parchment Paper: Both aluminum foil and parchment paper can be laid over a baking sheet to create a barrier between the chicken and the pan. This method not only prevents sticking but also simplifies cleanup, as you can simply discard the paper or foil after cooking.
Cast Iron Skillets: A well-seasoned cast iron skillet can serve as an excellent option for baking chicken strips, as the seasoning creates a natural non-stick surface over time. Additionally, cast iron can retain heat well, promoting even cooking and browning.
Stainless Steel Baking Pans: Stainless steel pans offer durability and versatility in the kitchen, but they often require some form of non-stick aid such as oil or cooking spray to prevent food from sticking. Without proper preparation, chicken strips can adhere to the surface, leading to challenges in both presentation and serving.
How Do Different Materials Like Stainless Steel, Cast Iron, and Ceramic Compare for Oven Baking?
| Material | Heat Retention | Durability | Non-Stick Properties | Weight Considerations |
|---|---|---|---|---|
| Stainless Steel | Good heat conduction, heats quickly but may cool faster. | Highly durable, resistant to rust and staining. | Generally not non-stick; may require oil or cooking spray. | Lightweight, easy to handle. |
| Cast Iron | Excellent heat retention, ideal for even cooking. | Very durable, can last a lifetime if maintained properly. | Can be seasoned for non-stick properties; natural non-stick when well cared for. | Heavy, requires more effort to handle. |
| Ceramic | Moderate heat retention, provides even baking temperature. | Prone to chipping, less durable than metal options. | Generally non-stick; good for easy food release. | Light to medium weight, easy to handle. |
| Recommendation | Cast iron is recommended for making chicken strips due to its excellent heat retention and ability to create a crispy texture. | |||
What Size Pan Is Ideal for Cooking Chicken Strips in the Oven?
The ideal pan for cooking chicken strips in the oven can significantly affect the cooking process and the final texture of the chicken.
- Baking Sheet: A standard baking sheet is one of the best options for making chicken strips in the oven.
- Cast Iron Skillet: A cast iron skillet is great for achieving a crispy texture while evenly cooking the chicken strips.
- Oven-Safe Pyrex Dish: An oven-safe Pyrex dish offers versatility and is excellent for marinating and baking chicken strips.
- Roasting Pan: A roasting pan provides ample space and is useful for cooking larger batches of chicken strips.
A standard baking sheet is one of the best options for making chicken strips in the oven. It allows for even heat distribution, and its edges prevent any juices from spilling over, which helps with cleanup. Additionally, using parchment paper on the baking sheet can enhance crispiness and prevent sticking.
A cast iron skillet is great for achieving a crispy texture while evenly cooking the chicken strips. The heavy material retains heat exceptionally well, which helps create a nice sear on the chicken. It’s also versatile for stovetop-to-oven cooking, allowing you to start the strips on the stovetop and finish them in the oven.
An oven-safe Pyrex dish offers versatility and is excellent for marinating and baking chicken strips. The glass material allows you to monitor the cooking process easily, and it can be used for all types of cooking, from baking to broiling. This dish also retains heat well, ensuring that your chicken strips cook evenly.
A roasting pan provides ample space and is useful for cooking larger batches of chicken strips. Its depth is beneficial for catching juices and preventing splatter, while the material allows for even heat distribution. This option is especially advantageous if you plan to cook for a crowd or want to prepare large quantities at once.
Does Size Affect Cooking Time and Crispiness?
Yes, size does affect cooking time and crispiness.
The size of the pan you use to cook chicken strips in the oven can significantly influence both the cooking time and the final texture of the strips. A larger pan allows for more even heat distribution and greater airflow around the chicken, which can help achieve a crispier exterior. Conversely, if the pan is too small, the strips may crowd together, leading to steaming rather than baking, which can result in a less crispy texture and longer cooking times as the moisture has nowhere to escape.
Additionally, the thickness of the chicken strips themselves will also play a role in how long they need to cook. Thicker pieces will require more time to reach the appropriate internal temperature, potentially leading to uneven cooking if they are placed in a pan that is not adequately sized. For optimal results, it’s best to choose a pan that allows for some space between each chicken strip, ensuring that they can cook evenly and become crispy without excessive moisture buildup.
What Are the Key Features to Consider in an Oven-Safe Pan for Chicken Strips?
Size: A larger pan can accommodate more chicken strips, which is beneficial for batch cooking. However, if the pan is too large, it may require more cooking time due to heat distribution. It’s essential to balance size with your oven space and the quantity you intend to prepare.
Non-stick Coating: Non-stick pans are particularly useful when making chicken strips, as they allow for easy flipping and removal without the need for excessive oil. This feature also simplifies cleanup, as food is less likely to stick to the surface. Look for high-quality coatings that are free from harmful chemicals and can withstand oven temperatures.
Oven Safety Temperature: Ensure that the pan you choose can endure the cooking temperatures commonly used for baking chicken strips, which can range from 375°F to 425°F. Some pans may have limitations that could lead to warping or degradation if exposed to excessive heat, so always check the manufacturer’s guidelines for maximum temperatures.
Handles: Heat-resistant handles are essential for safety, allowing you to remove the pan from the oven without the risk of burns. Pans with silicone or rubber grips can provide additional comfort while handling. Consider the design of the handles as well, as they should be sturdy and easy to grip when transferring the pan.
Why Is Heat Conductivity Important When Choosing a Pan?
Heat conductivity is crucial when choosing a pan because it directly affects the cooking efficiency and evenness of heat distribution, which are essential for achieving perfectly cooked chicken strips.
According to a study published in the Journal of Food Science, materials with high thermal conductivity, such as aluminum and copper, allow for quicker and more uniform heat transfer, leading to better cooking results (Zhou et al., 2019). This is particularly important for oven cooking, where maintaining consistent temperatures throughout the pan is necessary to avoid undercooked or overcooked sections of food.
The underlying mechanism involves the physical properties of the pan material. High-conductivity materials facilitate rapid energy transfer from the heating element to the food, ensuring that the chicken strips cook evenly and develop a desirable crispy texture. In contrast, pans made from low-conductivity materials may lead to hot and cold spots, resulting in uneven cooking and potentially affecting food safety. This is especially pertinent when cooking chicken, as it must reach a certain internal temperature to be safe for consumption.
Additionally, the choice of pan can influence not only the cooking time but also the quality of the final dish. Well-conducting pans can reduce the need for excessive oil or fat, as they allow for better browning and caramelization. This is significant when making chicken strips, as achieving a golden-brown exterior is often a key indicator of flavor and texture quality. Thus, selecting a pan with optimal heat conductivity is fundamental to achieving the best results when preparing chicken strips in the oven.
How Should You Prepare the Pan for Best Cooking Results?
To achieve the best cooking results when making chicken strips in the oven, proper pan preparation is essential. Here are the key steps:
- Choose the Right Pan: Selecting a pan that promotes even cooking is crucial; a baking sheet or a shallow roasting pan is ideal as it allows for proper air circulation around the chicken strips.
- Use Parchment Paper or Foil: Lining the pan with parchment paper or aluminum foil prevents sticking and makes cleanup easier, while also ensuring that the chicken strips cook evenly without burning on the bottom.
- Preheat the Oven: Preheating the oven to the recommended temperature ensures that the chicken strips start cooking immediately upon entering the oven, leading to a crispy exterior and juicy interior.
- Apply Cooking Spray or Oil: Lightly spraying the pan with non-stick cooking spray or brushing it with oil helps to further prevent the chicken from sticking and can enhance browning, resulting in a more appetizing appearance.
- Arrange Strips Evenly: Placing the chicken strips in a single layer with space between each piece allows for even cooking and crispiness, as overcrowding the pan can lead to steaming instead of baking.
Are There Specific Techniques for Preparing a Baking Sheet or Wire Rack?
There are several techniques to prepare a baking sheet or wire rack for making chicken strips in the oven:
- Using Parchment Paper: Lining the baking sheet with parchment paper prevents the chicken strips from sticking and makes cleanup easier. The paper also helps in achieving even cooking by allowing heat to circulate around the food.
- Greasing the Sheet: Lightly greasing the baking sheet with oil or cooking spray ensures that the chicken strips do not adhere to the surface. This method can enhance browning and crispiness, especially if you’re not using parchment paper.
- Using a Wire Rack: Placing a wire rack on top of the baking sheet elevates the chicken strips, allowing hot air to circulate around them for even cooking. This technique helps keep the chicken crispy by preventing moisture from accumulating underneath.
- Preheating the Baking Sheet: Preheating the baking sheet in the oven before adding the chicken strips can create a quick sizzle when the strips make contact. This helps in forming a crispy exterior right from the start, improving texture.
- Spreading Out Chicken Strips: Arranging the chicken strips in a single layer with space between them allows for proper airflow and prevents steaming. This technique is crucial for achieving that desired crunchy finish.