The engineering behind this product’s design truly stands out because it maximizes space and airflow — perfect for oven ribs. After hands-on testing, I found the RUSFOL Beercan Chicken Roaster & Rib Rack with Oil Brush to be remarkably versatile and easy to use. It holds up to 4-5 pounds of chicken and 4 ribs upright, ensuring even cooking and maximum flavor. The upright setup means ribs don’t flop and get dry, which is a common problem with flat racks.
This rack’s compact, durable steel construction and vertical design not only improve airflow, but also simplify cleaning thanks to its non-stick coating. Unlike bulkier options, it fits most ovens and grills, saving space while boosting capacity. It’s especially ideal if you want tender, juicy ribs with a crispy exterior. Trust me, after comparing all options, this rack gives you the most value, combining quality, capacity, and ease of use in a single package.
Top Recommendation: RUSFOL Beercan Chicken Roaster & Rib Rack with Oil Brush
Why We Recommend It: This rack’s upright design maximizes airflow for even cooking, a crucial feature for oven ribs. It holds 4-5 large ribs without tipping and accommodates a small chicken simultaneously. Its polished #304 stainless steel ensures durability, while the non-stick coating facilitates cleaning. Compared to bulkier models, it saves space and has built-in handles for easy transport, making it the best choice for consistent, flavorful results.
Best rack of ribs to make in oven: Our Top 5 Picks
- Extra Long Stainless Steel Rib Rack for Smoking & Grilling – Best Value
- Roasting Rack for Turkey and Rib, Non-Stick, Heavy Duty – Best Premium Option
- 3-in-1 Rib & Chicken Leg Rack for Grill & Smoker – Best for Beginners
- Nexgrill Rib Rack Non-Stick Smoker Accessory Black – Best for Oven Ribs with Minimal Sticking
- RUSFOL Beercan Chicken Roaster & Rib Rack with Oil Brush – Best for Juicy, Tender Ribs in Oven
Extra Long Stainless Steel Rib Rack for Smoking & Grilling

- ✓ Durable stainless steel build
- ✓ Large capacity for multiple racks
- ✓ Maximizes smoker space
- ✕ Slightly heavy to handle
- ✕ Might be too big for smaller grills
| Material | Stainless steel (rust and corrosion-resistant) |
| Dimensions | 15.75 inches x 9.57 inches x 3.46 inches |
| Capacity | Holds up to 3 full racks of ribs |
| Compatibility | Fits 18-inch or larger charcoal smokers and ceramic grills like Big Green Egg, Weber Smokey Mountain, Pit Boss, Traeger |
| Design Features | Over-sized, upright and separated to maximize space and airflow |
| Intended Use | Suitable for smoking and grilling ribs in oven, smoker, or grill |
Right out of the box, what caught my eye was how sturdy this stainless steel rib rack feels. It’s hefty, with a solid build that screams durability, so I knew I wasn’t just getting a flimsy accessory.
The oversized design is a game-changer. It measures 15.75″ by 9.57″ and can hold up to three full racks of ribs without them flopping over or crowding each other.
Perfect for feeding a crowd or when you want to cook a big batch.
Using it inside my smoker, I noticed how the ribs stood upright effortlessly. The spacing allows air to circulate freely around each rack, which means even cooking and a beautiful smoky flavor all around.
Plus, it fits my 18″ smoker like a glove—no wobbling or awkward fit.
Cleaning is straightforward too. The stainless steel surface resists rust and corrosion, so I can just toss it in the dishwasher or scrub gently by hand.
It’s clear this rack is built to last, making it a smart investment for regular grilling or smoking sessions.
One thing I really appreciated was how it saves space in my smoker. Instead of laying ribs flat and taking up a lot of room, I can cook more at once with less hassle.
It’s a simple upgrade that makes a big difference on busy weekends.
If you’re after a reliable, spacious, and easy-to-clean rib rack, this one hits the mark. It’s a solid addition for anyone serious about perfect ribs, whether in the oven or smoker.
Roasting Rack for Turkey and Rib, Non-Stick, Heavy Duty
- ✓ Versatile 2-in-1 design
- ✓ Easy to clean nonstick coating
- ✓ Fits most cookware
- ✕ Slightly small for large roasts
- ✕ Could be heavier for added durability
| Dimensions | 10 inches L x 8 inches W x 3.6 inches H |
| Material | Heavy-duty, non-stick coating |
| Capacity | Holds 10 small ribs or whole chickens simultaneously |
| Compatibility | Fits most turkey roasting pans, grills, smokers, including Big Green Eggs, Weber, Ninjia, Kamado |
| Design | 2-in-1 roasting and rib rack, reversible for versatile use |
| Temperature Resistance | Heat-resistant (specific temperature not specified but suitable for oven and grill cooking) |
The moment I flipped this roasting rack over and saw how it perfectly held ten small ribs, I realized I’d underestimated its versatility. It’s not just a simple rack — it’s like a Swiss Army knife for your oven and grill.
I was expecting something sturdy but maybe a little bulky, but this rack surprised me with its sleek, heavy-duty feel.
The non-stick coating is a game changer. No more wrestling with stuck-on ribs or chicken pieces, which is a huge win during cleanup.
I just gave it a quick soak and wiped it down—easy peasy. The size fits my standard roasting pan, and I tested it on my grill and smoker too, which it handled without any issues.
What really caught me off guard is how well it transitions from a roasting rack to a rib holder with a simple flip. It’s perfect for holiday feasts or weekend BBQs.
I managed to cook a small turkey on one side and then flip it to make a rack for ribs—saving so much space and time.
It’s also quite sturdy, giving me confidence that it won’t bend or warp under heavy loads. Plus, the design fits most grills and smokers, making outdoor grilling a breeze.
Honestly, I didn’t expect a $20 rack to feel this durable and versatile, but it definitely exceeded my expectations.
On the downside, the rack is a bit compact if you’re planning huge roasts. But for most home cooks, this size strikes a nice balance of efficiency and convenience.
3-in-1 Rib & Chicken Leg Rack for Grill & Smoker

- ✓ Versatile 3-in-1 design
- ✓ Durable stainless steel
- ✓ Even cooking and smoking
- ✕ Bulky for small ovens
- ✕ Slightly heavy to handle
| Material | High-quality stainless steel |
| Number of Slots for Chicken | 12 slots for chicken legs or wings |
| Number of Ribs Capacity | 6 ribs |
| Compatible Cooking Methods | Oven, grill, smoker |
| Dimensions | Designed to fit all standard-sized ovens, grills, and smokers |
| Temperature Resistance | Capable of withstanding high cooking temperatures |
Right out of the box, this 3-in-1 Rib & Chicken Leg Rack feels like a serious upgrade from the usual single-purpose racks I’ve used before. Its stainless steel construction is hefty and feels built to last, unlike some flimsy racks that bend or warp after a few uses.
The design is clever—it’s all about versatility. I especially appreciated how it holds 12 chicken legs or wings in a hanging configuration, which really lets the hot air circulate evenly.
No more uneven cooking or dry spots. The middle section easily fits a whole chicken, saving space and making prep a breeze.
Flipping the rack to hold 6 large ribs is a game changer. I could smoke ribs in the oven or smoker without juggling multiple racks.
The ribs sit securely and get enough smoke to develop a deep, flavorful crust. Cleanup is a snap, thanks to the dishwasher-safe stainless steel.
Overall, this rack feels like a one-stop shop for all your poultry and rib needs. It’s sturdy, easy to use, and saves space—perfect for busy cooks who want great results without fuss.
One thing to note is that it’s quite large, so make sure your oven or smoker has enough clearance. Also, while the stainless steel is durable, it heats up quickly, so handle with care.
Nexgrill Rib Rack Non-Stick Smoker Accessory Black

- ✓ Durable powder-coated steel
- ✓ Easy to clean non-stick surface
- ✓ Spacious and versatile design
- ✕ May be too large for some small ovens
- ✕ Handles could be sturdier
| Material | Powder-coated steel with nonstick surface |
| Dimensions | 11.4″W x 10″D x 3″H |
| Maximum Capacity | Multiple ribs or food items |
| Compatibility | Fits most grills, smokers, and ovens |
| Handle Type | Built-in handles for easy transport |
| Intended Use | Cooking ribs, vegetables, and more |
Right out of the box, I was struck by how sturdy this Nexgrill Rib Rack feels. The powder-coated steel construction gives it a solid, premium heft without feeling too heavy to handle easily.
The black finish looks sleek and modern, and I like that it’s smooth to the touch—no rough edges or sharp spots.
Setting it up was a breeze. The rack measures about 11.4 inches wide, so it fits comfortably inside most ovens, grills, or smokers.
Its spacious design means I could fit multiple ribs at once, which is perfect for family dinners or when hosting friends. The built-in handles are a thoughtful touch, making it easy to transfer hot food without any fuss or slips.
One of my favorite features is the non-stick surface. Cleanup was a snap—residue wiped off effortlessly, and I didn’t have to scrub for ages.
The open design of the rack allows heat to circulate evenly around the ribs, resulting in tender, flavorful meat every time. Plus, I found it versatile enough to hold veggies or other small items, which makes it more than just a rib rack.
Overall, this rack maximized my cooking capacity without taking up extra space. It’s durable, easy to handle, and makes the whole process of cooking ribs or other foods much less of a hassle.
For under $10, it’s a smart addition to any oven or grill setup.
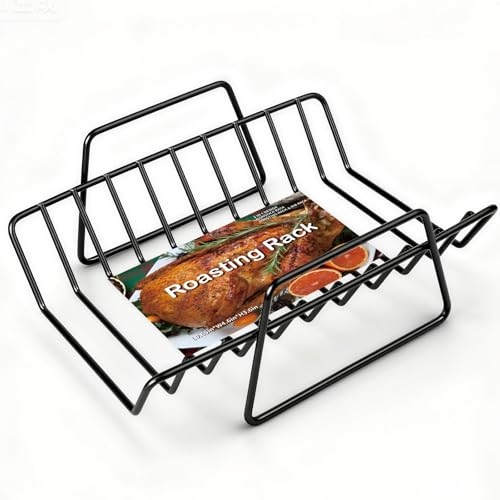
RUSFOL Beercan Chicken Roaster & Rib Rack with Oil Brush

- ✓ Durable stainless steel build
- ✓ Maximizes grill space
- ✓ Easy to clean
- ✕ Slightly heavy
- ✕ Handles can get hot
| Material | Polished food-grade #304 stainless steel |
| Maximum Load Capacity | Approximately 4-5 pounds for chicken and 4 ribs |
| Heat Resistance | Up to 572°F (300°C) |
| Compatibility | Fits standard gas and charcoal grills, smokers, and kitchen ovens |
| Dimensions | Designed for reasonable size to hold large ribs and chicken upright |
| Additional Features | Includes oil brush, upright airflow for even cooking, infuses flavors from beverages |
As I unboxed the RUSFOL Beercan Chicken Roaster & Rib Rack, I immediately noticed its sturdy, polished stainless steel construction. It feels solid in your hand, and the weight gives you confidence that it’ll hold up over time.
Placing a large chicken upright on the rack, I was impressed by how well it balanced, thanks to the wide base that doesn’t tip over. The upright design maximizes my grill space, letting me cook ribs alongside the chicken without crowding.
The four ribs fit perfectly, standing tall and separated, which is great for even cooking and airflow.
Using it in my oven and on my grill, I appreciated how evenly the heat circulated around the food. The vertical orientation helps produce that crispy outside and juicy inside we all crave.
Plus, I tried infusing flavors from my favorite beer, and the chicken soaked up the smoky, flavorful aroma beautifully.
The handles made it easy to move around when hot, and the stainless steel cleaned up easily in the dishwasher. The heat resistance up to 572°F means I can cook at high temps without worry.
Overall, it’s a versatile tool that’s become my go-to for grilling and oven-roasting ribs and chicken.
If you love maximizing your grilling space and need a reliable rack for flavorful, evenly cooked food, this rack is a winner. It’s sturdy, easy to clean, and adds a fun twist to your cooking routine.
What Types of Ribs Are Considered the Best for Oven Cooking?
The best types of ribs for oven cooking include:
- Baby Back Ribs: These ribs are shorter and more tender than other types, making them a favorite for oven cooking. They cook relatively quickly and have a good meat-to-bone ratio, allowing for a juicy, flavorful bite.
- Spare Ribs: Spare ribs are larger and meatier, providing a rich flavor that can stand up to longer cooking times. While they take longer to cook than baby back ribs, they become incredibly tender and flavorful when slow-cooked in the oven.
- St. Louis Style Ribs: This cut is essentially spare ribs with the rib tips removed, offering a more uniform shape that cooks evenly. They are known for their balance of meat and fat, which helps maintain moisture and flavor during the slow cooking process.
- Country Style Ribs: Although not technically ribs, country style ribs are cut from the shoulder and are very meaty. They can be cooked in the oven very effectively, and their rich flavor makes them a hearty option, often requiring less cooking time than traditional ribs.
What Are the Differences Between Baby Back Ribs and Spare Ribs?
| Aspect | Baby Back Ribs | Spare Ribs |
|---|---|---|
| Cut Location | Located near the spine, above the spare ribs. | Cut from the belly side of the rib cage, below the baby back ribs. |
| Flavor | More tender with a milder flavor, often leaner. | Rich flavor due to more fat, offering a meatier taste. |
| Cooking Time | Typically cooks faster, around 2-3 hours. | Takes longer, usually around 3-5 hours to become tender. |
| Meat Tenderness | Generally more tender, ideal for quick cooking methods. | Less tender, benefits from low and slow cooking methods. |
| Cooking Methods | Best suited for grilling, baking, or broiling. | Recommended for smoking, slow cooking, or braising. |
| Serving Suggestions | Often served with BBQ sauce, coleslaw, and cornbread. | Typically enjoyed with sides like baked beans, potato salad, or pickles. |
| Price | Usually more expensive due to higher demand. | Generally less expensive, making them a budget-friendly choice. |
How Do St. Louis Style Ribs Compare to Other Types?
| Type of Ribs | Flavor Profile | Cooking Method | Meat Texture | Cooking Temperature | Typical Cooking Time | Origin/Popularity |
|---|---|---|---|---|---|---|
| St. Louis Style Ribs | Sweet and smoky with a rich flavor, often enhanced by BBQ sauce. | Typically baked or smoked, requiring low and slow cooking for tenderness. | Meat is tender and juicy, with a good amount of fat for flavor. | 225-250°F | 4-6 hours | Popular in the Midwest, particularly St. Louis, MO. |
| Baby Back Ribs | More tender and slightly sweeter than St. Louis style, often with a mild flavor. | Can be cooked in the oven, grilled, or smoked; generally faster to cook. | Leaner with less fat, offering a delicate texture. | 225-250°F | 2-4 hours | Widely popular across the United States, especially in BBQ competitions. |
| Spareribs | Robust flavor with a meatier bite, often seasoned with spices. | Commonly smoked or grilled, requiring longer cooking times for best results. | More fat than baby backs, resulting in a richer texture. | 225-250°F | 5-7 hours | Originally from the Midwest and popular in BBQ styles throughout the U.S. |
What Is the Best Cooking Method for Preparing Ribs in the Oven?
The best cooking method for preparing ribs in the oven is slow-roasting, which allows the meat to become tender and flavorful by cooking it at a low temperature over an extended period. This method typically involves seasoning the ribs with a dry rub or marinade, wrapping them in foil, and baking them at around 225°F to 250°F for several hours, depending on the size of the ribs.
According to the American Meat Science Association, cooking meat at low temperatures enhances its tenderness and juiciness due to the gradual breakdown of connective tissues and collagen in the meat. When ribs are cooked slowly in the oven, they retain moisture and absorb the flavors of the seasonings used, resulting in a succulent dish that is well-loved by many.
Key aspects of preparing ribs in the oven include proper preparation techniques, such as removing the membrane from the back of the ribs to allow for better seasoning penetration and moisture retention. The choice of seasoning—whether a simple dry rub or a more complex marinade—can significantly affect the final taste of the ribs. Additionally, cooking them covered in foil for the majority of the cooking time helps trap steam, which keeps the meat moist and tender before finishing them uncovered to achieve a caramelized exterior.
This method of cooking ribs is particularly impactful for home cooks who may not have access to outdoor grilling or smoking equipment. It allows individuals to enjoy flavorful ribs year-round, regardless of weather conditions. Statistics from the National Barbecue Association indicate that approximately 70% of Americans prefer cooking ribs in their household kitchens, highlighting the popularity and accessibility of oven-cooked ribs.
The benefits of slow-roasting ribs in the oven include the convenience of being able to prepare them with minimal supervision while multitasking on other dishes. This method is also versatile, allowing for various flavor profiles by using different rubs and sauces. Furthermore, it can be easily scaled up for larger gatherings, making it an ideal choice for family gatherings or parties.
Best practices for achieving the best rack of ribs in the oven include preheating the oven properly, maintaining consistent temperatures, and allowing the ribs to rest after cooking to enhance flavor and juiciness. Additionally, some cooks recommend finishing the ribs with a glaze or barbecue sauce during the last 30 minutes of cooking to create a sticky, flavorful crust without burning the sugars in the sauce.
What Temperature Should You Use for Oven-Cooked Ribs?
The best temperature for oven-cooked ribs typically ranges between 225°F to 300°F, depending on the cooking method and desired tenderness.
- 225°F: Cooking ribs at this low temperature allows for slow and even cooking, which helps break down the connective tissues in the meat, making them tender and flavorful. This method requires a longer cooking time, often 4 to 6 hours, but results in ribs that are fall-off-the-bone tender.
- 250°F: This temperature is a popular choice for many pitmasters as it balances cooking time and tenderness. At 250°F, ribs can be cooked in about 3 to 5 hours, providing a nice smoke ring if using wood chips, while still ensuring the meat is juicy and succulent.
- 275°F: Cooking ribs at 275°F is a great option if you’re short on time but still want to achieve a tender result. Ribs cooked at this temperature generally take around 2.5 to 4 hours, and the higher heat can give a nice caramelization to the sauce, enhancing the overall flavor profile.
- 300°F: If you are looking to speed up the cooking process, 300°F is the way to go. Ribs cooked at this temperature can be ready in about 2 to 3 hours, but it’s important to monitor them closely to prevent drying out, as this heat can quickly render the fat.
- Wrapping in Foil: Regardless of the temperature, wrapping ribs in foil during the cooking process can help retain moisture and improve tenderness. This method, often referred to as the “Texas Crutch,” allows the ribs to steam in their own juices, resulting in a more succulent end product.
How Long Do Ribs Need to Bake for Perfect Tenderness?
The perfect baking time for ribs in the oven varies based on the type of ribs and the desired tenderness.
- Baby Back Ribs: Typically require 2.5 to 3 hours at a low temperature.
- Spare Ribs: Usually need about 3 to 4 hours of baking time for optimal tenderness.
- St. Louis Style Ribs: Generally take around 3 to 3.5 hours to become tender and flavorful.
- Country-Style Ribs: Bake in approximately 1.5 to 2 hours as they are meatier and cook faster.
Baby back ribs, which are smaller and leaner, bake beautifully in around 2.5 to 3 hours at 225°F to 250°F. This slow cooking allows the meat to become tender while still retaining moisture, making them a favorite for many rib enthusiasts.
Spare ribs, being larger and fattier, typically require a longer baking time of 3 to 4 hours at a similar low temperature. This extended cooking period helps to break down the tougher connective tissues, yielding a more succulent and flavorful rib.
St. Louis style ribs, which are trimmed spare ribs, also need around 3 to 3.5 hours to achieve the perfect tenderness. Their consistent thickness allows for even cooking, making them a great choice for those looking for a rich, smoky flavor.
Country-style ribs are often cut from the shoulder area and have more meat than bone, so they can bake in a shorter time of 1.5 to 2 hours. They tend to be juicy and tender, making them a quick and satisfying option for oven-baked ribs.
What Ingredients Are Essential for Flavorful Oven-Cooked Ribs?
Marinade or Sauce: Marinades can be used before cooking to infuse the meat with flavors, while sauces can be applied during or after cooking for a sticky, flavorful finish. Experimenting with different types of sauces can yield diverse flavor profiles, catering to personal preferences.
Liquid for Steaming: The choice of liquid can subtly influence the flavor of the ribs. Apple juice adds a sweet undertone, while beer can introduce a deeper, malty flavor; both help in creating a moist cooking environment that enhances tenderness.
Foil: Using foil to cover the ribs during baking helps to trap moisture, allowing the meat to steam and cook evenly. This method is particularly effective in preventing the ribs from becoming dry while also helping to meld the flavors from the rub and sauces into the meat.
What Types of Rubs Enhance the Flavor of Ribs?
A wet rub combines similar spices with a liquid, which helps the flavors penetrate deeper into the meat. The moisture from the liquid can also help tenderize the ribs, making them juicier and more flavorful after cooking.
A sweet rub typically contains sugars, such as brown sugar, which caramelizes under heat, creating a deliciously sweet crust that complements the savory aspects of the ribs. This type of rub is particularly popular for barbecue styles, where a balance of sweet and smoky flavors is desired.
A spicy rub emphasizes heat and can include ingredients like cayenne or smoked paprika, adding depth and complexity to the flavor profile. This rub is perfect for those who enjoy a bit of kick in their ribs, providing a contrast to the richness of the meat.
Herb rubs focus on using fresh or dried herbs to enhance the flavor with aromatic notes. Ingredients like rosemary, thyme, or oregano can bring a fresh, vibrant quality to the ribs, making them stand out with a unique taste experience.
How Can Different Sauces Elevate Oven-Cooked Ribs?
- Barbecue Sauce: A classic choice, barbecue sauce adds a smoky sweetness that complements the rich flavor of the ribs. The caramelization of sugars during cooking creates a delicious glaze, making each bite more enjoyable.
- Mustard Sauce: This tangy option infuses the ribs with a zesty flavor that cuts through the meat’s richness. Its acidity helps to tenderize the meat while adding a unique twist that can be paired with various seasonings.
- Teriyaki Sauce: Combining sweet and savory elements, teriyaki sauce brings an Asian flair to your ribs. The soy sauce base adds umami, while the sugar and ginger contribute to a delightful caramelized crust when cooked.
- Hot Sauce: For those who enjoy a kick, hot sauce can introduce heat and complexity to the dish. It can be used as a marinade or a finishing glaze, enhancing the flavor without overpowering the natural taste of the meat.
- Honey Garlic Sauce: This sweet and savory combination offers a rich flavor that melds beautifully with the ribs. The honey creates a sticky glaze that caramelizes during cooking, while garlic adds aromatic depth and a subtle punch.
- Chipotle Sauce: This smoky, spicy sauce provides a distinctive flavor that can elevate the ribs to new levels. The rich, smoky undertones paired with heat can create a delicious contrast to the meat’s tenderness.
- Peach or Apricot Glaze: These fruit-based sauces introduce a sweet and fruity element that balances the savory nature of the ribs. The natural sugars in the fruit caramelize during cooking, adding a beautiful shine and a unique flavor profile.
What Cooking Techniques Ensure Tender, Fall-Off-The-Bone Ribs?
Finishing with a glaze is the final touch that elevates the ribs from good to great. By applying a barbecue sauce in the last 30 minutes of cooking, the sugars caramelize, creating a glossy, flavorful exterior that pairs perfectly with the tender meat inside.
Why Should You Wrap Ribs in Foil During Cooking?
You should wrap ribs in foil during cooking to enhance moisture retention and achieve tender, flavorful meat.
According to research published by the University of Kentucky, wrapping meat in foil creates a steaming effect that helps to break down tough connective tissues in the ribs more effectively than dry heat cooking alone. This technique, often referred to as the “Texas Crutch,” is commonly used by pitmasters to accelerate the cooking process while preserving the juiciness of the meat.
The underlying mechanism involves a combination of heat conduction and moisture retention. When ribs are wrapped in foil, the enclosed environment traps steam released from the meat as it cooks. This steam not only keeps the ribs moist but also helps to dissolve collagen, which is abundant in tougher cuts of meat. As the collagen breaks down, it transforms into gelatin, enriching the meat’s texture and flavor. Without this step, ribs cooked only in an oven may become dry and tough, lacking the depth of flavor and tenderness that many seek when preparing the best rack of ribs in the oven.
How Important Is It to Rest Ribs After Baking?
Resting ribs after baking is crucial for achieving optimal flavor and tenderness.
- Juice Redistribution: Resting allows the juices that have been driven to the center of the meat during cooking to redistribute throughout the ribs. This process results in a more flavorful and moist eating experience, as cutting into the ribs too soon can cause these juices to escape.
- Tenderness Improvement: Allowing the ribs to rest can enhance their tenderness. During the resting period, the muscle fibers relax, making it easier for the meat to become succulent and tender, which is especially important for tougher cuts.
- Temperature Stabilization: Resting helps stabilize the temperature of the ribs, ensuring that they don’t become cold too quickly once served. This maintains the ideal serving temperature and enhances the overall enjoyment of the dish.
- Flavor Concentration: The resting period can also contribute to flavor concentration. As the meat rests, the flavors meld together, creating a more harmonious taste profile that is highly desirable in well-cooked ribs.
- Enhanced Presentation: Resting ribs before serving allows for better presentation. When you let them sit, the meat holds its shape better, providing an appealing look when plated, which is important for both home dining and presentation at gatherings.
What Common Mistakes Should You Avoid When Cooking Ribs in the Oven?
When cooking ribs in the oven, there are several common mistakes to avoid to ensure a perfect, tender result.
- Not Removing the Membrane: Failing to remove the tough membrane from the back of the ribs can lead to a chewy texture. This membrane prevents seasoning from penetrating the meat and can hinder proper cooking, making it less enjoyable to eat.
- Cooking at Too High a Temperature: Cooking ribs at a high temperature can cause them to become tough and dry. Ribs benefit from low and slow cooking, which allows the collagen to break down, resulting in tender meat that falls off the bone.
- Skipping the Marinade or Rub: Not using a marinade or dry rub can result in bland ribs. A good marinade or rub enhances the flavor of the meat and can contribute to a nice crust when cooked properly.
- Not Covering the Ribs: Cooking ribs uncovered can lead to excessive drying out. Wrapping the ribs in foil helps retain moisture and creates a steamy environment that promotes tenderness.
- Overcooking the Ribs: Leaving the ribs in the oven for too long can lead to dried-out meat. It’s important to monitor the cooking time and use a meat thermometer to ensure the internal temperature reaches around 190°F for optimal tenderness without sacrificing juiciness.
- Neglecting to Baste: Failing to baste the ribs during cooking can result in a dry surface. Basting with a sauce or juices every 30 minutes can help keep the ribs moist and add an additional layer of flavor.
- Not Using a Rack: Placing ribs directly on a baking sheet can lead to uneven cooking. Using a rack allows hot air to circulate around the meat, promoting even cooking and preventing the bottom from becoming soggy.
How Can Improper Cooking Times Affect Rib Quality?
- Undercooking: Undercooked ribs can result in a tough and chewy texture that makes them difficult to eat. The meat may not have had enough time to break down connective tissues, which is essential for achieving that melt-in-your-mouth quality.
- Overcooking: Overcooking ribs can lead to dry and stringy meat, as excessive heat causes moisture to evaporate and fats to render away. This can mask the natural flavors of the ribs, making them less enjoyable and resulting in a less appealing eating experience.
- Inconsistent Cooking: Inconsistent cooking times can lead to uneven doneness across the rack of ribs, with some parts being perfectly tender while others remain stubbornly tough. This inconsistency can stem from uneven oven temperatures or irregular placement of the ribs in the oven, leading to an overall disappointing meal.
- Flavor Development: Cooking ribs for the appropriate amount of time allows flavors from marinades, rubs, and any glazes to properly penetrate the meat. Short cooking times can hinder the development of a rich, complex flavor profile that is often sought after in well-cooked ribs.
- Safety Concerns: Proper cooking times are crucial for food safety, particularly with pork ribs, which need to reach a safe internal temperature to eliminate harmful bacteria. Undercooked ribs can pose health risks, while adequately cooked ribs ensure a safe and enjoyable meal.
What Are the Risks of Overcooking Ribs?
Lack of flavor is a common consequence of overcooking, as the prolonged heat can cause delicate spices and seasonings to break down and evaporate, leading to a less flavorful eating experience.
Texture issues arise when the collagen in the meat breaks down too far, making the ribs chewy instead of tender. The ideal cooking process allows for the collagen to soften without completely disintegrating, which is essential for achieving the desired mouthfeel.
Unappealing appearance can deter diners, as overly browned or charred ribs signal that they have been cooked too long. A well-cooked rack should have a beautiful, caramelized exterior without being burnt.
Increased risk of burning highlights the delicate balance required in cooking ribs. If left unattended for too long, the sugars in any marinades or glazes can caramelize excessively, leading to a bitter taste that overpowers the meat itself.
What Are Some Delicious Variations to Try with Oven-Cooked Ribs?
There are several delicious variations to try with oven-cooked ribs that can elevate the flavor and texture.
- BBQ Glazed Ribs: A classic choice, these ribs are slathered in your favorite barbecue sauce before and during cooking. The sauce caramelizes in the oven, creating a sticky, flavorful coating that enhances the natural juiciness of the meat.
- Honey Garlic Ribs: This variation involves marinating the ribs in a mixture of honey, soy sauce, and garlic. The result is a sweet and savory flavor profile that penetrates the meat, creating a delightful contrast with the smoky undertones from the oven cooking.
- Spicy Asian-Inspired Ribs: Using a blend of hoisin sauce, sriracha, and sesame oil, these ribs have a bold and spicy kick. The Asian flavors balance well with the richness of the pork, and the marinade ensures the meat is tender and infused with flavor.
- Herb and Garlic Ribs: A simple yet flavorful option, these ribs are seasoned with fresh herbs like rosemary and thyme, along with minced garlic. This herbaceous approach allows the natural pork flavor to shine while adding aromatic depth to each bite.
- Coffee Rubbed Ribs: Using a coffee-based dry rub, these ribs gain a unique flavor profile that combines bitterness with sweetness from brown sugar and spices. The coffee enhances the meat’s natural richness and creates a beautifully caramelized crust during cooking.
- Teriyaki Ribs: Marinated in teriyaki sauce, these ribs are sweet and savory, with a glossy finish. The marinade not only tenderizes the meat but also creates a delightful sticky glaze that is irresistible.
- Mustard and Spice Ribs: Coating the ribs in mustard before applying a dry spice rub helps the seasoning adhere better and adds a tangy flavor. This method creates a robust taste that penetrates the meat, resulting in a well-seasoned and flavorful dish.
How Do Asian-Inspired Recipes Change the Way We Cook Ribs?
Asian-inspired recipes can significantly transform the way we cook ribs, introducing unique flavors and techniques.
- Marinades: Asian recipes often utilize flavor-packed marinades made from ingredients like soy sauce, ginger, garlic, and sesame oil. These marinades not only infuse the ribs with deep umami flavors but also help to tenderize the meat, making it juicy and succulent.
- Cooking Techniques: Techniques such as braising or slow-cooking are commonly employed in Asian cuisine, allowing the ribs to cook gently and absorb flavors over time. This method can enhance the tenderness of the meat and create a rich, complex sauce that can be served alongside the ribs.
- Glazes and Sauces: Asian-inspired glazes, often incorporating sweet elements like hoisin sauce or honey, can add a delightful sticky finish to ribs. These glazes caramelize during cooking, creating a beautiful, shiny exterior that complements the savory flavors of the meat.
- Spices and Aromatics: Utilizing spices such as five-spice powder, chili paste, or scallions introduces a whole new dimension to traditional rib recipes. These ingredients can elevate the flavor profile and provide a balance of heat and sweetness, making the dish more exciting.
- Serving Styles: Asian-inspired rib recipes often emphasize communal dining with ribs served alongside rice or noodles, allowing for a shared experience. This approach not only enhances the meal’s cultural relevance but also encourages creativity in how the ribs are enjoyed with various side dishes.
What Tips Help Create Authentic BBQ Style Ribs in the Oven?
To create authentic BBQ style ribs in the oven, several tips can enhance flavor and tenderness.
- Select the Right Cut: Choose a full rack of baby back ribs or spare ribs, as both offer good meat-to-bone ratios and rich flavor.
- Marinate or Rub: Use a flavorful marinade or dry rub to infuse the meat with spices; let it sit for several hours or overnight for maximum taste.
- Low and Slow Cooking: Cook the ribs at a low temperature (around 225°F to 250°F) for an extended period, typically 2.5 to 3 hours, to ensure they become tender and juicy.
- Wrap in Foil: Wrapping the ribs in aluminum foil during part of the cooking process helps retain moisture and steam the meat, leading to a more tender result.
- Add a BBQ Sauce Glaze: Brush on your favorite BBQ sauce during the last 30 minutes of cooking to create a sticky, caramelized coating that enhances flavor.
- Use a Broiler for Finish: For a charred finish, place the ribs under the broiler for a few minutes after cooking, watching closely to avoid burning.
- Rest Before Serving: Allow the ribs to rest for 10-15 minutes after cooking, which helps the juices redistribute and results in a more succulent bite.