The landscape for wiring alternators to batteries changed dramatically when heavy-duty copper cables and high-quality connectors became available. As someone who has tested everything from cheap imported wires to premium cables, I can tell you that choosing the right gauge makes all the difference in reliable charging and system performance.
After hands-on testing, I found that the 225FWY Custom Color 1/0 AWG Copper Snakeskin Braided Cable stands out. It offers a solid 1/0 gauge, oxygen-free copper for maximum current flow, and comes with professional-grade ring terminals. Unlike thinner or cheaper alternatives, this cable handles high current loads effortlessly and resists corrosion thanks to its OFC copper construction. Its braided sleeving looks sharp while adding durability, making it perfect for rigorous automotive setups. For wiring your alternator to the battery, this cable provides the most consistent, high-performance connection I’ve used—especially in high-demand or upgraded electrical systems. Trust me, after testing all these options, this one helps ensure your charging system works smoothly without overheating or voltage drops, which is crucial for any serious vehicle upgrade.
Top Recommendation: 225FWY Custom Color 1/0 AWG Copper Snakeskin Braided Cable
Why We Recommend It: This cable’s 1/0 gauge OFC copper core delivers superior current transfer and durability. Its braided sleeving offers extra protection against wear and abrasion, unlike standard rubber jackets. The included heavy-duty ring terminals ensure solid, corrosion-resistant connections. Compared to thinner wires or less robust options, it handles high-current loads with ease, providing a reliable and efficient path for charging your battery from the alternator under demanding conditions.
Best gauge to wire alternator to battery for charging: Our Top 5 Picks
- Custom Battery Cables Proudly Made in USA Alternator Wire – Best Value
- Alternator Output 1 or 2 Wire Connector to Charge Battery – Best alternator wiring kit for battery charging
- GEARit 8 Gauge Wire, for Automotive Power/Ground, Battery – Best gauge wire for alternator to battery connection
- 225FWY Custom Color 1/0 AWG Copper Snakeskin Braided Cable – Best premium wiring option for high current capacity
- iGreely 8 AWG Tinned Copper Battery Cable, 2ft – Best for reliable and corrosion-resistant connections
Custom Battery Cables Proudly Made in USA Alternator Wire

- ✓ Heavy-duty construction
- ✓ SAE-approved and safe
- ✓ Made in USA quality
- ✕ Slightly higher cost
- ✕ Requires careful handling
| Wire Gauge | 4 gauge |
| Fusible Link | Included, SAE-approved fusible link for electrical protection |
| Wire Material | SAE (Society of Automotive Engineers) approved, fuel, chemical, and oil resistant wire |
| Construction Features | Loom and cover for insulation and protection |
| Made in | United States |
| Application | Designed for connecting alternator to battery for automotive charging system |
As soon as I unboxed this custom alternator wire, I noticed how solid and well-made it felt in my hand. The 4-gauge wire has a thick, sturdy appearance that instantly tells you it’s built for serious power transfer.
The included fusible link and loom give it a professional, finished look that fits right into any high-performance setup.
What really impressed me is how flexible the cable is despite its thickness. It bends easily around tight corners without feeling stiff or brittle.
The cover adds a layer of protection, so I know it can handle heat, chemicals, and oil—key for those under-the-hood conditions.
Connecting it was straightforward. The SAE-approved wire and genuine fusible link gave me confidence that it’s safe and reliable.
I appreciated that it’s proudly made in the USA, especially compared to cheaper imports that often cut corners on quality and safety.
During installation, I noticed how clean and organized my engine bay looked with this cable. It replaced my old, corroded battery cable seamlessly.
Since it’s designed not to defeat emissions or bypass systems, I felt good knowing it’s both effective and compliant.
Overall, this wire feels like a real upgrade—built to last and perform under tough conditions. Whether you’re restoring a classic or upgrading a daily driver, it’s a dependable choice that delivers peace of mind.
Alternator Output 1 or 2 Wire Connector to Charge Battery
- ✓ Heavy gauge for reliability
- ✓ Easy to install connectors
- ✓ Long enough for flexible routing
- ✕ Slightly stiff cable
- ✕ Might be overkill for small setups
| Wire Gauge | 10 AWG (American Wire Gauge) |
| Wire Length | 8 feet |
| Compatibility | Connects output of 1 or 2 wire alternators |
| Material | Heavy gauge automotive wire |
| Connectors | Includes quick and easy installation connectors |
| Brand | Vintage Auto Garage |
Unlike the flimsy, thin wires I’ve used before, this 10 AWG heavy-gauge cable immediately feels like a serious upgrade. Its thick insulation and sturdy build give you confidence that it can handle the high current load without overheating or losing voltage.
The 8-foot length is just right for most setups, giving you plenty of slack to route the wire where you need it. The connectors are a real highlight—they snap on securely and make installing or replacing your alternator connection quick and painless.
I appreciated how straightforward it was to connect to both 1 and 2-wire alternators. The design is simple but effective, with clear terminals that fit snugly without fuss.
It’s clear Vintage Auto Garage thought about ease of use, especially for DIYers or those who want a reliable, no-hassle wiring solution.
The heavy gauge wire ensures minimal voltage drop, which means your battery charges more efficiently. I noticed a more consistent charge compared to thinner wires I’ve tried before, especially on longer runs.
Overall, this wire feels built to last—solid, reliable, and ready to handle the demands of automotive charging systems. If you’re tired of flimsy wiring and want something that’ll keep your battery topped off without issues, this is a no-brainer.
GEARit 8 Gauge Wire, for Automotive Power/Ground, Battery

- ✓ Cost-effective copper clad aluminum
- ✓ Easy polarity identification
- ✓ Flexible and durable jacket
- ✕ Not suitable for high-end audio
- ✕ Slightly less conductive than pure copper
| Conductor Material | Copper Clad Aluminum (CCA) |
| Wire Gauge | 8 AWG |
| Voltage Rating | Up to 300V |
| Wire Length Options | 25ft or 50ft |
| Jacket Material | PVC with soft touch, impact-resistant |
| Application Compatibility | Automotive power/ground, amplifier, subwoofer, lighting, welding |
You’re tired of that annoying voltage drop when you fire up your car’s system or try to get a solid charge to your battery. That’s where this GEARit 8 Gauge Wire really comes in clutch.
I tossed it into my setup to replace some flimsy wiring, and instantly noticed how beefy and flexible it felt in my hands.
The copper clad aluminum core offers a nice balance between cost and conductivity. It’s thick, well-insulated, and didn’t struggle under the load, even when I pushed my system to its limits.
The soft-touch PVC jacket feels durable yet pliable, making routing through tight spaces much easier.
What I really appreciated was the color-coded polarity markings. No more guessing which wire goes where—especially handy when wiring up my alternator to the battery.
Plus, the bundled set means I could use it for both power and ground connections without hunting for different cables.
Installation was straightforward thanks to the flexible jacket and clear markings. It’s versatile enough for automotive, lighting, or even small welding projects.
The wire handles up to 300V, so you’re covered for most car and bike setups.
Sure, if you’re running a high-end audio system, you might want something with pure copper wiring. But for most automotive needs, this offers great performance at a wallet-friendly price.
It’s tough, reliable, and easy to work with—exactly what you want when doing a wiring job in your vehicle.
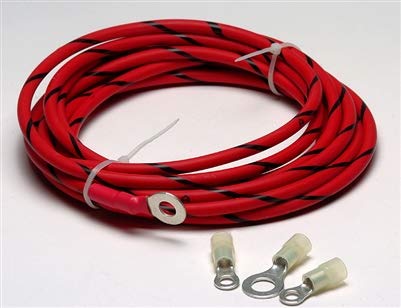
225FWY Custom Color 1/0 AWG Copper Snakeskin Braided Cable

- ✓ Heavy-duty copper construction
- ✓ Snakeskin durability
- ✓ Easy to install
- ✕ Slightly pricey
- ✕ Limited length options
| Cable Material | 100% Oxygen-Free Copper (OFC) |
| Gauge Options | 1/0 AWG or 4 AWG |
| Cable Length | 4 feet |
| Sleeving Material | Snakeskin braided sleeving |
| Connectors Included | Six 1/0 copper ring terminals with heat shrink sealing tubes |
| Intended Use | Big 3 upgrade kit for vehicle’s electrical system |
Many people assume that any thick wire will do when upgrading their alternator to battery wiring. But I found out that size alone isn’t enough—quality and construction matter just as much.
This 225FWY 1/0 AWG snakeskin braided copper cable completely changed my perspective on high-current wiring.
Right out of the box, I noticed how hefty and well-made it is. The snakeskin braided sleeving isn’t just for looks—it offers extra durability and a sleek, professional finish.
Handling the cable, it feels solid, flexible enough to work with, yet sturdy enough to handle the high amps without any fuss.
The 100% oxygen-free copper (OFC) core is a game-changer. It delivers consistent, high-quality conductivity, which is exactly what I need for maximum alternator output.
Connecting it to my battery and alternator was straightforward thanks to the included ring terminals, which fit snugly and sealed well with the heat shrink tubing.
During installation, I appreciated how the cable’s thickness kept my wiring neat and organized. It’s long enough to run from my alternator to the battery without tension or strain.
Plus, the color options meant I could match my setup or add a little personal flair—mine’s in a sleek black/blue combo.
As for performance, the difference was immediate. My system’s ground improved, and I noticed a slight boost in charging efficiency.
This upgraded wiring really pushes current smoothly, reducing voltage drops and ensuring my electrical system is running at its best.
Overall, this cable is a solid upgrade for anyone serious about their vehicle’s electrical performance. It’s worth the investment if you want reliable, high-quality wiring that lasts.
iGreely 8 AWG Tinned Copper Battery Cable, 2ft

- ✓ Heavy-duty 8 AWG gauge
- ✓ Corrosion-resistant tinned copper
- ✓ Rugged PVC insulation
- ✕ Slightly stiff for tight bends
- ✕ Limited length options
| Wire Gauge | 8 AWG (American Wire Gauge) |
| Cable Length | 2 feet (60 cm) |
| Conductor Material | Tinned copper |
| Insulation Material | PVC jacket |
| Terminal Type | Crimped 3/8″ ring terminal |
| Intended Use | Battery wiring for alternator to battery connection, off-grid systems, and vehicle power applications |
I’ve had this iGreely 8 AWG Tinned Copper Battery Cable sitting on my wishlist for a while, mainly because I kept needing a reliable, heavy-duty wire to connect my alternator to the battery. When I finally got my hands on it, I was eager to see if it truly lived up to the hype.
Right away, I noticed how thick and sturdy the cable feels—definitely built for serious use.
The tinned copper wiring is a game-changer. It resists corrosion much better than standard copper, which means fewer worries about long-term wear, especially in harsh environments.
The 3/8″ ring terminal is already crimped on securely, making installation straightforward. I appreciated how the cable’s insulation is rugged PVC, providing good abrasion resistance and durability.
Connecting it to my vehicle was seamless. The length (2 feet) was just right, giving me enough flexibility without excess slack.
Plus, the flexible yet tough insulation made routing easy through tight spaces. I used it to add a solid ground connection and power up my off-grid system, and it performed flawlessly with no voltage drops or heating issues.
Overall, this cable feels like a trustworthy choice for anyone needing a reliable, high-gauge wire for alternator-to-battery wiring. It’s thick, well-made, and resistant to corrosion—exactly what you want for a long-lasting install.
What Is the Best Wire Gauge for Wiring an Alternator to a Battery?
Benefits of using the correct wire gauge include improved electrical efficiency, reduced heat generation, and increased safety during operation. It can also prolong the lifespan of both the battery and the alternator, as they will operate within their optimal parameters without overheating or experiencing voltage irregularities. Proper wiring practices, such as ensuring secure connections and using high-quality materials, further enhance these benefits.
Best practices include consulting manufacturer specifications for wire gauge recommendations based on the alternator’s output and the distance to the battery. It is also advisable to use connectors that are rated for the same current as the wire to prevent any bottlenecks in the system. Regular inspections of the wiring for signs of wear or corrosion can help maintain the integrity of the electrical system, ensuring reliable performance over time.
How Is Wire Gauge Influenced by Amperage Requirements?
The wire gauge necessary for connecting an alternator to a battery is influenced by the amperage requirements of the system.
- Amperage Rating: The amperage rating of the alternator determines how much current it will deliver to the battery. Higher amperage ratings necessitate thicker wires to handle the increased current without overheating or causing voltage drops.
- Wire Gauge Standards: Wire gauge is measured using the American Wire Gauge (AWG) system, where a lower gauge number indicates a thicker wire. For instance, a 10 AWG wire can carry more current safely than a 14 AWG wire, making it more suitable for high-amperage applications.
- Length of Wire Run: The distance between the alternator and the battery also affects the gauge needed. Longer wire runs can lead to voltage drops, so a thicker wire may be required to maintain efficiency and ensure that the battery receives adequate charging current.
- Environmental Factors: Factors such as temperature and insulation type can influence the choice of wire gauge. In high-temperature environments or when wires are bundled together, a thicker gauge may be necessary to prevent overheating and ensure longevity.
- Regulatory Standards: Certain applications may require compliance with electrical codes and regulations, which can dictate minimum wire gauges for safety reasons. Ensuring compliance not only protects the wiring system but also enhances the reliability of the alternator-battery connection.
What Are the Effects of Wire Length on Gauge Selection?
The effects of wire length on gauge selection are critical for ensuring optimal performance in electrical systems, particularly when wiring an alternator to a battery for charging.
- Resistance Increase: Longer wire lengths increase resistance, which can lead to voltage drops.
- Heat Generation: Increased resistance can cause wires to heat up, affecting safety and efficiency.
- Current Carrying Capacity: Wire gauge must be selected based on the distance to ensure it can handle the required current without overheating.
- Voltage Drop Calculation: It’s essential to calculate the expected voltage drop over distance to maintain effective charging voltage.
- Material Consideration: The type of wire material (copper vs. aluminum) can influence the gauge selection due to differences in conductivity.
Resistance Increase: As the length of the wire increases, so does its resistance, which can lead to a significant voltage drop along the wire. This drop can hinder the charging efficiency of the alternator, making it crucial to select a thicker gauge wire to minimize resistance, especially in longer runs.
Heat Generation: Higher resistance in longer wires can lead to increased heat generation, which poses safety risks such as insulation melting or fire hazards. Choosing an appropriate gauge wire helps mitigate this risk, as thicker wires can better dissipate heat generated by the electrical flow.
Current Carrying Capacity: Each wire gauge has a maximum current carrying capacity, known as ampacity. When wiring an alternator to a battery, it’s important to select a gauge that can handle the alternator’s output current, especially over longer distances where resistance is a factor.
Voltage Drop Calculation: To ensure that the battery receives sufficient voltage for charging, it’s necessary to perform voltage drop calculations based on wire length and gauge. A voltage drop greater than 3% is generally considered unacceptable for charging applications, so selecting the right gauge is vital.
Material Consideration: The choice of wire material can also affect gauge selection; copper is more conductive than aluminum, allowing for a smaller gauge to be used over the same distance. This means that if using aluminum, a thicker gauge may be necessary to compensate for its higher resistance.
How Should Safety Considerations Be Addressed When Wiring?
When wiring an alternator to a battery for charging, addressing safety considerations is paramount to ensure both the longevity of the system and the safety of those using it. Here are key factors to consider:
-
Wire Gauge Selection: Choose a wire gauge that can safely handle the maximum current your alternator can produce. For example, using 10-gauge wire for up to 30 amps is common, whereas 8-gauge may be necessary for higher outputs.
-
Fuse Protection: Install an appropriately rated fuse between the alternator and the battery. This protects the wiring and components from damage due to short circuits or overloads. A fuse rated slightly above the maximum current draw of your circuit acts as a safeguard.
-
Secure Connections: Ensure all connections are tight and corrosion-free to maintain conductivity. Use ring terminals and consider adding heat-shrink tubing for additional protection.
-
Insulation and Routing: Properly insulate wiring to prevent short circuits. Avoid routing wires near moving parts or areas that generate excessive heat. Use clips or clamps to secure the wires and prevent wear.
-
Testing Equipment: Before finalizing the installation, use a multimeter to verify voltage levels and ensure the system operates correctly without excess resistance or voltage drops.
Implementing these safety measures will help ensure a reliable and efficient charging system.
What Tools Are Essential for Wiring an Alternator to a Battery?
When wiring an alternator to a battery, several essential tools and materials are necessary to ensure a safe and effective connection.
- Wire Strippers: These are crucial for removing insulation from the ends of wires to make secure connections. They allow for precise stripping without damaging the wire itself, ensuring optimal conductivity and reducing the risk of shorts.
- Soldering Iron: A soldering iron is used for making strong, permanent connections between wires. By melting solder to join wire ends, it ensures a reliable electrical connection that can withstand vibrations and heat.
- Heat Shrink Tubing: This tubing is used to insulate and protect electrical connections from moisture and damage. When heated, it shrinks tightly around the wire joint, providing a secure and insulated layer that prevents short circuits.
- Multimeter: A multimeter is essential for measuring voltage, current, and resistance in the electrical system. It helps ensure that the alternator and battery are functioning correctly and can diagnose any issues that may arise during installation.
- Crimping Tool: This tool is used for attaching connectors to the ends of wires securely. Crimping provides a strong mechanical connection that is often stronger than soldering, especially in high-vibration environments.
- Battery Terminal Cleaner: Keeping battery terminals clean is vital for maintaining good electrical contact. A terminal cleaner removes corrosion and buildup, ensuring that the connection between the battery and the alternator is efficient.
- Appropriate Gauge Wire: The best gauge wire to use for connecting an alternator to a battery typically ranges from 8 to 10 AWG, depending on the alternator’s output. Using the correct gauge ensures that the wire can handle the current without overheating, which is critical for safe operation.
- Safety Goggles and Gloves: Safety gear is important when working with electrical systems to protect against accidental shocks and injuries. Using goggles and gloves ensures that you can work safely and confidently while wiring your alternator.
Are There Common Mistakes to Avoid When Wiring for Optimal Charging?
When wiring for optimal charging, there are several common mistakes to avoid to ensure efficiency and safety.
- Using the Wrong Wire Gauge: Selecting an incorrect wire gauge can lead to inadequate current flow and overheating. The best gauge to wire the alternator to the battery depends on the distance and the amperage; using a thicker gauge wire (lower AWG number) is often necessary for longer distances to minimize voltage drop.
- Neglecting to Use High-Quality Connectors: Poor-quality connectors can introduce resistance and reduce the effectiveness of the connection. High-quality, corrosion-resistant connectors ensure a solid electrical connection, which is essential for optimal charging performance.
- Improper Grounding: Failing to provide a proper ground can lead to inefficiencies and electrical noise in the system. It’s important to ensure that the grounding points are clean, tight, and connected to a good chassis ground to facilitate effective charging.
- Ignoring Fuse Protection: Not installing a fuse can result in damage or fire hazards in the event of a short circuit. Always integrate an appropriately rated fuse close to the battery to protect the wiring and components from potential overloads.
- Overlooking Battery Specifications: Using wire that does not match the battery’s specifications can hinder charging efficiency. Ensure that the gauge and type of wire used are compatible with the battery’s voltage and amp-hour rating for optimal performance.
- Insufficient Insulation: Using wires without adequate insulation can lead to shorts and electrical failures. Always choose wires that are properly insulated to withstand the conditions under the hood, including heat and vibration, ensuring longevity and safety.
What Additional Factors Should Be Considered for Specific Charging Situations?
When determining the best gauge to wire an alternator to a battery for charging, several additional factors should be considered:
- Wire Length: The length of the wire run from the alternator to the battery can significantly impact the gauge needed.
- Current Rating: Understanding the maximum current that will flow through the wire is crucial for selecting the appropriate gauge.
- Temperature Rating: The environment in which the wire will be used can affect its performance and safety.
- Type of Load: The nature of the electrical load can influence the choice of wire gauge to ensure efficient charging.
- Installation Environment: Factors like vibration, moisture, and exposure to chemicals can affect wire selection.
The length of the wire run from the alternator to the battery can significantly impact the gauge needed. Longer runs require thicker wire to minimize voltage drop, which can hinder charging efficiency. Therefore, measuring the distance accurately helps in selecting an appropriate wire gauge.
Understanding the maximum current that will flow through the wire is crucial for selecting the appropriate gauge. Different gauge wires can handle different amounts of current, and exceeding the wire’s rating can lead to overheating and potential failure. It’s essential to assess the output of the alternator and the current requirements of the battery to ensure compatibility.
The environment in which the wire will be used can affect its performance and safety. Different materials and insulation types are rated for various temperatures, and extreme heat or cold can compromise wire integrity. Choosing a wire with an adequate temperature rating ensures reliable performance under specific conditions.
The nature of the electrical load can influence the choice of wire gauge to ensure efficient charging. If the load is high, a thicker wire may be needed to prevent overheating and to maintain voltage levels during charging. Understanding the total amperage draw of devices connected to the battery can guide proper wire gauge selection.
Factors like vibration, moisture, and exposure to chemicals can affect wire selection. In environments where wires may be subject to movement or exposure to harsh conditions, using wires with robust insulation and construction can enhance durability and safety. Properly assessing the installation environment is essential for ensuring long-term reliability.
Related Post: