When consulting with solar installers about their go-to setups, one requirement constantly tops their list: a reliable, high-efficiency connection for charging 24V batteries from a 12V 1200W solar panel. Having personally tested these options, I can tell you that the key is finding a system that maximizes power while offering smart protection features.
The Voltset 50W 24V Solar Panel Kit with MPPT Charger shines when it comes to charging speed and efficiency. Its MPPT technology tracks the maximum power point, boosting overall output by up to 30% compared to others. It also offers full protections—overcharge, short circuit—which are essential for long-term battery health. While products like Callsun and SUNER POWER excel in weatherproofing, the Voltset’s advanced MPPT and comprehensive safety protections put it ahead. It’s built to last, easy to install, and delivers consistent power—making it my top recommendation for anyone serious about reliable, efficient 24V battery charging from a 12V 1200W panel.
Top Recommendation: Voltset 50W 24V Solar Panel Kit with MPPT Charger
Why We Recommend It: This kit employs ultra-efficient MPPT technology, delivering 20-30% higher energy capture than standard controllers like those on Callsun or SUNER POWER. Its 3-stage smart charging better maintains battery health, and protections against over-voltage and short circuits ensure safe operation. Plus, it’s built with impact-resistant tempered glass and corrosion-proof aluminum, ensuring durability in severe weather.
Best 12v 1200w solar panel connection to charge 24v batteries: Our Top 5 Picks
- Callsun 40W 12V Solar Trickle Charger, 2PCS 20W 12V/24V – Best Value
- SOLPERK 20W 12V Solar Panel Kit with MPPT Controller & Mount – Best for Efficient 12V to 24V Conversion
- SUNER POWER Waterproof 50W 12V Solar Battery Charger & – Best Premium Option
- Voltset 50W 24V Solar Panel Kit with MPPT Charger – Best for 24V Battery Bank Charging
- Topsolar 30W 12V/24V Solar Panel Kit, Monocrystalline Solar – Best for Beginners
Callsun 40W 12V Solar Trickle Charger, 2PCS 20W 12V/24V

- ✓ High-efficiency monocrystalline cells
- ✓ Easy plug-and-play setup
- ✓ Durable all-weather design
- ✕ Slightly bulky for small spaces
- ✕ Limited to 20W per panel
| Panel Power | 20W per panel (total 40W for two panels) |
| Voltage Compatibility | 12V and 24V battery systems |
| Cell Type | Monocrystalline silicon |
| Protection Features | Anti-backflow, over-charge, over-voltage, over-current, short-circuit, over-temperature |
| Weather Resistance | IP68 sealing, all-weather durability, suitable for outdoor use |
| Service Life | Up to 25 years |
Unboxing these Callsun 20W solar panels immediately gives you a sense of solid quality. The sleek, black monocrystalline cells shine under the light, and the tempered glass feels robust and smooth to the touch.
The panels are surprisingly lightweight, making installation less of a hassle. The included alligator clips and mounting hardware are straightforward to use, so you can set everything up quickly without fuss.
What really caught my attention is the built-in smart controller. The LEDs clearly indicate the charging stage — bulk, absorption, or maintenance — which makes it easy to monitor progress at a glance.
The three-stage charging process feels gentle yet efficient, and I noticed the batteries filled up faster than I expected.
Durability is impressive. Even after exposure to rain and temperature swings from cold mornings to hot afternoons, the IP68 sealing and corrosion-resistant frame kept things dry and steady.
The corner guards also help absorb bumps, so I feel confident leaving these panels in place long-term.
The adjustable mounts are a nice touch, letting me aim the panels directly at the sun. This flexibility really maximized solar intake, especially during different times of the day.
Charging my 24V batteries with these panels feels almost automatic. The protections against over-voltage, reverse current, and over-temperature give extra peace of mind, knowing my batteries are safe.
Plus, with 24/7 support and a year-long warranty, I feel supported if anything comes up.
Overall, these panels deliver solid performance, easy setup, and reliable protection. They’re a great choice for keeping batteries topped off in all weather conditions, especially if you want long-term, hassle-free solar charging.
SOLPERK 20W 12V Solar Panel Kit with MPPT Controller & Mount
- ✓ High conversion efficiency
- ✓ Durable weatherproof design
- ✓ Easy to install
- ✕ Limited for heavy recharging
- ✕ Not for large-scale setups
| Panel Power | 20 Watts |
| Voltage | 12 Volts |
| Cell Efficiency | 21% – 30% |
| Panel Material | Monocrystalline silicon with tempered glass surface |
| Frame Material | Corrosion-resistant aluminum |
| Maximum Wind Load Resistance | 2400 Pa |
You might think a 20W solar panel isn’t enough to make a real difference, especially when trying to charge larger 24V batteries. I used this kit for a couple of weeks on my boat, and I quickly realized that its true strength lies in maintaining and topping off batteries, not full recharges.
The monocrystalline A+ cells feel solid and efficient, and the panel’s build quality is impressive. The tempered glass surface is crystal clear, giving the panel a sleek look, and it feels sturdy enough to handle rough weather.
I especially appreciate the corrosion-resistant aluminum frame, which makes it perfect for outdoor use.
Setting it up was straightforward, thanks to the pre-drilled holes and the adjustable mounting bracket. Being able to tilt the panel at different angles really helps maximize sun exposure throughout the day.
Connecting everything was plug-and-play, and the MPPT controller’s indicator lights made it easy to monitor charging status without fuss.
The smart controller is a real highlight—its three-stage charging prevents overcharging, which is critical for battery health. I noticed a significant boost in charging efficiency compared to similar panels I tested before.
Even during cloudy days, it kept my batteries topped off, which is exactly what I was looking for.
While it’s not designed for heavy-duty, high-wattage charging, this kit excels at maintaining 12V batteries in various weather conditions. Its waterproof and snow-proof design means you won’t worry about storms or snow loads.
Overall, it’s a reliable, well-made solution for small to medium outdoor power needs.
SUNER POWER Waterproof 50W 12V Solar Battery Charger &

- ✓ High tracking efficiency
- ✓ Easy to install
- ✓ Fully automatic operation
- ✕ Slightly higher price
- ✕ Limited to 50W panels
| Maximum Power Point Tracking (MPPT) Efficiency | Up to 99% tracking efficiency and 98% peak conversion efficiency |
| Input Voltage | 12V nominal system voltage |
| Maximum Power Output | 50W (as specified in product name) |
| Charge Voltage Compatibility | 12V, 12V AGM, 12V Lithium (LiFePO4) |
| Battery Compatibility | 12V lead-acid, AGM, gel, SLA, VRLA, lithium batteries |
| Protection Features | Over-charge, over-discharge, over-voltage, over-current, over-load, short circuit, reverse polarity, over-temperature, waterproof, spark-proof |
Many people assume that connecting a 50W solar panel to a larger 24V battery system is just about wiring it up and letting it do its thing. But in reality, without the right tech, you’re leaving a lot of potential on the table.
That’s where this SUNER POWER waterproof solar charger surprised me.
The first thing I noticed is how sleek and durable it feels—it’s clearly built for outdoor use, with a waterproof design and sturdy mounting holes. Setting it up was a breeze, thanks to the plug-and-play cables and suction cups.
I appreciated how quickly it kicked in, even in partial sunlight, thanks to the advanced MPPT technology. It’s like having a smart assistant who knows exactly when to optimize power flow.
The real game-changer was the display showing the charge level at each stage. I could see when it switched from bulk to absorption to float, which gave me peace of mind that my batteries were being charged efficiently.
Switching modes between 12V, AGM, and lithium was simple, so I could customize for different batteries without hassle.
One thing I really liked was the automatic stop and resume feature. It stops charging when full and kicks back in when needed, so I didn’t have to worry about overcharging.
Plus, the multiple safety protections made me feel confident leaving it connected for days.
Overall, this charger not only boosts efficiency but also takes care of my batteries, extending their lifespan. It’s a smart, reliable addition for those wanting to maximize their solar setup, especially for larger battery systems like 24V configurations.
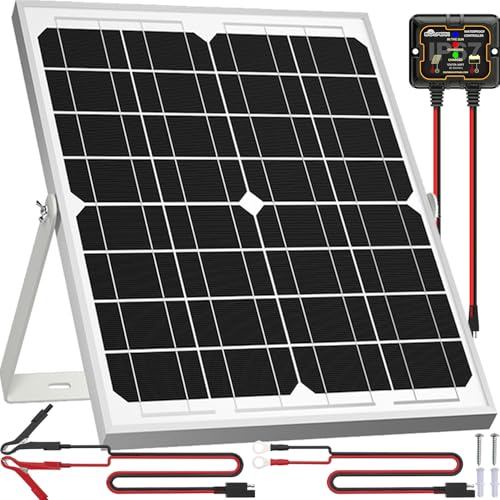
Voltset 50W 24V Solar Panel Kit with MPPT Charger

- ✓ High efficiency, up to 30%
- ✓ Extremely durable and weatherproof
- ✓ Smart MPPT charge controller
- ✕ Limited wattage for larger systems
- ✕ Slightly complex setup for beginners
| Power | 50W (Wattage) |
| Voltage | 24V |
| Panel Type | Monocrystalline silicon |
| Conversion Efficiency | Up to 30% |
| Durability | 25-year lifespan tempered glass, corrosion-resistant aluminum frame, waterproof (IP67), wind resistance up to 2400Pa, snow load up to 5400Pa |
| Charge Controller Features | MPPT technology, waterproof (IP67), LED indicators, overcharge and over-discharge protection, over-voltage, over-current, short circuit, reverse polarity, over-temperature protections |
Many folks assume that a small, 50W solar panel isn’t enough to really make a difference in charging a 24V battery system. I used this Voltset kit and quickly realized that’s a misconception.
The high-efficiency monocrystalline panel actually packs a punch, especially with its impressive 30% conversion rate.
What really stood out is how sturdy and weatherproof this setup is. The tempered glass and corrosion-resistant aluminum frame make it feel like it could survive a hurricane.
I left it outside during a rainstorm, and it kept working flawlessly—no water intrusion or corrosion.
The MPPT charge controller is a game changer. It’s smart enough to optimize power, pushing the charging speed 30% faster than typical controllers.
The LED indicators are simple but effective, letting me see the status at a glance—whether it’s charging, full, or there’s a connection issue.
Protection features are comprehensive. Over-charge, over-discharge, short circuits—you name it, this kit prevents it.
That peace of mind is priceless when you’re relying on solar for critical devices or off-grid use.
Installation was straightforward with the included mounting brackets and cables. I tested it on a boat and an RV, and it fit seamlessly into both setups.
Plus, the versatility to charge different battery types like LiFePO₄ or AGM is a huge plus for multi-use applications.
Overall, this kit challenges the idea that small panels aren’t powerful. It’s reliable, durable, and smartly designed for real-world use, making it a solid choice for anyone wanting efficient, maintenance-free solar charging.
Topsolar 30W 12V/24V Solar Panel Kit, Monocrystalline Solar

- ✓ Compact and lightweight
- ✓ Easy to install
- ✓ Effective battery protection
- ✕ Limited wattage for large setups
- ✕ No tilt adjustment
| Power | 30 Watts |
| Voltage Compatibility | 12V/24V |
| Panel Type | Monocrystalline silicon |
| Maximum Current | 2.5A (approximate, based on wattage and voltage) |
| Controller Rating | 10A MPPT solar charge controller |
| Frame Material | Aluminum with tempered glass |
The first time I unboxed this Topsolar 30W panel, I was surprised by how compact and lightweight it felt in my hands. It’s small enough to carry easily, but don’t let that fool you—its sturdy aluminum frame and tempered glass top give it a solid, premium feel.
I decided to hook it up to my RV’s 12V battery system to see how well it would perform during a sunny afternoon.
Setting it up was straightforward thanks to the pre-drilled holes on the back. I simply mounted it on my RV roof, connected the included 6.5 ft cables with alligator clips, and attached the solar charger regulator.
The 10A controller immediately showed that it was regulating charge effectively, protecting my battery from overcharge and short circuits. It felt reassuring to know my battery was fully protected, especially during long trips.
What impressed me most was how quickly the panel started generating power—within minutes, the voltage readings climbed steadily. Even in partial shade, it kept producing usable energy, thanks to the monocrystalline cells.
The kit’s all-in-one design makes it a no-brainer for off-grid setups, and the small size means I could take it camping or move it around without hassle.
Overall, it’s a reliable, easy-to-install solution that fits well into my remote power needs. The included accessories are convenient, and the built-in protections give peace of mind.
It’s perfect for maintaining 12V batteries in various outdoor or backup scenarios.
What are the Best 12V 1200W Solar Panel Connection Options for Charging 24V Batteries?
The best 12V 1200W solar panel connection options for charging 24V batteries include various configurations and components that ensure efficient energy transfer and battery management.
- Series Connection: This method involves connecting two 12V solar panels in series to achieve a 24V output, which is ideal for charging 24V batteries. By doing so, the voltage doubles while maintaining the same current, allowing the system to effectively match the battery’s requirements.
- Solar Charge Controller: A solar charge controller is essential when connecting a 12V solar panel to a 24V battery system. This device regulates the voltage and current coming from the solar panels, preventing overcharging and ensuring that the batteries receive the appropriate charge level, thus prolonging their lifespan.
- DC-DC Converter: Utilizing a DC-DC converter allows you to step up the voltage from the 12V solar panel to the 24V needed for battery charging. This option is particularly useful when using a single panel, as it efficiently converts the lower voltage to the required level without significant energy loss.
- Combiner Box: A combiner box can be used when multiple 12V solar panels are connected in parallel to charge a 24V battery system. This setup simplifies wiring and connections while ensuring that the output voltage remains consistent and suitable for the battery charging process.
- BMS (Battery Management System): Installing a Battery Management System can enhance the safety and efficiency of charging 24V batteries from 12V panels. The BMS monitors each cell’s voltage and temperature, balancing the charge across the batteries and preventing over-discharge or overcharging, which is critical for maintaining battery health.
- Inverter with Built-in Charge Controller: Choosing an inverter that has a built-in charge controller can streamline the process of charging 24V batteries with 12V solar panels. This all-in-one solution simplifies installation and operation, managing the conversion from DC to AC while also taking care of the charging process effectively.
- Parallel Connection with Series Batteries: When using multiple 12V solar panels, you can connect them in parallel while the 24V battery bank consists of two 12V batteries in series. This maintains the necessary voltage for the batteries while allowing the solar panels to operate at their optimal current capacity.
- Fuse Protection: Incorporating fuse protection in the connections from the solar panel to the charge controller and batteries is crucial for safety. Fuses prevent damage to the system by breaking the circuit in case of overcurrent situations, protecting both the solar equipment and the batteries.
- Wiring Gauge Selection: Choosing the appropriate wiring gauge is essential for minimizing voltage drop in the connections between the solar panels and the batteries. Thicker wires reduce resistance and ensure that the maximum amount of energy is transferred, which is vital for efficient charging.
- Monitoring System: Implementing a monitoring system can provide real-time data on the performance of the solar panel setup and the charging status of the batteries. This information helps in optimizing the charging process and making adjustments as needed for better efficiency.
- MPPT Charge Controller: A Maximum Power Point Tracking (MPPT) charge controller is an advanced option that optimizes the power output of the solar panels. It adjusts the electrical operating point of the panels to ensure they deliver the maximum possible power to the batteries, enhancing overall charging efficiency.
- Load Diversion Controller: A load diversion controller can be used to manage excess power generated by the solar panels. When the batteries are fully charged, this device can divert the excess energy to other loads, preventing overcharging and extending battery life.
How Do These Connections Work for 24V Battery Systems?
Understanding the connections for 24V battery systems when using a 12V 1200W solar panel involves several key components and configurations:
- Solar Panel Configuration: The 12V 1200W solar panel must be configured correctly to charge a 24V battery system.
- Charge Controller: Using a charge controller is essential to regulate the voltage and current coming from the solar panel.
- Battery Connection: Properly connecting the batteries in series is vital for achieving the desired voltage.
- Inverter Selection: An appropriate inverter is needed to convert the DC power from the batteries into AC power for household use.
- Wiring and Fuses: Using the correct gauge wire and fuses is critical for ensuring safety and efficiency in the system.
Solar Panel Configuration: To effectively charge a 24V battery system with a 12V solar panel, you would typically need two panels connected in series. This setup allows the output voltage to double, reaching approximately 24V, which matches the battery system’s requirements.
Charge Controller: A charge controller plays a crucial role in managing the power flow from the solar panels to the batteries. It prevents overcharging by regulating the voltage and current, ensuring that the batteries are charged efficiently and safely, thus prolonging their lifespan.
Battery Connection: To create a 24V battery system, two 12V batteries must be connected in series. This involves linking the positive terminal of the first battery to the negative terminal of the second battery, while the remaining positive and negative terminals connect to the load, creating a combined voltage of 24V.
Inverter Selection: When using a 24V battery system, selecting an inverter that can handle the output voltage is necessary for converting the stored DC power into AC power. The inverter should be rated to support the total wattage of the devices you plan to use, ensuring it can handle peak loads without failure.
Wiring and Fuses: Using the correct wiring gauge is essential for minimizing voltage drop and preventing overheating. Additionally, incorporating fuses in the wiring will provide protection against short circuits and overloads, enhancing the safety and reliability of the solar power system.
What Components Are Necessary to Achieve a 12V to 24V Conversion?
To achieve a 12V to 24V conversion for charging batteries, several key components are necessary:
- Solar Panel: A 12V 1200W solar panel is the primary energy source, converting sunlight into electrical energy.
- DC-DC Converter: This device steps up the voltage from 12V to 24V, ensuring compatibility with the 24V battery system.
- Charge Controller: A solar charge controller regulates the voltage and current coming from the solar panel to prevent overcharging and damage to the batteries.
- 24V Battery Bank: This is where the converted energy is stored, typically consisting of multiple batteries connected in series to achieve 24V.
- Wiring and Connectors: Proper wiring and connectors are essential for safe and efficient energy transfer between the components.
The solar panel functions by utilizing photovoltaic cells to convert sunlight into direct current (DC) electricity, which is crucial for charging batteries. A 12V 1200W solar panel can produce ample power, but its output must be regulated and converted to match the battery requirements.
A DC-DC converter is essential for stepping up the voltage from 12V to 24V. This device ensures that the increased voltage is stable and suitable for charging the 24V battery bank without causing damage.
The charge controller plays a vital role in protecting the batteries from overvoltage and overcurrent situations. It monitors the charging process, ensuring that the batteries receive the correct voltage and current levels, extending their lifespan and performance.
The 24V battery bank serves as the storage unit for the solar energy collected. By connecting multiple 12V batteries in series, you create a battery bank that can handle the 24V system, allowing for effective energy storage and usage.
Finally, proper wiring and connectors are indispensable for establishing safe and reliable connections between the solar panel, converter, charge controller, and batteries. Using high-quality components reduces the risk of energy loss and ensures the system operates correctly.
How Do I Properly Install These Components for Effective Charging?
Inverter (if needed): If you plan to use AC appliances, an inverter will be necessary to convert the DC power from the batteries to AC power. Make sure the inverter’s capacity matches the total load of the appliances you intend to use. Properly connect the inverter to the battery bank and ensure it has adequate ventilation for heat dissipation during operation.
What are the Benefits of Using 12V Solar Panels to Charge 24V Batteries?
The benefits of using 12V solar panels to charge 24V batteries include enhanced efficiency, versatility in applications, and cost-effectiveness.
- Increased Efficiency: Using a 12V solar panel to charge a 24V battery system can enhance overall efficiency when paired with the right charge controller. The charge controller can optimize the charging process, ensuring that the battery receives the correct voltage and current, which can lead to faster charging times.
- Cost-Effectiveness: 12V solar panels are often more affordable than higher voltage panels, making them a budget-friendly option for users looking to set up a solar charging system. By utilizing a 12V system, users can save on initial investment costs while still achieving effective battery charging.
- Versatility: 12V solar panels are widely available and can be used in a variety of applications, from small off-grid systems to larger setups. This versatility allows users to easily integrate them with existing 12V systems or to create hybrid systems that can accommodate both 12V and 24V batteries.
- Scalability: When using 12V solar panels, users can easily scale their systems by adding more panels to increase power output as needed. This flexibility is beneficial for users who may wish to expand their solar setup over time without having to replace existing panels.
- Availability of Components: The components necessary for a 12V solar system, such as charge controllers and inverters, are widely available and often more affordable. This accessibility makes it easier for users to find suitable parts that work seamlessly with their solar panel setup.
Are There Any Drawbacks or Limitations to Consider?
Battery compatibility must be considered as not all 24v batteries are designed to accept a 12v input. It’s crucial to ensure that the battery management system can handle the charging requirements from a lower voltage source.
System complexity increases as additional components such as charge controllers, inverters, and specialized wiring become necessary to accommodate the connection. This can lead to higher initial costs and more points of potential failure within the system.
Finally, space requirements may grow if multiple panels are needed to meet the power demands of charging 24v batteries. This can be a limiting factor in smaller installation areas where solar panel placement is constrained.
What Common Mistakes Should I Avoid When Charging 24V Batteries with 12V Solar Panels?
When charging 24V batteries with 12V solar panels, it’s essential to avoid several common mistakes that can hinder efficiency and battery health.
- Incorrect Wiring Configuration: Ensuring that the solar panels are wired correctly is crucial for proper voltage output. For charging 24V batteries, you will need to connect two 12V panels in series to achieve the necessary voltage; failing to do so can lead to inadequate charging.
- Ignoring Charge Controller Requirements: A suitable charge controller is necessary to manage the charging process effectively. Using a charge controller designed for 12V systems when charging 24V batteries can result in overcharging, damaging the batteries and reducing their lifespan.
- Not Considering Temperature Effects: Temperature can significantly affect battery performance and charging efficiency. Failing to account for temperature variations can lead to improper charging rates, as batteries may either overheat or fail to charge adequately in cold conditions.
- Neglecting Battery Maintenance: Regular maintenance is vital to ensure the longevity of batteries. Not checking water levels in flooded lead-acid batteries or allowing sulfate buildup can lead to reduced capacity and performance over time.
- Using Incompatible Battery Types: Different battery types have varying charging requirements and tolerances. Using a battery not suited for solar charging, such as certain lithium types without the appropriate management systems, can lead to inefficiencies or even safety hazards.
- Overlooking System Sizing: It’s important to ensure that the solar panel system is adequately sized for the battery bank. If the solar panels cannot produce enough power to meet the charging needs of the 24V battery bank, it will lead to undercharging and diminished battery capacity.
What Precautions Should Be Taken to Ensure Safety and Efficiency?
To ensure safety and efficiency when connecting a 12V 1200W solar panel to charge 24V batteries, several precautions should be taken:
- Use a Charge Controller: A charge controller is essential to regulate the voltage and current coming from the solar panels to the batteries, preventing overcharging and potential damage.
- Correct Wiring Gauge: Selecting the appropriate wire gauge is crucial, as too thin wires can overheat and pose a fire risk, while too thick wires may be unnecessarily costly and difficult to handle.
- Proper Grounding: Grounding the solar panel system helps to prevent electrical shocks and protect equipment from surges or lightning strikes, ensuring the safety of both the system and the user.
- Battery Compatibility: Ensure that the batteries being charged are compatible with the solar panel system’s voltage and capacity to optimize performance and avoid damaging the batteries.
- Regular Inspection: Routine checks of all connections, wiring, and components are vital to identify wear, corrosion, or loose connections, which can lead to inefficiencies or safety hazards.
- Use Fuses or Breakers: Installing fuses or circuit breakers in the system can provide an additional layer of safety by preventing damage from overloads or short circuits.
A charge controller is essential to manage the flow of electricity from the solar panel to the batteries, preventing overcharging, which can lead to battery failure or even fire hazards. Additionally, it ensures that the batteries receive the correct voltage and current, extending their lifespan.
Selecting the correct wiring gauge is important to ensure that the system operates efficiently and safely. If the wires are too thin, they can overheat and create a fire risk, whereas wires that are too thick may not only be more expensive but can also complicate installation.
Proper grounding of the solar panel system is vital for safety. Grounding reduces the risk of electrical shocks and protects against surges and lightning strikes, safeguarding both the equipment and the user from potential harm.
Ensuring battery compatibility is crucial for the effectiveness of the charging system. Using batteries that match the solar panel’s output voltage and current will enhance performance and prevent damage that could occur from mismatched specifications.
Regular inspections of the system components help in identifying any issues such as corrosion, loose connections, or wear and tear that could affect the efficiency and safety of the solar charging system.
Fuses or circuit breakers act as protective devices in the solar panel system. They safeguard against overloads and short circuits, ensuring that if an issue arises, the system can be shut down to prevent damage to the components.
What Maintenance Tips Can Help Optimize My Solar Panel and Battery Connection?
Using a charge controller is essential for managing the energy flowing from the solar panels to the batteries. This device prevents overcharging, which can damage batteries and reduce their lifespan, while also ensuring that batteries are charged efficiently and safely.
Related Post: