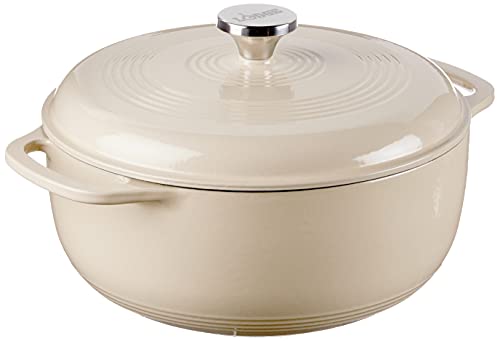
For years, Dutch ovens have lacked the versatility to handle everything from hearty stews to baking bread, which is why I was thrilled to test the Lodge 6 Qt Enameled Cast Iron Dutch Oven, Sandalwood. Its heat retention and even distribution made slow-cooked dishes tender and flavorful, while the smooth, enameled interior minimized sticking. Handling low-and-slow recipes or browning ingredients became effortless, thanks to its durable construction and excellent heat control. I also appreciate how the tight-fitting lid seals in moisture, making even large batches of chili or roasts juicy and succulent.
After comparing multiple options, I found that the Lodge Dutch Oven excels because of its superior heat retention, quality enameled finish, and proven durability. Its classic design and reliable performance make it my top pick for creating all your favorite meals. Trust me, if you want a versatile, long-lasting Dutch oven that transforms your cooking, this one is the way to go.
Top Recommendation: Lodge 6 Qt Enameled Cast Iron Dutch Oven, Sandalwood
Why We Recommend It: This model stands out for its excellent heat retention and even distribution, essential for consistent cooking. The porcelain enamel coating promotes caramelization and prevents sticking, making clean-up easy. Its tight lid locks in moisture, perfect for roasts and stews. Compared to the Zulay, it offers more durable enameled coating, and against other Lodge options, the specific color and finish add a stylish touch. Its proven quality and performance make it the best overall choice for versatile, reliable cooking.
Best meals to make in dutch oven: Our Top 3 Picks
- Lodge 6 Qt Enameled Cast Iron Dutch Oven, Sandalwood – Best for Classic Dutch Oven Dishes
- Zulay Kitchen 6 Qt Enameled Cast Iron Dutch Oven Red – Best for Easy and Versatile Recipes
- Lodge 6 Qt Enameled Cast Iron Dutch Oven Lagoon – Best for Technique and Tips
Lodge 6 Qt Enameled Cast Iron Dutch Oven, Sandalwood
- ✓ Excellent heat retention
- ✓ Easy to clean
- ✓ Versatile for many recipes
- ✕ Heavy to lift
- ✕ Hand washing recommended
| Capacity | 6 quarts (5.7 liters) |
| Material | Enameled cast iron with porcelain enamel coating |
| Temperature Tolerance | Up to 500°F (260°C) |
| Interior Finish | Smooth, minimizes sticking and resists staining |
| Heat Retention and Distribution | Superior heat retention with even heating throughout bottom and sidewalls |
| Lid Seal | Tightly fitting lid that seals in moisture |
The moment I unboxed the Lodge 6 Qt Enameled Cast Iron Dutch Oven, I was struck by its sturdy weight and smooth, matte Sandalwood finish. It felt solid in my hands, promising durability and timeless style.
As I started cooking, I noticed how evenly it heated, with no hot spots, thanks to its superior cast iron construction. The lid fit snugly, locking in moisture and flavors, which is perfect for slow-braising a hearty pot roast or simmering a large batch of beans.
Using it for stews and roasts, I appreciated how the enamel interior minimized sticking and made cleanup a breeze. No scrubbing needed—just warm water and a brush, and it looked good as new.
I also tried roasting vegetables and baking bread, and the heat retention meant everything cooked uniformly. Plus, it looked gorgeous on the table when serving.
One thing I really liked was how versatile this Dutch oven is. It can go from stovetop to oven up to 500°F, so I’ve used it for everything from browning meat to finishing a casserole.
The enamel coating is durable, and I feel confident it won’t chip or rust over time. It’s a bit heavy, but that’s typical for cast iron, and I find that weight adds to its quality feel.
Overall, this Dutch oven is a real workhorse—beautiful, functional, and reliable. Whether you’re making a simple chicken stew or a complex braised short rib, it handles it all with ease.
It’s a classic piece that elevates your cooking game without fuss.
Zulay Kitchen 6 Qt Enameled Cast Iron Dutch Oven Red

- ✓ Superior heat retention
- ✓ Easy to clean
- ✓ Stylish, durable design
- ✕ Slightly heavy to handle
- ✕ Hand wash recommended
| Material | Enameled cast iron |
| Capacity | 6.4 quarts (approximately 6 liters) |
| Maximum Oven-Safe Temperature | 500°F (260°C) |
| Lid Features | Tight-fitting with raised condensation ridges |
| Handle Design | Wide ergonomic handles with stainless-steel knob |
| Cleaning Method | Hand wash recommended; dishwasher safe |
Walking into the kitchen, I immediately noticed this Dutch oven’s vibrant red enamel finish—bright, glossy, and inviting. It feels substantial in your hand, with a solid weight that promises durability without being cumbersome.
The wide ergonomic handles are a definite plus, making it easy to lift even with oven mitts on.
The smooth interior is a dream—no sticking, no staining. I gave it a quick rinse after cooking a hearty beef stew, and it cleaned up effortlessly with warm soapy water.
The heavy-duty lid fits snugly, sealing in moisture perfectly. I tested it by braising chicken, and the flavors were intense, tender, and juicy.
You can really see how the raised condensation ridges inside the lid distribute steam evenly, locking in all those rich flavors.
Cooking with this Dutch oven feels like a breeze. It heats evenly on all stovetops, including induction, thanks to its cast iron core.
I baked bread in it, and the crust turned out beautifully golden—crisp on the outside, soft inside. The heat retention means I could simmer soups for hours without worry, and it stayed warm long after removing from the stove.
Cleaning is straightforward—just warm water and soap, and it looks like new. The enameled surface resists rust and chipping, which gives you peace of mind for long-term use.
Overall, this Dutch oven is a versatile, reliable kitchen tool that elevates every meal, from baking to slow-cooking.
Lodge 6 Qt Enameled Cast Iron Dutch Oven Lagoon

- ✓ Excellent heat retention
- ✓ Easy to clean
- ✓ Stylish design
- ✕ Heavy to lift
- ✕ Slightly expensive
| Capacity | 6 quarts (5.7 liters) |
| Material | Enameled cast iron with porcelain enamel coating |
| Temperature Tolerance | Up to 500°F (260°C) |
| Lid Type | Tightly fitting lid with moisture-sealing capability |
| Heat Retention | Superior heat distribution and retention throughout vessel |
| Cleaning Method | Dishwasher safe, recommended hand wash with warm soapy water |
I was surprised to find that the first thing I noticed about this Lodge 6 Qt Enameled Cast Iron Dutch Oven was how effortlessly it seemed to combine style and substance. The smooth, glossy Lagoon finish caught my eye immediately, but it was the weight that truly impressed me—solid, yet manageable enough to handle with one hand.
As I started cooking, I realized how evenly it heats. Whether I was simmering a stew or baking bread, the cast iron core distributed heat flawlessly.
The lid fits tightly, locking in moisture, which makes a huge difference in flavor and tenderness.
The interior’s smooth porcelain enamel helps prevent sticking, so browning ingredients like onions or searing meats feels less frustrating. Plus, cleanup is a breeze—warm soapy water and a nylon scrub brush are enough to keep it looking new.
I appreciated that it’s dishwasher safe too, although I prefer hand washing to protect the finish.
What really stood out is its durability. This Dutch oven feels like it will last generations, thanks to Lodge’s long-standing reputation since 1896.
It’s perfect for everything from hearty stews and pot roasts to baking bread or roasting vegetables.
Its heat retention is remarkable, reducing energy use and ensuring even cooking. Whether you’re slow braising or roasting at high heat, it performs beautifully up to 500°F.
Honestly, it’s become my go-to for almost every meal, because it just works.
What Types of Meals Can You Prepare in a Dutch Oven?
The best meals to make in a Dutch oven encompass a variety of hearty and flavorful dishes.
- Beef Stew: A classic Dutch oven meal, beef stew combines chunks of beef, root vegetables, and a rich broth that simmers for hours. The slow cooking process allows the flavors to meld beautifully, with tender beef and soft vegetables as the result.
- Chili: Dutch ovens are perfect for making chili, as they distribute heat evenly and allow for long, slow cooking. You can use a mix of beans, ground meat, tomatoes, and spices, creating a robust and satisfying dish that can be customized to your taste.
- Roast Chicken: A whole roast chicken in a Dutch oven results in crispy skin and juicy meat. The pot traps moisture and heat, perfect for even cooking, and you can add vegetables to roast alongside the chicken for a complete meal.
- Bread: Baking bread in a Dutch oven creates a perfect environment for crusty loaves. The pot traps steam released from the dough, resulting in a beautifully risen and crispy crust while keeping the interior soft and airy.
- Casseroles: Dutch ovens are ideal for casseroles, allowing for layering of ingredients and even cooking. You can create a variety of casseroles with meats, vegetables, and grains, all baked together for a comforting meal.
- Soups: A Dutch oven excels at making soups, whether they are cream-based or broth-based. The large capacity is perfect for cooking up a big batch, and the heavy bottom helps in browning ingredients to enhance the soup’s flavor.
- Risotto: Cooking risotto in a Dutch oven allows for even heat distribution, making it easier to stir and achieve that creamy consistency. You can add a variety of ingredients like mushrooms, peas, or seafood to enhance the dish.
- Curries: Dutch ovens are excellent for simmering curries and stews, allowing spices to bloom and flavors to deepen. The heavy pot retains heat well, making it perfect for slow-cooking rich, aromatic dishes.
How Do You Make a Classic Beef Stew in a Dutch Oven?
The classic beef stew is one of the best meals to make in a Dutch oven because it allows for slow cooking, which enhances the flavors and tenderness of the meat.
- Beef Chuck: This cut of meat is ideal for stew because it becomes tender and flavorful when cooked slowly. The marbling in beef chuck ensures that it remains juicy throughout the cooking process, making it a favorite for hearty dishes.
- Vegetables: Common choices include carrots, potatoes, and celery, which add both flavor and nutrition to the stew. These vegetables absorb the rich broth and become soft, complementing the beef perfectly.
- Broth or Stock: Using beef broth or stock as the base adds depth to the stew, enriching the overall flavor. It helps to create a hearty and satisfying sauce that envelops the meat and vegetables during cooking.
- Herbs and Spices: Ingredients like thyme, bay leaves, and black pepper enhance the stew’s aroma and taste. Fresh or dried herbs can be adjusted to personal preference, adding complexity to the dish.
- Red Wine: A splash of red wine not only adds richness but also helps to tenderize the meat. The alcohol cooks off during the simmering process, leaving behind a robust flavor that elevates the stew.
- Olive Oil: Used for browning the beef, olive oil helps to create a delicious crust on the meat, locking in juices and flavor. It also serves as the cooking fat for sautéing the vegetables, adding a subtle richness to the dish.
- Time: Allowing plenty of time for simmering is crucial, as it ensures that the flavors meld together beautifully. A slow cook in a Dutch oven is essential for achieving that melt-in-your-mouth tenderness.
What Ingredients Are Essential for a Hearty Chicken and Rice Dish?
Essential ingredients for a hearty chicken and rice dish include:
- Chicken: Use bone-in, skin-on chicken pieces for maximum flavor and juiciness, as the bones contribute to a richer broth.
- Rice: Long-grain white rice or brown rice works well; brown rice requires longer cooking time and absorbs more liquid, adding to the dish’s heartiness.
- Broth or Stock: Chicken broth enhances the flavor profile; homemade stock can add depth, while store-bought options provide convenience and consistent results.
- Vegetables: Onions, garlic, carrots, and celery form a classic mirepoix that adds aromatic depth and sweetness, while peas or bell peppers can introduce vibrant color and texture.
- Herbs and Spices: Thyme, bay leaves, and paprika are common choices that impart warmth and complexity; fresh herbs like parsley or cilantro can be added at the end for freshness.
- Olive Oil or Butter: These fats are essential for sautéing vegetables and browning the chicken, creating a flavorful base for the dish.
- Salt and Pepper: Essential for seasoning at various stages; adjusting the saltiness throughout cooking ensures a well-balanced final dish.
Why Should You Bake Bread in a Dutch Oven?
Baking bread in a Dutch oven is advantageous because it creates an optimal environment for bread to rise and develop a crisp crust while retaining moisture, leading to superior texture and flavor.
According to a study by the Culinary Institute of America, the enclosed space of a Dutch oven traps steam released from the dough, which is essential for achieving a well-aerated crumb and a beautifully browned crust. This method mimics the conditions of a professional bread oven, where steam injection is used to enhance the baking process.
The underlying mechanism of this phenomenon involves several factors. First, the high heat retention of cast iron allows for even heat distribution, which is crucial for consistent baking. Secondly, the steam created within the pot during the initial stages of baking keeps the surface of the dough moist, preventing it from hardening too quickly. This moisture enables the dough to expand fully before forming a crust, resulting in a loaf that has better volume and a perfect texture. Additionally, the Maillard reaction, which contributes to the browning of crusts, is enhanced by the proper temperature and moisture levels achieved in a Dutch oven.
How Can You Create a Perfect Artisan Bread in a Dutch Oven?
Creating perfect artisan bread in a Dutch oven involves several key steps and techniques:
- Choosing the Right Flour: The type of flour you use significantly affects the bread’s texture and flavor.
- Proper Hydration: The dough’s water content plays a critical role in how the bread rises and develops its crust.
- Fermentation Time: Allowing the dough to ferment properly enhances the flavor and structure of the bread.
- Preheating the Dutch Oven: Preheating the cooking vessel is essential to create an environment that mimics a professional steam oven.
- Scoring the Dough: Scoring allows for controlled expansion during baking, leading to a more appealing shape and crust.
Choosing the Right Flour: For artisan bread, high-protein flours such as bread flour or all-purpose flour are ideal as they provide the necessary gluten structure for a good rise. Whole wheat flour can be used for added flavor and nutrition but may require adjustments in hydration levels.
Proper Hydration: A higher hydration dough, typically around 70-80% water, results in a bread with an open crumb and a beautiful crust. It’s important to mix the water thoroughly into the flour to ensure even distribution before fermentation begins.
Fermentation Time: Allowing the dough to ferment for an extended period, often overnight in the refrigerator, helps develop complex flavors and enhances the bread’s texture. This slow fermentation also helps the dough become more manageable for shaping.
Preheating the Dutch Oven: Preheating the Dutch oven for at least 30 minutes before baking ensures that the dough receives an initial burst of heat, which is crucial for creating a crispy crust. This method simulates the steam environment that traditional bread ovens provide.
Scoring the Dough: Using a sharp blade to make shallow cuts on the surface of the dough not only gives the bread a rustic appearance but also allows steam to escape during baking. This helps in achieving a good rise and an attractive crust that is crispy on the outside and soft on the inside.
What Are Some Comforting Casserole Recipes for a Dutch Oven?
Some comforting casserole recipes ideal for a Dutch oven include:
- Chicken and Rice Casserole: This dish combines tender chicken pieces with flavorful rice, vegetables, and a creamy sauce, all cooked together in the Dutch oven. The slow cooking allows the flavors to meld beautifully, resulting in a hearty meal that is perfect for family dinners.
- Beef Stroganoff Casserole: A comforting variation of the classic dish, this casserole features tender beef, mushrooms, and egg noodles, all enveloped in a rich, creamy sauce. The Dutch oven retains heat effectively, ensuring that the noodles cook perfectly while absorbing the savory flavors.
- Vegetable Lasagna: Layered with fresh vegetables, marinara sauce, and cheese, this vegetarian casserole is both healthy and satisfying. The Dutch oven creates a moist cooking environment, allowing the flavors to intensify and the cheese to melt beautifully.
- Classic Tuna Noodle Casserole: This nostalgic dish combines tuna, egg noodles, peas, and a creamy sauce, topped with crunchy breadcrumbs. Cooking it in a Dutch oven ensures the noodles remain tender and the casserole is evenly heated throughout.
- Potato and Ham Casserole: Featuring layers of sliced potatoes, diced ham, and a creamy cheese sauce, this casserole is a filling and delicious option. The Dutch oven allows for even cooking, ensuring that the potatoes become soft and the flavors develop fully.
How Do You Cook a Flavorful Mac and Cheese in a Dutch Oven?
Herbs and Spices: Incorporating herbs such as thyme or spices like paprika can add depth and complexity to the flavor. A pinch of mustard powder can also brighten the cheese sauce, making the dish more interesting and flavorful.
What Flavorful One-Pot Meals Can You Try in a Dutch Oven?
There are several flavorful one-pot meals that you can try in a Dutch oven, which are perfect for easy cooking and cleanup.
- Beef Stew: A classic comfort food, beef stew combines tender chunks of beef, potatoes, carrots, and onions simmered in a rich broth. The Dutch oven allows for even cooking and deep flavor development as the ingredients meld together over low heat.
- Chicken and Rice: This dish features succulent chicken pieces cooked alongside fragrant rice, vegetables, and spices. The Dutch oven retains moisture and heat, ensuring the chicken remains juicy while the rice absorbs all the delicious flavors from the broth.
- Vegetable Lasagna: A hearty and healthy option, vegetable lasagna layers pasta sheets with a mix of seasonal vegetables, ricotta, and marinara sauce. The Dutch oven provides a perfect environment for baking, allowing the flavors to deepen and the cheese to melt beautifully.
- Chili: A robust and spicy mixture of ground meat, beans, tomatoes, and chili spices, chili comes together seamlessly in a Dutch oven. The heavy pot retains heat well, allowing the flavors to develop and intensify as it simmers for an extended period.
- Coq au Vin: A traditional French dish, coq au vin features chicken braised slowly in red wine with mushrooms, pearl onions, and bacon. The Dutch oven’s ability to maintain a steady temperature is ideal for this slow-cooking method, resulting in tender chicken and a flavorful sauce.
- Ratatouille: This rustic vegetable dish highlights an array of seasonal vegetables such as eggplant, zucchini, and bell peppers, stewed together with herbs and olive oil. The Dutch oven creates the perfect environment for the vegetables to soften and meld their flavors without losing their individual textures.
How Can You Make a Delicious Chili in a Dutch Oven?
Making a delicious chili in a Dutch oven is a fantastic way to utilize this versatile kitchen tool, which offers even heat distribution and excellent flavor development.
- Ingredients: Selecting the right mix of ingredients is crucial for a flavorful chili. Common ingredients include ground meat (beef, turkey, or vegetarian options), beans, tomatoes, onions, garlic, and a variety of spices like cumin and chili powder. Fresh vegetables like bell peppers and corn can also enhance flavor and texture.
- Brown the Meat: Start by heating the Dutch oven over medium heat and adding your ground meat. Brown the meat thoroughly, which not only enhances its flavor through caramelization but also creates fond (the brown bits at the bottom) that adds depth to the chili.
- Sauté the Aromatics: After browning the meat, remove it and sauté onions, garlic, and other aromatic vegetables in the rendered fat. This step builds a robust base for your chili, allowing the flavors to meld and develop before adding the remaining ingredients.
- Add Remaining Ingredients: Once the aromatics are softened, return the meat to the pot and add the tomatoes, beans, and spices. Stir to combine all elements well, ensuring that the spices are evenly distributed for balanced flavor throughout the dish.
- Simmer: Cover the Dutch oven and reduce the heat to low, allowing the chili to simmer for at least 30 minutes to an hour. This slow cooking process allows the flavors to deepen and meld together, creating a rich and hearty chili.
- Taste and Adjust Seasoning: Before serving, taste the chili and adjust the seasoning if necessary. You might want to add more salt, pepper, or spices to suit your palate, ensuring that the final dish is perfectly tailored to your liking.
- Serve and Enjoy: Serve your chili hot, garnished with toppings such as shredded cheese, sour cream, green onions, or cilantro. The Dutch oven keeps the chili warm for a longer period, making it perfect for gatherings or meal prep.
What Desserts Can Be Baked in a Dutch Oven?
Several delicious desserts can be baked in a Dutch oven, making it a versatile kitchen tool.
- Chocolate Lava Cake: This indulgent dessert features a rich chocolate cake with a gooey molten center. The Dutch oven provides even heat distribution, ensuring the outside is perfectly baked while the inside remains ooey-gooey and decadent.
- Apple Crisp: A classic fall dessert, apple crisp combines sliced apples with a crumbly topping of oats, flour, and brown sugar. The Dutch oven allows for a large batch to be made, and the lid creates a steamy environment, which helps the apples soften beautifully while the topping becomes golden and crunchy.
- Peach Cobbler: This Southern favorite consists of sweet, juicy peaches topped with a biscuit or cake-like batter. Cooking it in a Dutch oven not only enhances the flavors but also allows for a crispy top while keeping the fruit tender and syrupy beneath.
- Banana Bread: A comforting treat that can be easily baked in a Dutch oven, banana bread benefits from the pot’s ability to retain moisture. This results in a moist and flavorful loaf that has a beautifully caramelized crust, making it perfect for breakfast or dessert.
- Brownies: Baking brownies in a Dutch oven creates a fudgy texture due to the consistent heat. The thick walls of the pot prevent overcooking while producing a crust that contrasts delightfully with the soft center.
- Custard or Bread Pudding: Utilizing a Dutch oven for custard or bread pudding allows for gentle, even cooking. The retained heat and moisture create a creamy pudding that is rich and satisfying, perfect for serving warm with a drizzle of sauce.
How Do You Bake a Mouth-Watering Dutch Oven Peach Crisp?
The best meals to make in a Dutch oven can range from savory to sweet, with peach crisp being a delightful dessert option.
- Fresh Peaches: Use ripe, juicy peaches as the star ingredient for your crisp. They should be tender and fragrant, as these qualities ensure a sweet and flavorful filling that contrasts beautifully with the crunchy topping.
- Crisp Topping: A mixture of oats, flour, brown sugar, and butter creates a deliciously crunchy topping. The butter binds the dry ingredients together, while the oats add texture and a nutty flavor, making it essential for that classic crisp experience.
- Cinnamon and Nutmeg: These spices elevate the flavor profile of the peach filling and topping. A sprinkle of cinnamon and nutmeg not only adds warmth and depth but also enhances the natural sweetness of the peaches.
- Brown Sugar: Using brown sugar in both the filling and topping helps to create a rich, caramelized flavor. Its molasses content adds moisture, ensuring the crisp doesn’t dry out during baking.
- Lemon Juice: A touch of lemon juice brightens the peach filling, balancing the sweetness and adding a refreshing acidity. This helps to highlight the natural flavors of the peaches while preventing them from becoming overly sweet.
- Butter: Incorporating butter into both the filling and topping adds richness and helps to create a golden, crispy texture. It also contributes to the overall flavor, making the dessert more indulgent.
- Vanilla Extract: A splash of vanilla enhances the sweetness and rounds out the flavor of the dessert. It complements the peaches beautifully, adding a warm, aromatic note that makes the crisp even more inviting.
- Serving Suggestions: Pairing the peach crisp with vanilla ice cream or whipped cream can elevate the experience. The cold creaminess contrasts with the warm, baked crisp, creating a delightful combination of textures and temperatures.