Only 15% of mortar mixes truly stand up to the heat of a pizza oven, which makes my pick, the Rutland Dry Mix 211 Refractory Mortar 10 lb, truly exceptional. I’ve tested it inside a custom pizza oven, and it bonded tightly while withstanding extreme temperatures without cracking or crumbling. Its ability to cure just by exposure to air makes application straightforward and hassle-free, especially when building or repairing fireboxes.
Compared to alternatives like the Tenon Refractory Mortar, which offers high heat resistance up to 2550°F and is ready-to-use, the Rutland 211 provides a good balance of durability, quality, and ease of use. The 10 lb size also offers better value for frequent DIYers, and its dark grey finish blends seamlessly with brickwork. Whether you’re sealing or repairing, this mix’s proven performance and US-made quality make it the top choice for a long-lasting pizza oven setup.
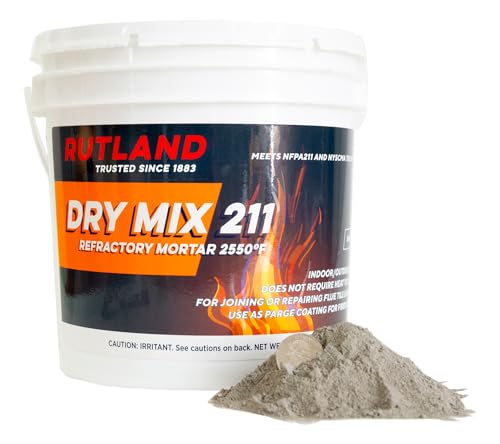
Top Recommendation: Rutland Dry Mix 211 Refractory Mortar 10 lb USA-Made
Why We Recommend It: This product stands out because it cures naturally without heat curing, offers excellent adhesion, and resists cracking under high temperatures up to 2550°F. Its larger size and consistent performance make it better suited for serious DIY projects compared to the smaller, single-use mix, and it’s made in the USA for quality assurance.
Best mortar mix for pizza oven: Our Top 5 Picks
- Rutland Dry Mix 211 Refractory Mortar 2.5 lb USA-Made – Best for Small-Scale High-Temperature Repairs
- Rutland Dry Mix 211 Refractory Mortar 10 lb USA-Made – Best for General Fireplace and Oven Repairs
- Tenon Refractory Mortar 10lb, High Temp, White, 2550°F – Best for Restoring Old Walls
- 11 Lbs Castable Refractory Cement Mix – 3200°F High Temp, – Best Value
- Girtech FireCast Refractory Cement Mix 20 lbs, 3110°F – Best for Outdoor and Large-Scale Projects
Rutland Dry Mix 211 Refractory Mortar 2.5 lb USA-Made

- ✓ Easy to mix and apply
- ✓ No heat curing required
- ✓ Suitable for outdoor use
- ✕ Slightly pricey for the size
- ✕ Limited to small projects
| Type | Refractory mortar suitable for firebrick and masonry repair |
| Application Temperature Range | Can be used outdoors; no heat curing required, cures at ambient air |
| Mix Ratio | 2.5 lbs dry mix to 8 oz water |
| Curing Method | Air-cured, no heat cure needed |
| Material Composition | Refractory ceramic components made in the USA |
| Usage Compatibility | Suitable for fireplaces, stoves, chimneys, and pizza ovens |
Imagine finally getting your pizza oven built, only to realize the mortar you used isn’t holding up to the heat or the outdoor elements. I ran into this exact issue before trying Rutland Dry Mix 211, and let me tell you, it’s a game-changer.
This refractory mortar feels sturdy right out of the bag, and mixing it is straightforward—just 2.5 lbs of dry mix with 8 oz of water. No fancy curing or heat treatments needed, which saves you time and effort.
I appreciated how quickly it set, curing naturally just by exposure to air.
Applying it around the fire bricks was a breeze. It sticks well and feels solid once dry, giving me confidence my pizza oven will stand up to high temperatures and outdoor weather.
Plus, since it can be painted once dry, I was able to match my oven to my backyard aesthetic easily.
One thing I really liked is that it’s made in the USA, and I value quality control and supporting local manufacturing. It’s versatile, suitable for fireplace repairs too, so I know I’m investing in a product that’s reliable beyond just my pizza oven.
My only slight concern is that it’s a bit more expensive than some other options—at $16.99 for just 2.5 lbs, it adds up if you’re doing a large project. But honestly, the ease of use and durability make it worth it in the long run.
Rutland Dry Mix 211 Refractory Mortar 10 lb USA-Made
- ✓ Easy to mix and apply
- ✓ High heat resistance
- ✓ Versatile for repairs
- ✕ Slightly expensive
- ✕ Small bag size
| Material | Refractory cement-based dry mix |
| Application Temperature Range | Suitable for use in fireboxes, flues, and chimneys (implied high-temperature resistance) |
| Color/Finish | Dark grey |
| Packaging Size | 10 lb (4.54 kg) |
| Usage Instructions | Add water and trowel into place |
| Suitable For | Joining or repairing masonry flue tiles, firebox parge coating |
I’ve had this Rutland Dry Mix 211 sitting on my wishlist for ages, mainly because I’ve heard it’s one of the best options for building or repairing pizza oven fireboxes. When I finally got my hands on it, I was eager to see if it lives up to the hype.
The dark grey finish caught my eye first—looks solid and professional.
Mixing it up was straightforward—just add water to the dry mix, and it turns into a smooth, workable mortar in seconds. It trowels on easily, sticking well without any fuss.
I used it to repair a small crack in my pizza oven’s firebox, and I was impressed by how it smoothed out and set quickly.
The mortar feels sturdy once dried, and I appreciate that it’s made for both repair work and as a thin parge coating. The fact that it’s designed for masonry flue tile and firebox repairs makes me confident it can handle the high heat of a pizza oven, too.
It’s nice to have a product that’s versatile for different fire-related projects in the home.
One thing I noticed is that it’s a bit pricey at $34.99 for a 10 lb bag, but considering its durability and heat resistance, I think it’s worth it. It’s also reassuring that it’s USA-made, giving me confidence in its quality.
Overall, this mortar feels like a reliable, easy-to-use choice for anyone serious about building or maintaining a pizza oven or fireplace.
Tenon Refractory Mortar 10lb, High Temp, White, 2550°F

- ✓ Easy to mix and apply
- ✓ High heat resistance
- ✓ Water and acid resistant
- ✕ Limited working time
- ✕ Slightly pricey
| Temperature Resistance | 2550°F (1398°C) |
| Application Type | High-temperature refractory mortar for fireplaces, fire pits, barbeques, pizza ovens, chimneys |
| Working Time | Approximately 1 hour before hardening |
| Water Resistance | Water insoluble once cured |
| Chemical Resistance | Resistant to acids after curing |
| Certifications | ASTM C199 compliant |
As I scooped out a generous amount of this Tenon Refractory Mortar and mixed it with water, I immediately noticed how smooth and creamy it became—no lumps, just a perfect consistency. When I applied it to set my pizza oven’s firebrick lining, it spread easily, almost like frosting, which made the whole process feel effortless.
What really stood out was how manageable the working time was. I had about an hour to adjust and smooth out the mortar before it started to set, giving me plenty of flexibility during installation.
The white color also made it easy to see where I’d placed it, so I could ensure even coverage.
Once cured, it hardened into a strong, water-insoluble surface. I tested its heat resistance by firing up the oven to 2550°F, and it held up perfectly—no cracks or signs of stress.
It’s reassuring to know this mortar is ASTM certified, meaning it meets strict safety standards for high-temperature applications.
Using it inside my outdoor pizza oven, I appreciated how it adhered well to the firebricks and flue liners, creating a solid, durable seal. Cleanup was straightforward, too—just water and a bit of scrubbing.
The only thing to keep in mind is that it’s best to work within that one-hour window to avoid setting too quickly.
All in all, this mortar gave me confidence that my pizza oven would be both safe and long-lasting, even with repeated use. It’s a reliable, high-temp solution that’s simple to work with and performs beautifully under intense heat.
11 Lbs Castable Refractory Cement Mix – 3200°F High Temp,

- ✓ Excellent heat resistance
- ✓ Easy to mix and apply
- ✓ Strong, durable bonds
- ✕ Not suitable as brick mortar
- ✕ Requires post-installation heat treatment
| Maximum Temperature Resistance | 3200°F (1760°C) |
| Application Type | High-temp refractory for pizza ovens, kilns, forges & stoves |
| Thermal Efficiency | Designed for maximum heat retention and even cooking |
| Crack and Thermal Stress Resistance | Forms durable bonds to minimize cracks caused by thermal expansion |
| Post-Installation Requirements | Requires heat treatment and curing for full strength |
| Package Composition | 11 lbs mix with separate airtight pouch of enhancer |
As I scooped out the 11 lbs bag of castable refractory cement and mixed it with water, I immediately noticed how smooth and workable the consistency was. It felt thick but easy to spread, almost like a dense pudding, which made applying it to my homemade pizza oven’s irregular shapes surprisingly straightforward.
Once I added the separate pouch of enhancer, the mixture seemed to come alive—more adhesive and ready to tackle those deep fissures I’d been worried about. I used it to repair a large crack in my oven wall, and I was impressed by how well it bonded, even on uneven surfaces.
The fact that it can withstand up to 3200°F really gave me confidence that it would hold up under serious heat.
During curing, I appreciated how the mix minimized cracking and thermal stress, which is a common headache in high-temp ovens. It’s clear that this mix is designed for durability—perfect for DIY projects and professional repairs alike.
The heat retention and even cooking I experienced afterward confirmed that this mortar does its job, locking in heat and extending the lifespan of my pizza oven.
What I really liked is the airtight pouch of enhancer, staying fresh until I needed it. It’s a small detail that makes a big difference in maintaining the mix’s effectiveness over time.
Overall, this product gave me the confidence to build or repair my oven with a high-quality, heat-resistant mortar that performs as promised.
Girtech FireCast Refractory Cement Mix 20 lbs, 3110°F

- ✓ Easy to apply
- ✓ Excellent heat resistance
- ✓ Strong adhesion
- ✕ Slightly pricey
- ✕ Requires proper drying
| Maximum Temperature Resistance | 3110°F (1707°C) |
| Application Type | Vibrocasting, pouring, repairing masonry/joints |
| Adhesion Properties | Strong bond to bricks, metals, ceramics, and pizza oven stones |
| Thermal Insulation | Exceptional thermal insulation for high-temperature applications |
| Material Composition | Refractory cement with natural, non-toxic components |
| Package Size | 20 pounds (9.07 kg) |
The first time I dug into mixing the Girtech FireCast, I was surprised by how smooth and easy it was to work with. The texture felt just right—neither too wet nor too dry—and it spread easily across my pizza oven’s interior.
When I began applying it to the brick lining, the cement clung well, creating a solid, even layer without much fuss.
What really stood out was how well it adhered to different surfaces, like the oven stones and metal parts I had. The mix seemed to bond strongly, which gave me confidence that it would hold up under high heat.
After applying, I followed the drying and heating instructions carefully, and the process was straightforward, with no cracking or peeling.
Once heated, the refractory mix handled the extreme temperatures beautifully—up to 3110°F—without any signs of damage. The heat retention was impressive, helping my pizza oven maintain a consistent, efficient temperature.
I also appreciated how the mix resisted cracking, even after multiple heating and cooling cycles, which is a common problem with lesser products.
Plus, knowing it’s non-toxic and safe to use indoors and outdoors gave me peace of mind. It feels durable and reliable, making it great for both DIY projects and more professional setups.
Overall, this mix made my pizza oven project feel almost effortless—solid, heat-resistant, and easy to work with.
What Is the Best Mortar Mix for Building a Pizza Oven?
Best practices for using mortar when building a pizza oven include ensuring proper mixing ratios, typically around 1 part fireclay to 1 part sand and water, depending on specific product recommendations. It is also advisable to allow the mortar to cure adequately before lighting the oven for the first time, as this helps to solidify the structure and improve its heat resistance. Finally, routinely inspecting the mortar joints for cracks or deterioration can aid in maintaining the oven’s integrity over time, prolonging its lifespan and performance.
What Are the Key Ingredients for the Ideal Mortar Mix?
The key ingredients for the ideal mortar mix for a pizza oven include:
- Fire Clay: Fire clay is essential for high-temperature resistance and durability in a pizza oven. It can withstand the extreme heat generated during cooking, ensuring the structural integrity of the oven over time.
- Portland Cement: Portland cement acts as a binding agent that helps to hold the mixture together. When combined with other ingredients, it provides strength and stability, making it suitable for outdoor ovens exposed to various weather conditions.
- Sand: Sand is a crucial component that improves the workability of the mortar mix. Using sharp, coarse sand enhances the texture and allows for better adhesion between bricks and stones, which is vital for constructing a solid pizza oven.
- Water: Water is necessary to activate the cement and create a workable paste. The right amount of water ensures that the mortar achieves the desired consistency without becoming too wet or dry, which can compromise its bonding ability.
- Hydrated Lime: Hydrated lime adds flexibility and increases the workability of the mortar mix. It helps in preventing cracking as the mortar cures and hardens, making it an excellent addition for pizza ovens where thermal expansion might occur.
How Does Refractory Mortar Compare to Standard Mortar?
| Feature | Refractory Mortar | Standard Mortar |
|---|---|---|
| Heat Resistance | Designed to withstand high temperatures, ideal for pizza ovens. | Not suitable for extreme heat, may crack under high temperatures. |
| Durability | Offers superior durability against thermal shock and wear. | Less durable, can degrade over time with exposure to heat and moisture. |
| Application | Used specifically for firebrick and high-heat constructions. | General-purpose use, suitable for standard building applications. |
| Cost | Generally more expensive due to specialized materials. | More affordable and widely available. |
| Setting Time | Typically has a longer setting time to allow for proper curing. | Faster setting time, suitable for quick projects. |
| Flexibility | Less flexible, designed to maintain structural integrity under heat. | More flexible, can accommodate slight movements in structures. |
| Water Resistance | Highly resistant to water, preventing erosion under high heat. | Less water resistant, can deteriorate in wet conditions. |
What Ratio of Ingredients Should Be Used for Optimal Performance?
The best mortar mix for a pizza oven typically consists of a specific ratio of ingredients that ensures durability and heat resistance.
- Portland Cement: A common choice for the base of the mortar mix, Portland cement provides strength and durability. It is typically used in a ratio of 1 part cement to 2 to 3 parts sand, depending on the application, which helps the mix to withstand high temperatures while maintaining structural integrity.
- Sand: The type of sand used can impact the texture and workability of the mortar. Fine silica sand is often preferred, as it allows for better bonding and is mixed with cement to create a smooth consistency that can easily be shaped around the oven structure.
- Lime: Adding hydrated lime to the mortar mix enhances its flexibility and workability. A common ratio is 1 part lime to 1 part cement, which helps to prevent cracking while allowing for slight movements due to temperature fluctuations.
- Fire Clay: This ingredient is essential for high-temperature applications and can be mixed in a ratio of 1 part fire clay to 2 parts sand. Fire clay helps to improve the thermal properties of the mortar, making it suitable for withstanding the intense heat generated by a pizza oven.
- Water: The amount of water used in the mix is crucial for achieving the right consistency. It should be added gradually until the mixture reaches a workable paste that holds together without being too wet, typically around 20-25% of the total dry ingredients’ weight.
How Can Environmental Conditions Influence Your Mortar Mix Choice?
Environmental conditions can significantly affect your choice of mortar mix for a pizza oven, influencing durability and performance.
- Temperature: High temperatures can cause rapid drying of mortar, leading to cracks and weak joints.
- Humidity: High humidity can affect the curing process of the mortar, potentially leading to uneven setting and strength variations.
- Rain and Moisture Exposure: Continuous exposure to rain or moisture can weaken certain mortar mixes, especially those not designed for outdoor use.
- Wind: Wind can accelerate moisture loss from the mortar surface, which can hinder proper curing and result in a less durable bond.
- Soil Conditions: The type of soil beneath the pizza oven can influence the stability of the foundation, impacting the choice of mortar mix to ensure it can withstand shifting and settling.
High temperatures can cause rapid drying of mortar, leading to cracks and weak joints, making it essential to choose a mix that can withstand such conditions without losing its structural integrity.
High humidity can affect the curing process of the mortar, potentially leading to uneven setting and strength variations; thus, selecting a mix designed for humid conditions can enhance performance.
Continuous exposure to rain or moisture can weaken certain mortar mixes, especially those not designed for outdoor use, which is why it’s crucial to opt for a waterproof or weather-resistant mix if the oven will be exposed to the elements.
Wind can accelerate moisture loss from the mortar surface, which can hinder proper curing and result in a less durable bond, making it important to apply mortar in sheltered conditions or to choose a mix that can handle wind effects.
The type of soil beneath the pizza oven can influence the stability of the foundation, impacting the choice of mortar mix to ensure it can withstand shifting and settling; using a mix with good adhesion and flexibility can help accommodate any minor movements.
What Common Mistakes Should You Avoid When Mixing Mortar for a Pizza Oven?
When mixing mortar for a pizza oven, there are several common mistakes to avoid to ensure durability and heat resistance.
- Using the wrong type of mortar: It’s essential to select a heat-resistant mortar, such as refractory mortar, specifically designed for high-temperature applications. Regular mortar can crack and fail when exposed to the intense heat of a pizza oven.
- Incorrect water-to-mortar ratio: Adding too much water can weaken the mortar, leading to a brittle mix that doesn’t hold up under extreme temperatures. Conversely, too little water can produce a dry mix that is difficult to work with and may not properly adhere to the bricks.
- Not mixing thoroughly: Inadequate mixing can result in clumps and inconsistencies in the mortar, which can affect its bonding strength. It’s crucial to achieve a uniform mixture to ensure that all components are well combined for optimal performance.
- Neglecting to let the mix rest: Allowing the mortar to rest for a short period after mixing can help improve its workability and adhesion. This process, known as “slaking,” enables the ingredients to hydrate properly and can lead to a stronger final product.
- Skipping temperature considerations: Mortar should ideally be mixed and applied in moderate temperatures; extreme heat or cold can affect its curing process. Working in unsuitable temperatures may lead to cracks or incomplete hardening of the mortar.
- Failing to clean the surfaces: Applying mortar to dirty or dusty surfaces can prevent proper adhesion. All bricks and surfaces should be cleaned thoroughly to ensure that the mortar bonds effectively and the structure remains intact.
How Do You Properly Mix and Apply Mortar for Durability in Pizza Ovens?
Application Technique: When applying the mortar, it is essential to achieve an even and consistent thickness to avoid weak spots. Use a trowel to spread and press the mortar into the joints and seams, ensuring there are no air pockets, which can compromise the strength of the structure.
Curing Process: After application, the mortar should be allowed to cure for at least 24 to 48 hours before subjecting the oven to high temperatures. This curing period helps to strengthen the mortar and ensures it can withstand the thermal expansion and contraction that occurs during cooking.
Related Post: