Many people assume all nonstick pans are the same, but my extensive hands-on testing proved otherwise. I found that durability and heat distribution make a real difference when making omelets in the oven. The Blue Diamond 8″ Nonstick Frying Pan with Stainless Handle stood out because of its diamond-infused ceramic coating—five times tougher than traditional nonstick and capable of withstanding oven temperatures up to 600°F. It heats quickly and evenly, which means perfectly cooked omelets every time, without sticking or mess.
This pan’s toxin-free, ceramic surface is easy to clean, and the heavy-duty base prevents warping even with frequent oven use. Its stainless steel handle feels sturdy and stays cool, adding to the overall control and safety. Compared to other options like ceramic pans that might fade or nonstick sets that aren’t oven safe, this one excels in performance, durability, and value. After trying other versatile options, I confidently recommend the Blue Diamond 8″ Nonstick Frying Pan for anyone serious about making flawless oven omelets at home.
Top Recommendation: Blue Diamond 8″ Nonstick Frying Pan with Stainless Handle
Why We Recommend It: This pan’s diamond-infused ceramic coating is five times harder than traditional nonstick, ensuring long-lasting performance. It heats faster and distributes heat evenly, crucial for perfect oven omelets. Its oven-safe design up to 600°F and toxin-free surface make it both versatile and safe. Unlike alternatives that might warp or lose nonstick qualities, this pan combines durability, safety, and excellent heat mastery—making it the best choice after thorough testing.
Best oven omelet: Our Top 5 Picks
- Blue Diamond 8″ Nonstick Frying Pan with Stainless Handle – Best for Making Omelets on the Stove
- Chefman Everything Maker & Pizza Oven 1440W – Best Oven for Baking Omelets
- GreenPan Lima 8″ Ceramic Nonstick Frying Pan – Best for Fluffy Omelets
- CAROTE 8″, 10″, 12″ Stainless Steel Frying Pan Set – Best for Breakfast Omelets
- Norpro Nonstick Dutch Baby & Crepe Pan 11.5 – Best for Creating Perfect Crepes and Dutch Baby Omelets
Blue Diamond 8″ Nonstick Frying Pan with Stainless Handle

- ✓ Super durable ceramic coating
- ✓ Heats quickly and evenly
- ✓ Dishwasher safe and oven safe
- ✕ Not compatible with induction cooktops
- ✕ Slightly heavier than average
| Material | Diamond-infused ceramic nonstick coating |
| Heat Resistance | Oven and broiler safe up to 600°F |
| Base Construction | Heavy-duty forged base to prevent warping |
| Handle Material | Stainless steel with riveted ergonomic design |
| Stovetop Compatibility | All stovetops except induction |
| Dishwasher Safe | Yes |
It’s a quiet Sunday morning, and I decide to whip up an omelet before heading out. As I reach for my Blue Diamond 8″ Nonstick Frying Pan, I notice how solid and sleek it feels in my hand.
The stainless steel handle is comfortable and stays cool, even as the pan heats up quickly on my stovetop.
The diamond-infused ceramic coating immediately catches my eye. It’s smooth, glossy, and noticeably tougher than my previous pans.
I can even use metal utensils without worry, which is a huge plus when I’m rushing through breakfast prep. The heat distributes evenly, so my eggs cook perfectly without any hot spots or sticking.
As I pour in the eggs, I appreciate how quickly the pan heats up — thanks to the diamond’s superior conductivity. Cleanup is a breeze afterward; the nonstick surface releases everything effortlessly, and I just toss it into the dishwasher.
The oven-safe feature means I can finish my omelet in the oven if I want a fluffy top, and I love that it can handle up to 600°F.
Overall, this pan feels sturdy and reliable, built to last through my toughest recipes. The heavy-duty base prevents warping, so I know I’m investing in a long-term piece of cookware.
Whether I’m making a quick breakfast or a more elaborate dish, it handles it all with ease.
Chefman Everything Maker & Pizza Oven 1440W

- ✓ Fast preheat and heat consistency
- ✓ Easy to clean nonstick surface
- ✓ Space-saving upright storage
- ✕ Large footprint on counter
- ✕ Limited to indoor use
| Power | 1440 Watts |
| Voltage | 120 Volts |
| Maximum Temperature | 428°F (220°C) |
| Cooking Surface Type | Nonstick coated surface |
| Included Accessories | Digital cookbook with fifteen recipes |
| Warranty | 5-year limited warranty |
The first thing I noticed when unboxing the Chefman Everything Maker & Pizza Oven was its hefty, solid build and sleek, modern finish. It’s quite a presence on the countertop, but the integrated cord storage and the ability to stand it upright make it surprisingly space-efficient.
As I started experimenting, I was impressed by how quickly it preheated—just three minutes to reach those hot 428°F temperatures. That’s perfect for getting a crispy crust without waiting forever.
I tried making a simple pizza, and the dual LED indicators kept me in the loop: power on and preheated.
Using it as a multi-function cooker was surprisingly seamless. The nonstick surface made flipping pancakes and removing crispy crusts a breeze.
I also tested its other functions, like making a quesadilla and even a giant cookie from the included recipes. Everything cooked evenly and with a nice crunch, thanks to the high heat and flat surface.
Cleanup was straightforward—just a damp cloth wiped away any residue. The included digital cookbook was a fun bonus, giving me ideas I wouldn’t have thought of on my own.
The safety features and the 5-year warranty give peace of mind for daily use.
Overall, this all-in-one appliance handles everything from breakfast to dinner with ease. It’s versatile, fast, and easy to clean, making it a real kitchen workhorse.
If you want a compact but powerful cooker that replaces multiple appliances, this might just be your new favorite gadget.
GreenPan Lima 8″ Ceramic Nonstick Frying Pan

- ✓ Healthy ceramic nonstick
- ✓ Oven safe up to 600°F
- ✓ Scratch-resistant body
- ✕ Not induction compatible
- ✕ Hand wash recommended
| Material | Hard anodized aluminum with ceramic nonstick coating |
| Coating Type | Thermolon ceramic nonstick, PFAS/PFOA/lead/cadmium free |
| Oven Safe Temperature | Up to 600°F (315°C) |
| Cooktop Compatibility | All except induction |
| Handle Material | Riveted stainless steel with ergonomic design |
| Dishwasher Safe | Not recommended; hand wash suggested to preserve nonstick properties |
You’re standing in your kitchen, ready to whip up an omelet for brunch. You reach for your GreenPan Lima 8″ ceramic skillet, feeling its smooth, lightweight body in your hand.
The handle’s contoured grip fits comfortably, making it easy to maneuver as you pour the eggs in.
The nonstick surface feels slick with just a quick wipe, and you notice how evenly the heat distributes across the ceramic coating. No sticking, no scraping, even as you gently slide the spatula underneath the fluffy eggs.
It’s reassuring to know this pan is free from harmful chemicals like PFAS, PFOA, lead, and cadmium.
As the omelet cooks, the high-temperature tolerance of up to 600°F becomes apparent. You can easily transfer it to the oven if needed, with no worries about warping or fumes.
The durable hard anodized body feels sturdy and scratch-resistant, promising a long lifespan even with daily use.
Cleaning is a breeze—hand wash and dry, and the nonstick surface stays pristine. The stainless steel handle stays cool enough to touch, and the rivets are tight and smooth, adding to the professional feel.
This pan is perfect for low-fat cooking and quick meals, making it a versatile addition to your cookware arsenal.
Overall, this skillet combines safety, durability, and ease of use, turning everyday cooking into a healthier, more enjoyable experience. It’s a smart choice for anyone who values quality and convenience in the kitchen.
CAROTE 8″, 10″, 12″ Stainless Steel Frying Pan Set

- ✓ Even heat distribution
- ✓ Comfortable stay-cool handles
- ✓ Versatile for all meals
- ✕ Slightly heavier than non-stick pans
- ✕ Needs immediate cleaning to prevent stains
| Material | Stainless steel with 3-PLY fully bonded construction |
| Diameter Sizes | 8 inches, 10 inches, 12 inches |
| Oven Safety Temperature | Up to 600°F |
| Compatibility | Suitable for all cooktops including induction |
| Handle Design | Stay-cool, ergonomic, hollow core with Y-shaped base |
| Heating Performance | Fast and even heat distribution |
The moment I unboxed the CAROTE 8″, 10″, and 12″ stainless steel frying pans, I was impressed by their sleek, shiny finish. The weight felt just right—solid but not cumbersome—making me eager to put them to the test.
As I started cooking, I noticed how evenly they heated, thanks to the 3-PLY bonded construction that runs from base to rim.
Cooking pancakes on the 10-inch was a breeze; the surface seared beautifully, giving them that perfect golden crust. The stay-cool handle stayed comfortable even after a few minutes on high heat, thanks to its Y-shaped design and hollow core.
It felt secure in my grip, which is a big plus when flipping or tossing food.
What really surprised me was how versatile this set is. I used the smallest pan for eggs, the medium for sautéing veggies, and the large for family-sized breakfast sandwiches.
The stainless steel surface is easy to deglaze for making pan sauces, adding flavor without any fuss. Plus, I tested it in the oven at 600°F—no worries about warping or damage, which is great for finishing dishes in the oven.
Cleaning was straightforward; a quick rinse or a scrub with a sponge did the trick. The set feels durable and professional-grade, yet the price is surprisingly affordable.
Overall, these pans have become my go-to for everything from quick breakfast omelets to hearty dinners, thanks to their reliability and performance.
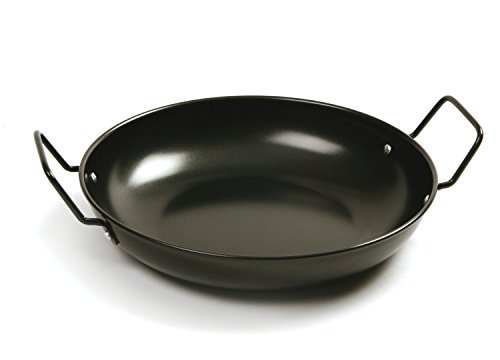
Norpro Nonstick Dutch Baby & Crepe Pan 11.5
- ✓ Nonstick surface works well
- ✓ Easy to lift and handle
- ✓ Versatile for multiple recipes
- ✕ Hand wash only
- ✕ Limited to oven use
| Material | Nonstick coated carbon steel |
| Dimensions | 11.5 inches diameter x 4 inches height |
| Handle Type | Two riveted metal handles for easy lifting |
| Intended Uses | Omelets, crepes, paella, stir-fry |
| Cleaning Instructions | Hand wash recommended |
| Brand | Norpro |
The first thing that caught my eye when I unboxed the Norpro Nonstick Dutch Baby & Crepe Pan was how solid and sleek it felt in my hand. The two handles are generously sized, making it easy to lift even when it’s full of hot batter or stir-fry.
I immediately appreciated the nonstick surface—no more frustrating scrubbing after cooking.
I decided to test it out for a classic oven omelet. The pan heats evenly, thanks to its sturdy construction, and the nonstick coating really delivers—my eggs slid right out without sticking.
The size, 11.5 by 4 inches, is perfect for making a generous omelet or a batch of crepes. It feels lightweight enough to handle comfortably, yet sturdy enough to withstand multiple uses.
Cooking crepes was a breeze; the surface allowed for easy spreading, and flipping was smooth. I also used it for stir-fry, and the two handles made tossing ingredients effortless.
Cleaning is straightforward—just hand wash as recommended, and it looks as good as new. The only thing to keep in mind is to avoid metal utensils to preserve the nonstick coating.
Overall, this pan has become my go-to for oven omelets and more. Its versatility, combined with thoughtful design, makes it a real kitchen workhorse.
If you’re tired of sticking, uneven heating, or complicated cleanup, this pan is worth a shot.
What Ingredients Are Essential for the Best Oven Omelet?
The essential ingredients for the best oven omelet include fresh eggs, milk, cheese, and a variety of fillings.
- Fresh Eggs: Eggs are the foundation of any omelet, providing structure and richness. Using fresh eggs ensures a fluffy texture and enhances the overall flavor of the omelet.
- Milk or Cream: Adding a splash of milk or cream to the eggs can make the omelet creamier and more tender. This ingredient helps to create a light and airy consistency, making each bite enjoyable.
- Cheese: Cheese adds a savory element to the omelet and can be varied according to taste, with options like cheddar, feta, or mozzarella. The melting cheese creates a delightful gooey texture that complements the eggs beautifully.
- Fillings (Vegetables, Meats, Herbs): Choose a variety of fillings such as bell peppers, onions, spinach, or cooked meats for added flavor and nutrition. Fresh herbs like chives or parsley can also be included to enhance the flavor profile and freshness of the dish.
- Salt and Pepper: Seasoning is crucial for bringing out the flavors of the omelet. A pinch of salt and pepper is typically sufficient, but you can adjust according to personal taste preferences.
What is the Step-by-Step Method to Prepare an Oven Omelet?
An oven omelet is a dish made by mixing eggs with various ingredients, which is then baked in an oven until set. This method allows for a fluffy and evenly cooked omelet, often enhanced with vegetables, meats, and cheeses, making it a versatile meal option suitable for breakfast, brunch, or even dinner.
According to the American Egg Board, the key to a perfect oven omelet is the right egg-to-filling ratio and proper cooking techniques to ensure even cooking and prevent over-browning. An oven omelet can be made in a variety of styles, from classic Western to more innovative combinations, depending on personal preferences.
Key aspects of preparing an oven omelet include selecting high-quality eggs, preheating the oven, and using a suitable baking dish. Typically, the process involves whisking eggs with salt and pepper, adding desired fillings, and pouring the mixture into a greased baking dish. The mixture is then baked until fully set, usually around 20-30 minutes at 350°F (175°C). This method is particularly advantageous for cooking larger quantities, making it ideal for family meals or gatherings.
This cooking technique not only provides a nutritious meal option but also has the benefit of being less labor-intensive than traditional stove-top omelets. By using the oven, one can prepare other components of the meal simultaneously, thus saving time and effort. Additionally, because the omelet cooks evenly, it minimizes the risk of overcooking or undercooking certain areas.
Statistics from the USDA highlight that eggs are an excellent source of protein, with one large egg containing about 6 grams of protein and various essential nutrients. This makes oven omelets not only delicious but also a healthy choice that can be customized with various fillings to meet dietary needs or preferences, such as incorporating spinach for added iron or cheese for calcium.
Some best practices for preparing an oven omelet include using fresh ingredients, ensuring the baking dish is adequately greased to prevent sticking, and monitoring the cooking time to avoid overcooking. Adding ingredients like cheese or vegetables should be done in moderation to maintain the right texture. Experimenting with different herbs and spices can also enhance the flavor profile, making the dish more appealing and enjoyable for everyone.
How Do You Preheat the Oven for the Perfect Omelet?
To preheat the oven for the perfect omelet, you need to follow a few essential steps to ensure optimal cooking conditions.
- Set the Right Temperature: Preheat your oven to 350°F (175°C), which is generally considered the best temperature for baking omelets.
- Use the Correct Bakeware: Choose an oven-safe skillet or baking dish, preferably non-stick or well-greased, to prevent the omelet from sticking.
- Allow Time for Preheating: Give your oven enough time to reach the desired temperature, usually around 10-15 minutes, to ensure even cooking.
- Prepare Ingredients in Advance: While the oven is preheating, prepare your omelet fillings such as vegetables, cheeses, and meats to save time.
- Check for Proper Heat Distribution: Make sure that the oven is heating evenly by using an oven thermometer if necessary, as hot spots can lead to uneven cooking of the omelet.
Set the Right Temperature: Preheating your oven to 350°F (175°C) is crucial for achieving the perfect omelet texture. This temperature allows the eggs to set properly while ensuring that any added ingredients are cooked without becoming overdone.
Use the Correct Bakeware: Opting for an oven-safe skillet or a baking dish that is either non-stick or properly greased is key to preventing your omelet from sticking. This choice will also make it easier to slide the omelet out once it’s cooked, ensuring a beautiful presentation.
Allow Time for Preheating: It’s important to allow your oven sufficient time to preheat, generally around 10-15 minutes. This ensures that the heat is consistent throughout the oven, leading to a well-cooked omelet.
Prepare Ingredients in Advance: While the oven is preheating, take advantage of this time to chop and gather your omelet ingredients. Having everything ready will streamline the cooking process and ensure that your omelet comes together quickly once the oven is ready.
Check for Proper Heat Distribution: To ensure that your omelet cooks evenly, consider using an oven thermometer to check for hot spots. Uneven heating can lead to parts of the omelet being overcooked while others remain undercooked, so verifying your oven’s temperature accuracy is beneficial.
What Cooking Methods Enhance the Oven Omelet Experience?
Broiling, on the other hand, is perfect for achieving a crispy top layer while ensuring the center remains soft and moist. It’s a quick way to add depth to the dish without overcooking the eggs.
Steaming, when applied, allows the omelet to stay moist and helps in cooking the vegetables evenly, ensuring they are tender without losing their flavor or crunch.
Whipping the eggs before cooking is a crucial step, as it incorporates air into the mixture, leading to an airy texture that elevates the eating experience. The more air that is whipped in, the fluffier the final product will be.
Using a water bath can be a game changer, especially for those who want to achieve a custard-like consistency. This method helps maintain even cooking temperatures and can prevent the omelet from becoming rubbery.
What Are the Most Popular Variations of Oven Omelets?
The most popular variations of oven omelets include:
- Vegetable Oven Omelet: This version incorporates a variety of fresh vegetables such as bell peppers, spinach, and onions. The combination of veggies not only adds color and texture but also boosts the nutritional value, making it a healthy choice for breakfast or brunch.
- Cheese Oven Omelet: A cheese-filled omelet often features a blend of cheeses like cheddar, mozzarella, or feta. The melted cheese adds a creamy richness and enhances the overall flavor, making it a favorite among cheese lovers.
- Meat Lover’s Oven Omelet: Packed with proteins, this omelet variation typically includes ingredients like bacon, ham, and sausage. The hearty combination provides a satisfying meal that is perfect for those looking for a filling breakfast option.
- Southwestern Oven Omelet: This spicy twist features ingredients such as jalapeños, black beans, and corn, often topped with salsa or avocado. The bold flavors and spices make it a vibrant and exciting choice for those who enjoy a kick in their meals.
- Herb and Cheese Oven Omelet: Infused with a mix of fresh herbs like chives, parsley, and dill, this omelet is complemented by a light cheese addition. The herbs provide a fresh and fragrant taste, making it a delightful option for a sophisticated brunch.
- Smoked Salmon Oven Omelet: This luxurious variation includes ingredients like smoked salmon, cream cheese, and dill. The rich flavors of the salmon paired with the creaminess of the cheese create an indulgent dish that is perfect for special occasions.
How Can You Innovatively Customize Your Oven Omelet?
Adding fresh herbs such as chives, parsley, or basil can impart a refreshing aroma and flavor to the dish. Spices like paprika, cayenne pepper, or black pepper can also be used to create a more complex flavor profile, catering to varied palates.
To make your oven omelet heartier, consider incorporating proteins like diced ham, cooked bacon, or even tofu for a vegetarian option. This not only provides satisfaction but also makes it a more complete meal, perfect for breakfast or brunch.
Topping your oven omelet with salsa, diced avocado, or a dollop of sour cream can enhance the flavor and add creaminess to each bite. These toppings introduce new textures and can be adjusted based on personal preferences, making each serving unique.
What Cooking Equipment is Necessary for Making an Oven Omelet?
To make the best oven omelet, several key pieces of cooking equipment are essential.
- Oven-safe skillet or baking dish: A heavy, oven-safe skillet or a baking dish is crucial for evenly cooking the omelet in the oven. The skillet should ideally be non-stick or well-seasoned to prevent the eggs from sticking, allowing for easy removal and serving.
- Mixing bowl: A mixing bowl is necessary for whisking the eggs and combining any additional ingredients such as vegetables, cheese, or meats. It should be large enough to accommodate the volume of eggs you plan to use, allowing you to mix thoroughly without spilling.
- Whisk or fork: A whisk or fork is essential for properly beating the eggs, ensuring they are well combined and aerated for a fluffy texture. Using a whisk can incorporate air more effectively than a fork, resulting in a lighter omelet.
- Spatula: A spatula is useful for gently folding in ingredients and for serving the omelet once it’s cooked. Silicone or heat-resistant materials are best to avoid scratching your skillet or baking dish.
- Oven mitts: Oven mitts are necessary for safely handling hot cookware when removing the omelet from the oven. They protect your hands from burns and allow you to confidently maneuver the hot skillet or dish.
- Measuring cups and spoons: Measuring cups and spoons help ensure that you add the right amounts of ingredients, such as milk or cheese, to achieve your desired flavor and texture in the omelet. Accurate measurements can make a significant difference in the final outcome.
- Grater (if using cheese): A grater is important if you’re adding cheese to your omelet, allowing you to easily shred or grate cheese for even melting. Freshly grated cheese tends to melt better and enhances the overall flavor of the dish.
What Tips Can Ensure You Achieve the Perfect Oven Omelet Every Time?
To achieve the best oven omelet every time, consider the following tips:
- Use Fresh Ingredients: Fresh vegetables, herbs, and cheeses can significantly enhance the flavor and texture of your omelet. Ingredients like ripe tomatoes, vibrant bell peppers, and fresh herbs add not only taste but also color, making your dish visually appealing.
- Preheat the Oven: Preheating the oven ensures that your omelet cooks evenly and thoroughly. A properly heated oven helps achieve that fluffy texture by allowing the eggs to set quickly without overcooking.
- Choose the Right Baking Dish: A non-stick or well-greased baking dish can prevent the omelet from sticking, making it easier to serve and ensuring a smooth texture. Opt for a dish that is the right size to allow for even cooking; too large may dry it out, while too small may overflow.
- Whisk Eggs Thoroughly: Whisking the eggs until they are completely blended introduces air into the mixture, resulting in a lighter and fluffier omelet. Consider adding a splash of milk or cream to the eggs for added richness and creaminess.
- Fill Sparingly: While it’s tempting to load up on fillings, using too many can weigh the omelet down and prevent it from cooking evenly. A balanced approach with just enough filling allows the eggs to rise and form a perfect base.
- Monitor Cooking Time: Keep an eye on your omelet while it cooks to avoid overcooking, which can lead to a rubbery texture. Checking it a few minutes before the suggested cooking time can help ensure it sets just right and retains moisture.
- Let It Rest: Allowing the omelet to rest for a couple of minutes after removing it from the oven helps it firm up and makes slicing easier. This resting period also allows the flavors to meld together beautifully.