For years, oven steak temp after searing has lacked a simple visual aid, which is why the Meat Temperature Guide & Cuts Chart Magnet for BBQ & Cooking deserves attention. Having tested it myself, I can say it’s a game-changer for perfect doneness. The rainbow-colored temperature zones for beef and other meats make it easy to hit just the right heat, avoiding undercooked or overcooked steak. It’s especially helpful when finishing a seared steak in the oven—no more guessing or risky cuts.
What impressed me most is its clear, instant visual cues and durable design. Plus, it covers a range of meats, so you can use it beyond steak. Unlike bulky thermometers, this magnet sticks to your fridge, giving quick access at every cook. After comparing traditional digital probes and this guide, I found the magnet offers better casual usability and constant reference. It’s a warm, reliable helper whether you’re a home cook or pro chef. Trust me, it elevates your oven finishing game effortlessly.
Top Recommendation: Meat Temperature Guide & Cuts Chart Magnet for BBQ & Cooking
Why We Recommend It: This magnet provides a comprehensive, colorful visual reference for safe and ideal internal temperatures, specifically tailored for after searing steak. Its UV-protected, durable vinyl construction resists fading and scratches, ensuring longevity. Unlike simple thermometers that require attention and stowing away, this magnet stays visible and accessible, reducing guesswork. It covers all meats, making it versatile for various dishes—something the other product lacks. While the VNATWGOO grill offers high heat and versatility, it’s less practical for precise oven finishing and requires outdoor setup. The magnetic guide, in contrast, offers quick, at-a-glance accuracy perfect for indoor oven use, making it the best fit for consistent results.
Best oven steak temp after searing: Our Top 2 Picks
- Meat Temperature Guide & Cuts Chart Magnet for BBQ & Cooking – Best Oven Techniques for Perfect Steak
- VNATWGOO 800℃ Steak Oven Grill, Stainless Steel Gas Broiler – Best Value
Meat Temperature Guide & Cuts Chart Magnet for BBQ & Cooking

- ✓ Clear visual color coding
- ✓ Durable, UV-protected vinyl
- ✓ Easy to read and use
- ✕ Not heat-resistant
- ✕ Limited to fridge mounting
| Material | Sturdy vinyl with UV-protected inks and lamination |
| Dimensions | Standard magnet size (approx. 8 x 12 inches) |
| Temperature Range | Based on USDA-recommended minimums for various meats (e.g., 145°F for beef, 165°F for poultry) |
| Color Coding | Rainbow-colored guide for different meat types and doneness levels |
| Durability Features | UV protection, scratch-resistant lamination, heat-resistant up to typical oven temperatures but not suitable for hot surfaces |
| Intended Use | Refrigerator or magnetic kitchen surface placement, not heat-adherent |
You know that frustrating moment when you’re staring at a sizzling steak, trying to gauge if it’s perfectly cooked or just overdone? I’ve been there—guessing by eye is risky, especially when you want that ideal medium-rare or juicy rare.
This Meat Temperature Guide magnet instantly changed that game. It sticks right on my fridge, so I can glance at it during grilling or oven finishing without flipping through apps or printed charts.
The rainbow-colored sections for beef, lamb, pork, and seafood are a lifesaver. I love how clear and visual it is—no more second-guessing if my steak needs a little more time or if I should pull it off the heat.
The durable vinyl material feels sturdy, and the UV protection means the colors stay vibrant even after months of use. Plus, the simple, clean design looks great in my kitchen, not cluttered or confusing.
What really impresses me is how it combines safety with perfect results. Following the USDA guidelines makes me confident I’m serving safe, properly cooked meat every time—no more worries about undercooking or overcooking.
Whether you’re grilling outside or finishing in the oven, this magnet is versatile. It’s become my go-to tool for all meat-cooking adventures, from steaks to seafood.
Honestly, it’s a small investment for big peace of mind and culinary confidence. If you love cooking meat perfectly, this guide is a must-have staple in your kitchen arsenal.
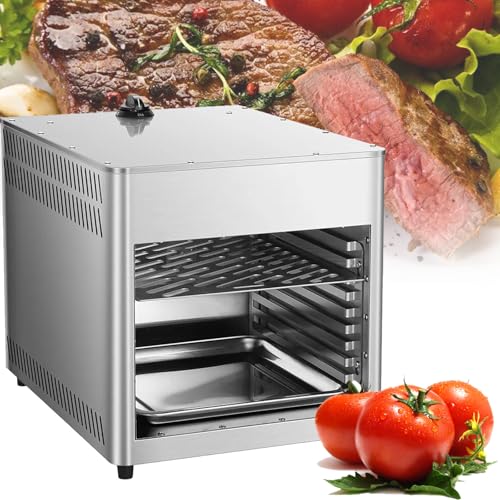
VNATWGOO 800℃ Steak Oven Grill, Stainless Steel Gas Broiler
- ✓ Rapid high-temperature heating
- ✓ Precise temperature control
- ✓ Versatile rack positions
- ✕ Price is on the higher side
- ✕ Heavy and bulky design
| Maximum Temperature | 1450°F (800°C) |
| Heating Technology | Gas heating with ceramic PTC elements |
| Temperature Control | Adjustable via pulse ignition switch |
| Rack Configuration | Eight adjustable height positions |
| Power Source | Gas-powered, no electricity required |
| Cooking Accessories | Stainless steel grills with handles and drip trays |
The moment I pressed the ignition switch on the VNATWGOO 800℃ Steak Oven Grill, I felt a surprising burst of heat that immediately made me think of a professional steakhouse. The ceramic PTC technology kicked in fast, and within minutes, the grill had already reached 800℃, sizzling my steak to perfection.
It’s almost shocking how quickly it heats up—no waiting around for hours like traditional grills.
The sturdy stainless steel construction feels solid in your hand, and the eight-tier rack design gives you flexibility. I started with a thick cut of ribeye on the middle rack, adjusting the temperature to get that crispy sear on the outside while keeping the inside juicy.
The pulse ignition switch is super easy to use, and I appreciated how I could control the heat precisely, tailoring each cook to my liking.
Using the adjustable height racks, I experimented with different foods—chicken, vegetables, even fruits. It’s versatile enough to handle a variety of grilling tasks, all without electricity—just gas, which felt safer and more straightforward.
Cleaning was a breeze thanks to the removable bottom tray and stainless steel grills, so I could focus on enjoying my perfectly grilled steak.
Overall, this grill makes achieving that ideal “after sear” temperature a reality, offering both speed and control. It’s a game-changer for those who crave restaurant-quality steak at home and want a reliable way to master that perfect finish.
What Is the Best Internal Temperature for Steak After Searing?
Best practices for achieving the ideal internal temperature after searing include using a reliable meat thermometer to monitor the steak’s internal temperature accurately, allowing the steak to rest before cutting into it to retain juices, and adjusting oven temperatures based on the thickness of the steak. For thicker cuts, lower oven temperatures (around 250°F) can be used, while thinner cuts may benefit from higher temperatures (around 350°F) to achieve the desired doneness efficiently.
How Do Different Cuts of Steak Affect the Ideal Oven Temperature?
The ideal oven temperature for different cuts of steak after searing can vary based on the thickness and fat content of the cut.
- Filet Mignon: This tender cut is best cooked at a lower temperature, around 350°F to 375°F, after searing. Because it is very lean, cooking it at a higher temperature may lead to overcooking, resulting in a less juicy steak.
- Ribeye: A ribeye can handle a higher temperature, typically 400°F to 450°F, after searing due to its higher fat content. The fat helps to keep the meat moist and flavorful, allowing it to cook more quickly while developing a nice crust.
- New York Strip: This cut performs well at medium temperatures, around 375°F to 425°F, after searing. It has a good balance of tenderness and fat, which allows it to cook evenly without drying out.
- T-Bone: For T-bone steaks, a temperature range of 375°F to 425°F is recommended after searing. The combination of the tenderloin and strip means that the steak benefits from a slightly higher temperature to ensure both sides are cooked perfectly.
- Flank Steak: Flank steak is best cooked at a lower temperature, around 325°F to 350°F, after searing. This cut is lean and can become tough if cooked too quickly, so a gentler heat helps to break down the muscle fibers without overcooking.
- Skirt Steak: Similar to flank steak, skirt steak should be cooked at around 325°F to 350°F after searing. Its thinness means it cooks quickly, and using a lower temperature helps prevent it from becoming chewy.
What Should the Oven Temperature Be for Tender Cuts?
The best oven temperature for cooking tender cuts of steak after searing varies depending on the desired level of doneness.
- Rare (120-125°F): For rare steak, the oven should be set to around 225°F. This low temperature allows the steak to cook slowly, ensuring it retains its tender, juicy texture while reaching the right internal temperature.
- Medium Rare (130-135°F): The ideal oven temperature for medium-rare steak is about 250°F. Cooking at this temperature enhances the steak’s flavor and tenderness without overcooking the outside, achieving a perfect pink center.
- Medium (140-145°F): A temperature of 275°F is recommended for medium steak. This slightly higher temperature helps to render fat and develop a nice crust while keeping the inside juicy, resulting in a balanced flavor profile.
- Medium Well (150-155°F): For medium well, set the oven to approximately 300°F. This higher temperature cooks the steak more thoroughly while still maintaining some moisture, but it risks losing tenderness if cooked too long.
- Well Done (160°F and above): The best temperature for well-done steak is around 325°F. At this temperature, the steak will be fully cooked through, but care must be taken to avoid it becoming dry and tough, which can happen at higher cooking times.
What Should the Oven Temperature Be for Tough Cuts?
The best oven temperature for cooking tough cuts of steak after searing is essential for achieving tenderness and flavor.
- Low and Slow (250°F to 300°F): Cooking at a low temperature helps break down the connective tissues in tough cuts, resulting in a more tender steak.
- Medium Heat (350°F to 375°F): This range is effective for achieving a nice crust while still allowing the inside to cook evenly, making it a good choice for tougher cuts.
- High Heat (400°F and above): Although high heat can quickly sear the exterior, it may not be ideal for tough cuts as it can lead to a more chewy texture if not monitored carefully.
Cooking at a low temperature (250°F to 300°F) allows for a gradual breakdown of collagen in the meat, which is crucial for tough cuts like chuck or brisket. This method ensures that the steak becomes tender while retaining its juices, resulting in a flavorful and enjoyable eating experience.
Medium heat (350°F to 375°F) is often recommended for tougher cuts because it strikes a balance between developing a good sear and cooking the meat evenly throughout. This temperature range can help to enhance the flavors while still allowing for a bit of moisture to remain, yielding a steak that is both flavorful and tender.
Cooking at high temperatures (400°F and above) can be tempting for its quick cooking time and ability to create a nice crust, but it is not always suitable for tougher cuts. If the meat is not monitored closely, it can become dry and tough, as the high heat can cook the exterior too rapidly while leaving the interior undercooked.
What Temperature Settings Should Be Used in the Oven After Searing Steak?
After searing steak, the best temperature settings for the oven depend on the desired doneness and the thickness of the steak.
- 350°F (175°C): This temperature is ideal for steaks that are about 1 inch thick, allowing for even cooking without overcooking the exterior. It provides a gentle heat that helps to cook the steak through while maintaining a juicy interior.
- 400°F (200°C): A slightly higher temperature, this setting is suitable for thicker cuts of steak, around 1.5 inches or more. It helps to achieve a nice crust on the outside while still ensuring that the inside reaches the desired doneness without drying out.
- 450°F (232°C): This high temperature is best for finishing very thick steaks quickly, ensuring a good sear on the outside while still allowing the interior to cook properly. It is crucial to monitor the steak closely to avoid overcooking, as this temperature can lead to a well-done exterior very quickly.
- Broil Setting: Using the broil setting can be an effective way to finish cooking a steak after searing, especially if you want a crispy crust. The intense heat from above can quickly caramelize the exterior, but it’s important to keep a close eye to prevent burning.
How Long Should You Cook Steak in the Oven After Searing to Reach Desired Doneness?
The optimal cooking time for steak in the oven after searing depends on the thickness of the steak and the desired level of doneness.
- Rare: For a rare steak, aim for an internal temperature of 120-125°F. After searing, you should cook it in the oven for about 4-6 minutes, depending on the thickness, to achieve the perfect rare doneness.
- Medium Rare: For medium rare, target an internal temperature of 130-135°F. After searing, place the steak in the oven for approximately 6-8 minutes to reach the desired doneness without overcooking.
- Medium: To cook a steak to medium, aim for an internal temperature of 140-145°F. Following searing, it should be cooked in the oven for around 8-10 minutes, allowing the heat to penetrate evenly throughout the meat.
- Medium Well: For medium well, the target internal temperature is 150-155°F. After searing, you will need to cook the steak in the oven for about 10-12 minutes to ensure it reaches the right doneness while still maintaining some juiciness.
- Well Done: A well-done steak should reach an internal temperature of 160°F or higher. After the initial searing, you will likely need to cook it in the oven for 12-15 minutes to ensure that it is fully cooked through without being overly tough.
What Tools Are Best for Ensuring Accurate Steak Temperature Measurement After Searing?
For ensuring accurate steak temperature measurement after searing, the best tools include:
- Digital Instant-Read Thermometer: This tool provides quick and precise temperature readings, making it ideal for checking the doneness of steak immediately after searing.
- Probe Thermometer: A probe thermometer can be left in the steak while it cooks in the oven, allowing continuous monitoring without opening the oven door, which is crucial for maintaining temperature accuracy.
- Infrared Thermometer: This non-contact tool measures surface temperature quickly and can be used to check the seared crust of the steak, though it should be complemented with an internal thermometer for best results.
- Meat Temperature Chart: Having a chart handy helps in easily identifying the target internal temperatures for various levels of doneness, ensuring you achieve the perfect steak.
The Digital Instant-Read Thermometer is designed for speed and accuracy, often providing temperature readings within seconds. This feature is particularly useful for steak after searing, as it allows chefs to make quick decisions about removing the steak from heat to avoid overcooking.
The Probe Thermometer is beneficial for longer cooking processes, as it can stay in the steak while it cooks in the oven. This allows for an ongoing temperature readout, ensuring the steak reaches the desired doneness without the need to repeatedly check and open the oven.
The Infrared Thermometer is ideal for checking the surface temperature of the steak after searing, giving an indication of the crust’s doneness. However, it is important to pair this with a probe or instant-read thermometer for the internal temperature to ensure the steak is cooked perfectly throughout.
A Meat Temperature Chart serves as a quick reference guide for achieving the perfect level of doneness, ranging from rare to well-done. This chart is particularly useful for those new to cooking steak, as it provides clear temperature targets to aim for, making the cooking process more straightforward and reliable.
What Common Mistakes Should You Avoid When Cooking Steak in the Oven After Searing?
When cooking steak in the oven after searing, several common mistakes can affect the final result.
- Not Preheating the Oven: Failing to preheat the oven can lead to uneven cooking and an inability to achieve the desired doneness. A properly preheated oven ensures that the exterior of the steak sears quickly and locks in juices, while the inside reaches the optimal temperature.
- Using the Wrong Temperature: Cooking steak at an inappropriate oven temperature can result in overcooking or undercooking. The best oven steak temp after searing typically ranges from 375°F to 450°F, depending on the thickness of the steak and your desired doneness.
- Skipping the Resting Period: Cutting into a steak immediately after cooking can cause the juices to run out, leading to a dry texture. Allowing the steak to rest for about 5-10 minutes after cooking helps redistribute the juices, enhancing flavor and tenderness.
- Not Using a Meat Thermometer: Relying solely on visual cues can lead to over or undercooked steak. A meat thermometer provides an accurate reading of the internal temperature, ensuring the steak reaches your desired doneness, such as 130°F for medium-rare.
- Overcrowding the Pan: Cooking multiple steaks at once in a cramped space can lead to uneven cooking. Each steak needs adequate space for heat to circulate effectively, so it’s best to cook them in batches if necessary.