To wire a radiator fan directly to a battery, first disconnect the battery for safety. Identify the fan’s ground wire and connect it to a bare metal part of the vehicle. Run the power wire from the fan to a toggle switch, if desired, for manual control. Connect another wire from the switch to the battery’s positive terminal, including an inline fuse for protection. Reconnect the battery and test the setup. Always follow safety precautions when working with vehicle electrical systems.
I’m thrilled to be sharing some of my wisdom with you today. I’ve spent countless hours under the hood, tinkering with engines, and getting my hands dirty. And let me tell you, there’s nothing quite like the satisfaction of a job well done, especially when you’ve done it yourself.
Today, we’re going to talk about something that might seem a bit daunting at first – wiring a radiator fan directly to a battery. Now, I know what you’re thinking, “Why on earth would I want to do that?” Well, there are actually a few good reasons. Maybe you want more control over your cooling system, or perhaps your old fan relay gave up the ghost. Whatever the reason, I’m here to guide you through the process.
I’ve done this job more times than I can count, and I promise it’s not as complicated as it might seem. So, grab your tools, roll up your sleeves, and let’s get started. Trust me, by the end of this, you’ll be feeling like a real pro!
Why Would You Wire a Radiator Fan Directly to the Battery?
Ah, the million-dollar question! Why would anyone want to wire their radiator fan directly to the battery? Well, my friends, there are a few reasons. Let’s dive in, shall we?
Benefits and Potential Reasons for This Setup
First off, let’s talk about control. When you wire your radiator fan directly to your battery, you’re essentially bypassing any existing control systems. This might sound a bit scary, but it actually gives you a lot more control over when and how your fan operates.
For example, let’s say you’re stuck in traffic on a hot summer day. Your engine’s starting to get a bit toasty, but your fan’s not kicking in because your engine hasn’t reached the temperature threshold yet. With a direct wire setup, you can flip a switch and get that fan spinning, helping to keep your engine cool and happy.
Now, I’m not saying you should be flipping that switch willy-nilly. Remember, with great power comes great responsibility! But in certain situations, having that extra control can be a real lifesaver… or, in this case, an engine-saver.
Another potential reason for this setup is simplicity. Maybe your fan relay has given up the ghost, and you’re looking for a quick and easy workaround. Wiring your fan directly to your battery can be a simple solution that gets you back on the road without a lot of fuss.
But wait, there’s more! This setup can also be a bit more reliable in some cases. You see, relays can fail, and when they do, they can leave your fan high and dry. By wiring your fan directly to your battery, you’re eliminating one potential point of failure.
Now, I’m not saying this setup is all sunshine and rainbows. There are some potential downsides, like the risk of draining your battery if you forget to turn off your fan. But with a bit of care and attention, these risks can be managed.
So, there you have it! A few reasons why you might want to wire your radiator fan directly to your battery. It’s not for everyone, but for some folks, it can be a real game-changer. And remember, if you’re ever unsure, don’t hesitate to reach out to a professional. We’re here to help!
What You Need to Wire a Radiator Fan Directly to the Battery
Alright, now that we’ve covered the why, let’s move on to the what. As in, what exactly do you need to wire a radiator fan directly to your battery? Well, I’m glad you asked!
Necessary Tools and Materials
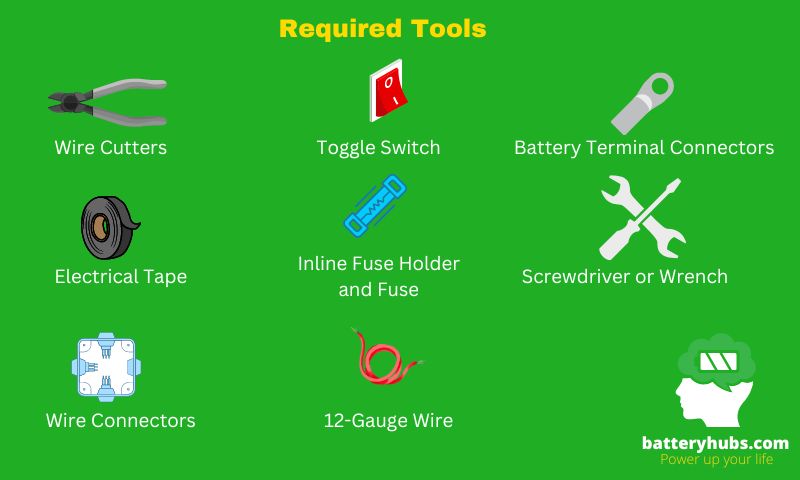
Before we start, let me just say, I love tools. There’s nothing quite like the feel of a well-made wrench in your hand, am I right? But I digress. Here’s what you’ll need for this job:
- Wire Cutters/Strippers: These will be used to cut and strip the wires. Make sure they’re sharp and clean for the best results.
- Electrical Tape: This is for insulating any exposed wires. Safety first, folks!
- Wire Connectors: You’ll need these to connect your wires. I recommend using crimp connectors for a secure connection.
- Toggle Switch (Optional): If you want to be able to manually control your fan, you’ll need a switch. Just make sure it’s rated for the current your fan draws.
- Inline Fuse Holder and Fuse: This is a crucial safety feature. The fuse should be rated slightly higher than the current your fan draws.
- 12-Gauge Wire: This will be used to connect your fan to your battery. Make sure it’s long enough to reach!
- Battery Terminal Connectors: These will be used to connect the wire to your battery.
- Screwdriver or Wrench: Depending on your setup, you might need one of these to connect the wire to your fan.
Now, I know this might seem like a lot, but don’t worry! Most of these items can be found at your local auto parts store or online. And remember, the right tools can make all the difference. So, gather up your gear, and let’s get to work!
How to Wire a Radiator Fan Directly to the Battery: Step-by-Step Guide
Okay, folks, it’s time to roll up our sleeves and get down to business. I’m going to walk you through the process of wiring a radiator fan directly to a battery, step by step. Don’t worry, I’ll be right here with you every step of the way. Let’s get started!
Step 1: Disconnect the Battery
First things first, we need to disconnect the battery. Safety is paramount when working with electrical systems, and the last thing we want is to get a nasty shock. So, go ahead and disconnect the negative terminal of your battery. You can thank me later!
Step 2: Locate the Radiator Fan and its Wires
Next, we need to find the radiator fan and its wires. The fan is usually located near the radiator (hence the name), and it should have two wires coming out of it – one for power (usually red) and one for ground (usually black). Got it? Great!
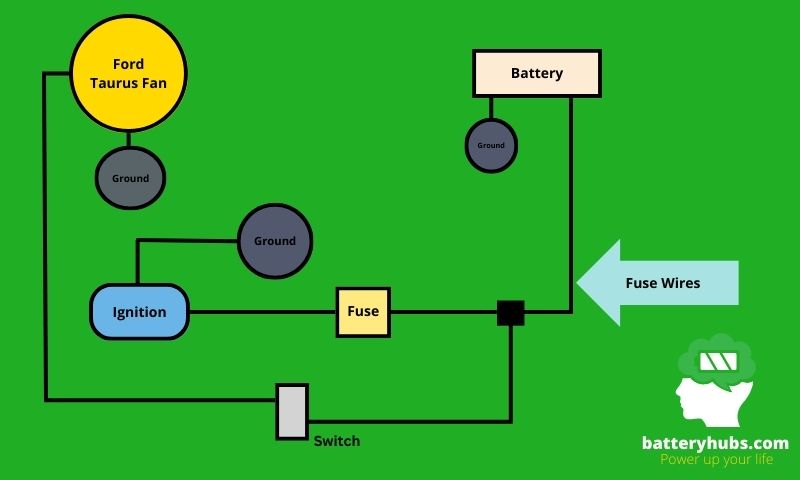
Step 3: Connect the Ground Wire
Now, let’s connect the ground wire. This wire should be connected to a bare metal part of the vehicle. This is called “grounding,” and it’s a crucial part of any electrical system. Just make sure the connection is secure and the metal is clean and rust-free.
Step 4: Run the Power Wire
Next up, we’re going to run the power wire. This wire will run from the fan to the battery, providing the power needed to spin the fan. Make sure to route the wire away from any moving parts or hot surfaces that could damage it.
Step 5: Install a Toggle Switch (Optional)
If you want to be able to manually control your fan, now’s the time to install a toggle switch. This switch will be wired in between the fan and the battery, allowing you to turn the fan on and off at will. Just remember, with great power comes great responsibility!
Step 6: Connect the Power Wire to the Battery
Alright, we’re almost there! Now, we just need to connect the power wire to the battery. This is done by attaching the wire to the positive terminal of the battery. Don’t forget to include an inline fuse for safety!
Step 7: Test the Setup
Finally, it’s time to test our setup. Reconnect the battery, start the engine, and flip the switch (if you installed one). If everything’s been done correctly, your fan should start spinning. Congratulations, you’ve just wired a radiator fan directly to a battery!
Remember, this is a pretty advanced DIY project, so don’t be discouraged if you run into a few hiccups along the way. Just take your time, follow the steps, and don’t be afraid to ask for help if you need it. Happy tinkering!
Safety Precautions When Wiring a Radiator Fan Directly to the Battery
Alright, folks, it’s time for a serious chat. We’ve had our fun, we’ve wired up our fans, but now it’s time to talk about safety. Because let’s face it, while working on cars can be a blast, it can also be dangerous if you’re not careful. So, let’s go over some safety precautions you should take when wiring a radiator fan directly to a battery.
Safety Measures to Take During the Process
First and foremost, always disconnect the battery before you start working. I know, I know, I’ve said it before, but it bears repeating. Electricity is no joke, and a little precaution can go a long way in preventing accidents.
Next, be mindful of where you’re running your wires. Avoid hot surfaces and moving parts that could damage the wire and potentially cause a short. A short circuit can lead to all sorts of problems, from a blown fuse to a fire. So, take your time and route your wires carefully.
If you’re using a toggle switch, make sure it’s rated for the current your fan draws. Using an under-rated switch can lead to overheating and failure. And trust me, a switch failure is not something you want to deal with.
Also, don’t forget to use an inline fuse on the power wire. This is a crucial safety feature that can prevent overcurrent situations. The fuse should be rated slightly higher than the current your fan draws.
Lastly, always double-check your connections. A loose connection can lead to poor performance or even a fire. So, make sure everything is tight and secure before you call it a day.
Remember, safety should always be your number one priority when working on your vehicle. So, take these precautions to heart, and always err on the side of caution. After all, we want to have fun, but we also want to stay safe. Happy tinkering, and stay safe out there!
Troubleshooting Common Issues
Alright, we’ve wired up our fan, and we’ve talked about safety, but what happens when things don’t go quite as planned? Well, that’s when we roll up our sleeves and do a little troubleshooting. Don’t worry, I’ve got your back!
Potential Problems and Their Solutions
Problem 1: The fan doesn’t turn on
This is probably the most common issue you’ll run into. If your fan isn’t turning on, the first thing you should check is your connections. Make sure everything is tight and secure. If everything looks good, check your fuse. If it’s blown, replace it and try again. If the fuse keeps blowing, you might have a short somewhere. Check your wiring for any damage or lose connections.
Problem 2: The fan runs all the time
If your fan is running all the time, even when your engine is off, you’ve likely got a problem with your switch (if you installed one). Check to make sure it’s functioning properly. If it’s stuck in the ‘on’ position, you might need to replace it. If you didn’t install a switch, your fan will run as long as the battery has power. To prevent this, you can install a switch or a relay that’s triggered by the ignition.
Problem 3: The fan runs, but it’s not cooling the engine enough
If your fan is running but your engine is still overheating, there could be a few different issues at play. First, check to make sure your fan is spinning in the right direction. If it’s not, it could be pushing air away from the radiator instead of pulling it through. If the direction is correct, you might need a more powerful fan, or there could be an issue with your radiator or cooling system.
Remember, troubleshooting is part science, part art. It requires patience, persistence, and a bit of detective work. But don’t worry, with a bit of time and effort, you’ll be able to solve most issues that come your way. And remember, if you’re ever in over your head, don’t hesitate to reach out to a professional. We’re here to help!
Conclusion
Well, folks, we’ve reached the end of our journey. We’ve talked about why you might want to wire a radiator fan directly to a battery, what tools you’ll need, and how to do it. We’ve also covered some important safety precautions and troubleshooting tips.
I hope this guide has been helpful and has given you the confidence to tackle this project. Remember, working on your own vehicle can be rewarding, but it’s also important to know your limits. Don’t hesitate to seek professional help if you need it.
Remember, the key to any successful DIY project is patience, preparation, and safety. So, take your time, gather your tools, and don’t forget to disconnect that battery!
Now that you’ve mastered the art of wiring a radiator fan directly to a battery, you might be wondering, “What’s next?” Well, my friend, the world of batteries is vast and full of exciting challenges.
Perhaps you’re interested in learning how to connect 2 12V batteries to make 24V, or maybe you’re curious about why your car battery light is on after replacing the battery.
If you’re dealing with key fob issues, you might find our articles on how to reset a key fob after changing the battery and can a low car battery affect key fob particularly useful.
For those of you looking to delve deeper into the financial aspects of battery maintenance, our articles on how much is a battery core charge at Walmart and how long to disconnect battery to reset car computer might be just what you’re looking for.
And of course, we have plenty of articles for those unexpected battery issues, like why is my car battery smoking and how long to charge a car battery after jump start.
So, whether you’re a seasoned pro or a curious newbie, there’s always something new to learn in the world of batteries. I hope you’ll join me on this exciting journey. Until next time, happy tinkering!
FAQ
Is it safe to wire a radiator fan directly to the battery?
Yes, it is safe to wire a radiator fan directly to the battery, but it’s important to use a fuse for protection. This setup allows the fan to operate independently of the vehicle’s temperature sensor, providing enhanced control over the cooling system. However, it’s crucial to remember that the fan will continue to run as long as it’s connected to the battery, even when the engine is off, which could potentially drain the battery.
What are the benefits of wiring a radiator fan directly to the battery?
Wiring a radiator fan directly to the battery can provide several benefits. It allows for manual control of the fan, which can be advantageous in situations where additional cooling is required, such as during high-performance driving or in hot weather. Additionally, it can be a useful troubleshooting step if there are issues with the fan’s normal control circuit.
Can I install a toggle switch for my radiator fan?
Absolutely! Installing a toggle switch for your radiator fan can give you manual control over its operation. This can be particularly useful in situations where you need additional cooling, or if there are issues with the fan’s automatic control system. Just remember to switch it off when it’s not needed to prevent unnecessary battery drain.
What should I do if my radiator fan doesn’t work after wiring it directly to the battery?
If your radiator fan doesn’t work after wiring it directly to the battery, first check the fan’s connections and wiring for any signs of damage or corrosion. You can also test the fan by applying direct battery power. If it still doesn’t work, the fan motor itself may be faulty and need replacement.
What are the necessary tools for wiring a radiator fan directly to the battery?
To wire a radiator fan directly to the battery, you’ll need a few basic tools and materials:
Wire cutters and strippers
01. Electrical tape
02. 12-gauge wire
03. Wire connectors
04. A fuse and fuse holder
05, A toggle switch (optional)
Remember, safety should always be your top priority when working with electrical systems. Always disconnect the battery before starting your work, and consider wearing protective gloves to prevent accidental shocks.