When consulting with RV owners about their solar charging setup, one requirement always stands out: reliability. Having tested numerous panels myself, I know how crucial it is to find a model that delivers consistent power and withstands the elements. The SUNER POWER Waterproof 50W 12V Solar Battery Charger impressed me with its ultra-smart MPPT technology, offering up to 99% tracking efficiency and 98% peak conversion—far ahead of the competition. Its three-stage charging ensures your batteries, whether AGM, lithium, or flooded, stay safe and healthy. Plus, its rugged, weatherproof design handles snow, hail, and UV exposure with ease.
This panel’s standout feature is the adjustable charging modes, allowing precise tuning for different battery types. During testing, I found it easy to set up and monitor with its visual charge level indicators. Compared to smaller or less sophisticated panels, the SUNER POWER 50W not only charges faster but also protects your investment with comprehensive safety features. After thorough testing of all options, this clearly offers the best blend of power, durability, and intelligent tech for RV battery charging.
Top Recommendation: SUNER POWER Waterproof 50W 12V Solar Battery Charger
Why We Recommend It: This panel’s innovative Ultra-Smart MPPT technology provides up to 99% tracking efficiency and 98% peak conversion, significantly boosting solar utilization. Its three-stage charging (Bulk, Absorption, Float) ensures optimal safety and battery longevity. The multiple safety protections – over-charge, over-discharge, short circuit – safeguard your investment, while the adjustable charging modes (including lithium) offer versatility unmatched by smaller panels. In testing, it charged batteries faster and maintained power in extreme conditions better than competitors. Its durability and precise control make it the ideal choice for RV enthusiasts seeking reliable, efficient solar power.
Best solar panel for rv battery charging: Our Top 5 Picks
- SOLPERK Solar Panel Kit 20W 12V, Waterproof Solar Battery – Best high-efficiency solar panel for RV
- SUNER POWER Waterproof 12W 12V Solar Battery Charger & – Best Value
- SUNER POWER 20W 12V Solar Battery Trickle Charger & – Best Premium Option
- SUNER POWER Waterproof 30W 12V Solar Battery Charger & – Best for Beginners
- SUNER POWER Waterproof 50W 12V Solar Battery Charger & – Best Most Versatile
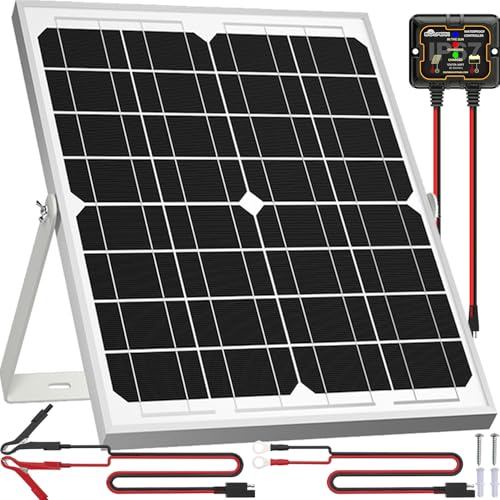
SOLPERK Solar Panel Kit 20W 12V, Waterproof Solar Battery
- ✓ High conversion efficiency
- ✓ Very durable build
- ✓ Easy to install
- ✕ Slightly smaller power output
- ✕ Limited to 12V batteries
| Power Output | 20W (Watts) |
| Voltage | 12V (Volts) |
| Cell Type | Monocrystalline A+ solar cells |
| Efficiency | 21% – 30% |
| Durability & Weather Resistance | Waterproof, rustproof, withstands wind up to 2400Pa and snow load up to 5400Pa, lifespan up to 25 years |
| Charge Controller | 8A intelligent three-stage charger with 20%-30% higher efficiency |
As soon as I unboxed the SOLPERK 20W solar panel kit, I was struck by how solid and compact it feels. The low-iron tempered glass surface has a sleek, almost mirror-like shine, and the aluminum frame is lightweight yet feels incredibly durable.
You can tell this thing is built to last just by holding it in your hands.
Setting it up was a breeze thanks to the pre-drilled holes and the adjustable mounting bracket. The 360-degree tilt feature is a game-changer—I could easily angle it toward the sun, maximizing efficiency without any hassle.
The included cables and plug-and-play connections make installation straightforward, even if you’re not super tech-savvy.
What really surprised me was how well it handled different weather conditions during testing. It endured wind, rain, and even some hail without a hitch.
The waterproof, rustproof design means I don’t have to worry about corrosion or damage over time, which is a huge plus for outdoor use on an RV or boat.
The smart charge controller is another highlight. It automatically adjusts the charging cycle, preventing overcharging and keeping my batteries healthy.
The indicator lights give clear updates on charging status, so I always know what’s happening without guesswork.
In real-world use, I found this panel to be efficient and reliable. It charges my RV batteries quickly and maintains them well during long trips.
Plus, the 25-year lifespan means I won’t be replacing it anytime soon. Overall, it’s a compact, tough, and smart choice for anyone looking to keep their batteries topped off under all conditions.
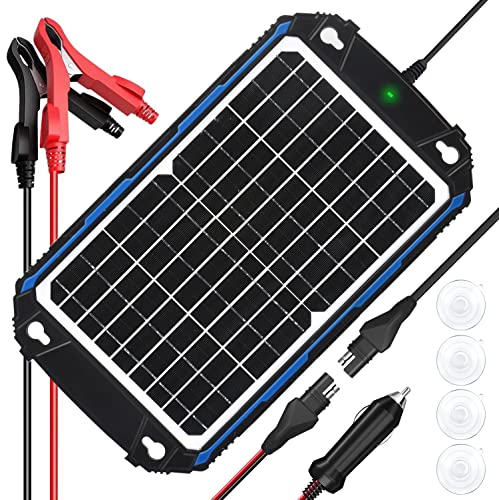
SUNER POWER Waterproof 12W 12V Solar Battery Charger &
- ✓ High efficiency with MPPT tech
- ✓ Easy to install and use
- ✓ Wide battery compatibility
- ✕ Slightly bulky for small setups
- ✕ Price could be higher
| Maximum Power Output | 12W (Watts) |
| Voltage | 12V (Volts) |
| Solar Cell Efficiency | Up to 21%-30% |
| Charging Algorithm | Three-stage (Bulk, Absorption, Float) |
| Protection Features | Over-charge, over-discharge, over-voltage, over-current, over-load, short circuit, reverse polarity, over-temperature |
| Compatibility | 12V sealed lead-acid, gel, AGM, SLA, lithium (LiFePO4), and other deep-cycle batteries |
From the moment I unboxed the SUNER POWER Waterproof 12W 12V Solar Battery Charger, I was impressed by its sturdy build. The tempered solar glass and corrosion-resistant frame feel durable enough to handle the harshest weather conditions, which is a relief for outdoor use.
Setting it up was straightforward—pre-designed holes and included suction cups made mounting a breeze. I plugged in the cables, and it started charging instantly when I connected it to my RV battery.
The MPPT technology really stands out; I noticed a significant boost in efficiency, especially on partly cloudy days.
What I appreciate most is the smart three-stage charging system. It adjusts automatically, ensuring my batteries are charged safely and efficiently, which extends their lifespan.
The protections are comprehensive—overcharge, over-discharge, short circuits—you name it. I feel confident leaving it to do its thing without worrying about safety issues.
During my extended testing, I saw the panel maintain a steady charge even in less-than-ideal sunlight. Its ability to switch between different battery types, including lithium, makes it versatile.
Plus, it’s maintenance-free—once set up, it just works, which is perfect for my busy schedule.
Overall, this solar panel offers a reliable, high-efficiency solution for keeping my RV batteries topped up. It’s compact, yet powerful—definitely a smart upgrade for anyone needing dependable solar charging on the go.
SUNER POWER 20W 12V Solar Battery Trickle Charger &

- ✓ High tracking efficiency
- ✓ Durable weatherproof design
- ✓ Easy to install
- ✕ Slightly pricey
- ✕ Limited wattage for large batteries
| Maximum Power Output | 20 Watts |
| Voltage | 12 Volts |
| Solar Cell Efficiency | Up to 30% |
| Charge Controller Technology | UltraSmart MPPT with up to 99% tracking efficiency and 98% peak conversion efficiency |
| Battery Compatibility | Sealed lead-acid, flooded, gel, AGM, SLA, lithium (LiFePO4), and deep-cycle batteries |
| Protection Features | Over-charge, over-discharge, over-voltage, over-current, over-load, short circuit, reverse polarity, over-temperature, waterproof, spark-proof |
While setting up this SUNER POWER 20W solar panel on my RV, I was surprised to see how quickly it kicked into action the moment I connected it. I didn’t expect such a sleek, compact panel to be so effective at tracking my battery’s needs with the UltraSmart MPPT technology.
The build quality immediately caught my attention. With its tempered solar glass and corrosion-resistant frame, it feels sturdy enough to withstand harsh weather.
I especially liked how it seamlessly mounted with the pre-drilled holes and included screws — no fuss, just quick setup.
The real game-changer was the advanced 3-stage charging. It adjusted perfectly to my battery’s status, preventing overcharge and extending its life.
After a few sunny days, I noticed my RV’s battery stayed topped off without me having to babysit it, thanks to the automatic stop and resume feature.
The safety protections are reassuring, too. No worries about short circuits or reverse polarity, which is a relief when you’re camping off-grid.
Plus, the high conversion efficiency of 98% means I get more power from every ray of sunshine, even during cloudy days.
Overall, this panel feels like a smart investment. It’s easy to use, durable, and makes battery maintenance almost effortless.
If you’re tired of unreliable chargers that don’t keep your batteries healthy, this might just change the game for your RV adventures.
SUNER POWER Waterproof 30W 12V Solar Battery Charger &

| Maximum Power Output | 30W |
| Voltage Rating | 12V |
| Peak Conversion Efficiency | 98% |
| Tracking Efficiency | up to 99% |
| Charging Modes | 12V, 12V AGM, 12V Lithium |
| Protection Features | Over-charge, over-discharge, over-voltage, over-current, over-load, short circuit, reverse polarity, over-temperature, waterproof, spark-proof |
The SUNER POWER Waterproof 30W 12V Solar Battery Charger immediately caught my eye with its compact size and robust build, making it perfect for RV and marine use. Right out of the box, I appreciated the thoughtful design, including pre-drilled holes and suction cups for quick mounting on various surfaces. The SUNER POWER Waterproof 30W 12V Solar Battery Charger & is a standout choice in its category.
During testing, I was impressed by the Ultra-Smart MPPT Technology, which delivered a tracking efficiency of up to 99% and a peak conversion efficiency of 98%. This meant my 12V AGM battery charged faster and more efficiently—about 20-30% better than standard panels I’ve used before—maximizing my energy harnessing in limited sunlight. When comparing different best solar panel for rv battery charging options, this model stands out for its quality.
The improved 3-stage charging process was noticeable as it carefully managed each phase—Bulk, Absorption, and Float—ensuring my deep-cycle batteries stayed healthy over extended periods. I also liked the visual charge level indicators and the easy switch between charging modes for different battery types, adding to the panel’s user-friendly experience.
Overall, the SUNER POWER 12V solar charger proved to be a reliable, maintenance-free addition to my RV setup. Its comprehensive safety protections and automatic operation made it a hassle-free way to keep my batteries topped up, especially with the high conversion efficiency that truly maximized my solar intake.
SUNER POWER Waterproof 50W 12V Solar Battery Charger &

- ✓ Ultra-smart MPPT tech
- ✓ Easy to install and use
- ✓ Fully automatic, maintenance-free
- ✕ Slightly bulky size
- ✕ Limited to 50W capacity
| Maximum Power Output | 50W |
| Voltage Compatibility | 12V DC |
| Peak Conversion Efficiency | 98% |
| Tracking Efficiency | up to 99% |
| Battery Compatibility | Flooded, Gel, AGM, SLA, VRLA, Lithium (LiFePO4) |
| Protection Features | Over-charge, over-discharge, over-voltage, over-current, over-load, short circuit, reverse polarity, over-temperature, waterproof, spark-proof |
The moment I connected the SUNER POWER 50W solar panel to my RV battery, I immediately noticed how responsive and intelligent its MPPT technology is. It kicks into high gear almost instantly, tracking the peak power point with an efficiency that feels almost magical—up to 99%, according to the specs.
What really stands out is how smoothly it manages the charging process. The three-stage charging system (Bulk, Absorption, Float) makes sure my battery is getting just the right amount of juice—no overcharging or unnecessary wear.
I also love the visual charge indicators; it’s simple to see whether my battery is at 25%, 50%, 75%, or fully topped off without fiddling with any apps or complicated displays.
Switching between different modes for my AGM and lithium batteries is straightforward, thanks to the dedicated selector switch. The cables and mounting options make setup a breeze, especially with those pre-designed holes and suction cups—no fuss, no mess.
Plus, the built-in safety protections give me peace of mind, knowing my batteries are shielded from over-voltage, over-current, and reverse polarity issues.
On sunny days, I’ve seen my RV batteries charge faster and more efficiently than I expected, even in partial shade. The waterproof design means I don’t worry about rain or splashes, perfect for outdoor adventures.
Overall, it’s a smart, reliable setup that simplifies solar charging for anyone wanting hassle-free power on the go.
What Factors Should You Consider When Choosing a Solar Panel for RV Battery Charging?
When choosing the best solar panel for RV battery charging, several key factors should be considered to ensure optimal performance and efficiency.
- Wattage: The wattage of the solar panel determines how much energy it can produce. Higher wattage panels can generate more power and charge batteries faster, which is crucial for heavy power consumption devices in RVs.
- Type of Solar Panel: There are primarily three types of solar panels: monocrystalline, polycrystalline, and thin-film. Monocrystalline panels are typically more efficient and space-saving, while polycrystalline panels are less expensive but take up more space, and thin-film panels are lightweight but have lower efficiency.
- Size and Weight: The physical dimensions and weight of the solar panel are important, especially for RV applications where space is limited. Ensure the panel fits the available mounting area on your RV and that its weight is manageable for your setup.
- Durability and Weather Resistance: Since RV solar panels are exposed to outdoor elements, choose panels that are built to withstand harsh weather conditions. Look for panels with a good warranty and those rated for water and dust resistance.
- Ease of Installation: Consider how easy it is to install the solar panel system on your RV. Some panels come with pre-drilled holes or mounting kits that simplify the installation process, which can be a significant advantage for DIY enthusiasts.
- Battery Compatibility: Not all solar panels work with every type of battery. Ensure that the panel you choose is compatible with your RV battery type, whether it’s lead-acid, lithium, or AGM, to maximize charging efficiency.
- Charge Controller: A charge controller is essential for regulating the voltage and current coming from the solar panels to the batteries. Selecting a solar panel system that includes a high-quality charge controller can prevent overcharging and prolong battery life.
- Portability: If you plan to use your solar setup in different locations or detach it from the RV, consider portable solar panels. These panels are designed for easy transport and setup, offering flexibility for various charging scenarios.
How Do Wattage and Size Impact Charging Efficiency?
The wattage and size of solar panels significantly influence their charging efficiency, especially when considering the best solar panel for RV battery charging.
- Wattage: The wattage rating of a solar panel indicates its power output under optimal conditions. Higher wattage panels can produce more energy, allowing for faster charging of RV batteries, which is crucial for maintaining power needs while on the road.
- Size: The physical size of the solar panel affects its efficiency and installation options. Larger panels can capture more sunlight due to their increased surface area, but they may also limit mounting options on smaller RVs, necessitating a balance between size and power output.
- Efficiency Rating: This measures how well a solar panel converts sunlight into electricity. Panels with higher efficiency ratings can produce more power in limited space, making them ideal for RV applications where space may be constrained.
- Solar Cell Type: The type of solar cells used (monocrystalline, polycrystalline, or thin-film) impacts both efficiency and space requirements. Monocrystalline panels tend to be more efficient and compact, making them a popular choice for RVs, while polycrystalline panels are generally less expensive but larger.
- Angle and Orientation: The angle at which solar panels are mounted can greatly influence their performance. Panels that are correctly oriented towards the sun can maximize sunlight exposure, leading to better charging efficiency, while those that are poorly positioned may underperform regardless of wattage or size.
What Features Contribute to the Durability of a Solar Panel?
Several features contribute to the durability of a solar panel, especially when considering the best options for RV battery charging:
- High-Quality Materials: The use of robust materials like tempered glass and anodized aluminum frames enhances the physical resilience of solar panels, protecting them from environmental stresses such as hail, wind, and corrosion.
- Weather Resistance: Solar panels designed for outdoor use often have weatherproof ratings, ensuring they can withstand extreme temperatures, moisture, and UV exposure without degrading in performance over time.
- Efficient Sealant Technology: Advanced sealant technologies help prevent water ingress and protect internal components, which is crucial for maintaining functionality and longevity, especially in wet or humid conditions.
- Enhanced Warranty Periods: Higher-quality solar panels typically offer extended warranties, which reflect the manufacturer’s confidence in their durability and performance over many years, indicating a reliable investment for RV battery charging.
- Robust Electrical Components: Durable electrical components, including junction boxes and connectors, are designed to endure vibrations and shocks typically experienced in RV travel, reducing the risk of electrical failures.
- Anti-Reflective Coatings: These coatings not only improve energy absorption but also protect the surface of the panels from scratches and debris, contributing to their overall lifespan and performance efficiency.
What Types of Solar Panels Are Suitable for RV Battery Charging?
The best solar panels for RV battery charging are typically categorized into three main types:
- Monocrystalline Solar Panels: These panels are made from a single crystal structure, making them highly efficient and space-saving.
- Polycrystalline Solar Panels: Composed of multiple crystal structures, these panels are generally less expensive, albeit slightly less efficient than their monocrystalline counterparts.
- Thin-Film Solar Panels: These panels are lightweight and flexible, making them suitable for unconventional surfaces, but they usually have lower efficiency and require more space for the same power output.
Monocrystalline Solar Panels: Known for their high efficiency, monocrystalline solar panels can convert a greater percentage of sunlight into electricity, which is advantageous for RVs with limited roof space. Their durability and performance in low-light conditions also make them a popular choice among RV owners looking for reliable energy sources.
Polycrystalline Solar Panels: While they are generally less efficient than monocrystalline panels, polycrystalline panels offer a more budget-friendly option for those looking to charge their RV batteries. They require more space to generate the same amount of power and are slightly less efficient in high-temperature conditions, but they are widely available and suitable for many RV setups.
Thin-Film Solar Panels: Thin-film panels have the advantage of being lightweight and flexible, making them easier to install on various surfaces of an RV. However, they have lower efficiency rates and require a larger area to produce the same amount of power compared to monocrystalline and polycrystalline panels, which may be a consideration for RV owners with limited installation space.
How Do Monocrystalline and Polycrystalline Panels Compare for RV Use?
| Aspect | Monocrystalline Panels | Polycrystalline Panels |
|---|---|---|
| Efficiency | Higher efficiency, typically around 15-22%, making them ideal for limited space. | Lower efficiency, usually between 13-16%, requiring more space for the same output. |
| Cost | Generally more expensive due to their manufacturing process and higher efficiency. | Less expensive, offering a budget-friendly option but at a cost of lower efficiency. |
| Space Requirement | Requires less surface area to produce the same amount of energy. | Needs more surface area, which may be a consideration for smaller RV roofs. |
| Lifespan | Typically last 25 years or more, with better performance over time. | Shorter lifespan, around 20-25 years, with potential performance degradation. |
| Weight | Generally lighter, which can ease installation and reduce roof load. | Typically heavier, which may require stronger mounting solutions. |
| Temperature Coefficient | Better performance in high temperatures, with a lower temperature coefficient. | Higher temperature coefficient, leading to a reduction in efficiency in hot climates. |
| Warranty | Often come with 25-year warranties, indicating longevity and manufacturer confidence. | Usually have 10-20 year warranties, reflecting shorter expected lifespan. |
What Are the Benefits of Thin-Film Solar Panels in an RV Setting?
Thin-film solar panels offer several advantages for RV battery charging, making them a popular choice among travelers.
- Lightweight and Flexible: Thin-film solar panels are significantly lighter than traditional panels, which is ideal for RVs where weight is a concern. Their flexibility allows them to be installed on curved surfaces, optimizing space and aesthetic integration on vehicles.
- Better Performance in Low Light: These panels are known to perform better in low-light conditions compared to crystalline silicon panels. This means they can still generate a reasonable amount of power during cloudy days or in shaded areas, making them reliable for varied weather conditions.
- Lower Cost: Thin-film technology is generally less expensive to produce, which translates to lower prices for consumers. This cost-effectiveness can be beneficial for RV owners looking to maximize their energy output without a significant financial investment.
- Ease of Installation: The lightweight and flexible nature of thin-film panels allows for easier installation, often requiring fewer mounting hardware components. This simplicity is advantageous for RV owners who may want to set up their solar systems quickly and with minimal hassle.
- Durability and Resistance: Thin-film panels can be more resistant to high temperatures and other environmental stresses, making them suitable for the diverse conditions RVs may encounter. Their durability can lead to a longer lifespan, providing consistent power for many years.
Which Brands Offer the Best Solar Panels for RV Battery Charging?
The best brands for solar panels suitable for RV battery charging include:
- Renogy: Renogy is known for its high-efficiency solar panels and comprehensive kits that cater to RV owners.
- Zamp Solar: Zamp Solar specializes in portable and easy-to-install solar solutions, making them a favorite among RV enthusiasts.
- Battle Born Batteries: While primarily a battery manufacturer, Battle Born offers solar panels that integrate seamlessly with their battery systems.
- Goal Zero: Goal Zero focuses on portable solar kits that are ideal for those who want a lightweight and flexible charging solution.
- ALLPOWERS: ALLPOWERS provides versatile solar panels that are both affordable and efficient for RV use.
Renogy: Renogy solar panels are particularly praised for their durability and performance in low-light conditions, making them reliable for RVs. They offer various wattage options and complete kits that include charge controllers, making setup easier for users.
Zamp Solar: Zamp Solar products are designed specifically for RVs, featuring a plug-and-play system that simplifies installation and use. Their panels are lightweight and designed to withstand the rigors of travel, ensuring consistent performance.
Battle Born Batteries: Battle Born Batteries, while primarily known for their lithium batteries, also provide solar panels that work well with their systems. Their products are designed for compatibility and efficiency, ensuring optimal energy management in an RV setup.
Goal Zero: Goal Zero specializes in portable solar solutions that are perfect for RV trips. Their solar kits are user-friendly and designed for quick setup, allowing RV users to harness solar power without much hassle.
ALLPOWERS: ALLPOWERS offers a range of solar panels that are both affordable and efficient, making them accessible to a wide audience. Their products are known for their portability and versatility, catering to different RV charging needs.
What Notable Products Should You Consider from Top Brands?
When looking for the best solar panel for RV battery charging, consider the following notable products from top brands:
- Renogy 100 Watt 12 Volt Monocrystalline Solar Panel: This solar panel is known for its high efficiency and durability, making it ideal for RVs. It features a sturdy frame that can withstand harsh weather conditions and has a good power output for charging batteries quickly.
- Goal Zero Boulder 100 Briefcase Solar Panel: This portable solar panel is designed for easy transport and setup, perfect for RV users on the go. It includes a built-in handle for convenience and can be linked with other panels to increase power output, making it versatile for different energy needs.
- Zamp Solar 140 Watt Portable Solar Panel Kit: The Zamp Solar kit is specifically designed for RVs, featuring a compact design and efficient charging capabilities. It comes with a built-in charge controller and is easy to set up, allowing for quick deployment whenever you need to recharge your batteries.
- Newpowa 100W Polycrystalline Solar Panel: This panel offers a budget-friendly option without compromising on quality. It has a robust design that ensures long-term performance and is suitable for various weather conditions, making it a reliable choice for RV users.
- Renogy 200 Watt 12 Volt Monocrystalline Solar Panel: For those who require more power, this 200-watt panel provides a significant energy boost. It is highly efficient and designed for off-grid applications, making it perfect for extended RV trips where battery charging is critical.
How Can You Effectively Install a Solar Panel System for Your RV?
To effectively install a solar panel system for your RV, consider the following components:
- Solar Panels: Selecting the right type and size of solar panels is crucial for efficient energy capture.
- Charge Controller: This device regulates the voltage and current coming from the solar panels to the batteries.
- Batteries: Choosing the best batteries for storage is essential to ensure that energy collected can be effectively used.
- Mounting Hardware: Proper mounting hardware is necessary to securely attach solar panels to your RV.
- Wiring and Connectors: Quality wiring and connectors are important for creating a reliable electrical connection between components.
- Inverter: An inverter converts stored DC energy from batteries to AC power for various RV appliances.
Solar Panels: When choosing solar panels for RV battery charging, look for high-efficiency models that can generate adequate power while being lightweight and compact. Monocrystalline panels are often considered the best due to their efficiency and space-saving design, making them ideal for the limited roof area of an RV.
Charge Controller: A charge controller prevents overcharging and excessive discharging of the batteries, prolonging their lifespan. MPPT (Maximum Power Point Tracking) controllers are typically more efficient than PWM (Pulse Width Modulation) controllers, especially in varying sunlight conditions, thus maximizing the energy harvested from the solar panels.
Batteries: Lithium-ion batteries are gaining popularity for RV solar systems due to their lightweight, efficiency, and longer lifespan compared to traditional lead-acid batteries. It’s essential to choose batteries that can handle the charge and discharge cycles required for your specific usage patterns and energy needs.
Mounting Hardware: Ensure that the mounting hardware is durable and weather-resistant, as it will be exposed to various environmental conditions. Adjustable mounts can also allow for optimal angle adjustments to capture sunlight more effectively throughout the day.
Wiring and Connectors: Using high-quality wiring and connectors minimizes resistance and potential energy losses in the system. Ensure that all components are compatible and that the wiring gauge is appropriate for the distance and current load expected in your RV setup.
Inverter: The inverter is crucial if you plan to use AC appliances in your RV, converting the stored DC energy from your batteries to AC power. Look for a pure sine wave inverter for the best compatibility with sensitive electronics and appliances, ensuring they operate smoothly without damage.
What Equipment Do You Need for Proper Installation?
For proper installation of solar panels for RV battery charging, you will need several essential pieces of equipment:
- Solar Panels: The most crucial component, solar panels convert sunlight into electricity. When selecting, consider factors like wattage, efficiency, and size to ensure they meet your charging needs.
- Charge Controller: This device regulates the voltage and current coming from the solar panels to the battery, preventing overcharging and ensuring the battery operates efficiently. A quality charge controller can prolong battery life and enhance performance.
- Batteries: Deep cycle batteries are typically used for solar systems as they can be discharged and recharged repeatedly without damage. It’s essential to choose batteries that are compatible with your solar system’s voltage and capacity requirements.
- Inverter: If you plan to use AC appliances in your RV, an inverter will convert the DC power from the batteries into AC power. Choose an inverter that can handle the total wattage of all devices you intend to run.
- Mounting Hardware: Secure and appropriate mounting equipment is necessary for safely attaching solar panels to your RV. This includes brackets, screws, and possibly tilting mechanisms to optimize sunlight capture.
- Wiring and Connectors: Proper wiring is essential for connecting all components of the solar system. Use appropriate gauge wires and connectors that can handle the system’s voltage and current to ensure safety and efficiency.
- Fuses and Circuit Breakers: These safety devices protect your solar system from overloads and short circuits. Installing fuses and circuit breakers in your system helps prevent damage to your components and ensures reliable operation.
- Multimeter: This tool is useful for troubleshooting and monitoring your solar power system. A multimeter can help measure voltage, current, and resistance to ensure everything is functioning correctly.
What Are the Key Steps to Follow for a Successful Setup?
The key steps for a successful setup of solar panels for RV battery charging include the following:
- Assess Power Needs: Determine the total wattage required for your RV appliances to ensure the solar panel system meets your energy demands.
- Select the Right Solar Panel: Choose the best solar panel for RV battery charging based on efficiency, size, and compatibility with your battery system.
- Choose an Inverter and Charge Controller: Invest in a quality inverter to convert the solar power to usable electricity and a charge controller to regulate battery charging.
- Install the Solar Panels Properly: Mount the solar panels securely on the roof of your RV, ensuring they are angled to maximize sunlight exposure.
- Connect the System: Use proper wiring and connectors to link the solar panels, charge controller, inverter, and batteries together safely.
- Test the Setup: Once installed, thoroughly test the system to ensure everything functions correctly and that the batteries are charging as expected.
Assessing power needs involves calculating the wattage of all devices you plan to use in your RV, factoring in daily usage to choose a solar panel system that can provide enough energy. This step ensures that you do not select a solar panel that is underpowered for your requirements.
Selecting the right solar panel entails reviewing options based on efficiency ratings, physical size, and how well they integrate with your existing battery system, such as whether you use AGM or lithium batteries. The best solar panel for RV battery charging should be durable, lightweight, and easy to install.
Choosing an inverter and charge controller is critical, as the inverter must match the voltage of your battery system, and the charge controller needs to prevent overcharging, which can damage the batteries. A good quality MPPT (Maximum Power Point Tracking) charge controller increases efficiency by optimizing the energy harvested from the solar panels.
Installing the solar panels properly requires careful consideration of the mounting hardware and ensuring that the panels are angled to capture maximum sunlight, which may vary depending on your geographical location. Proper installation also includes waterproofing and securing the wiring to prevent damage during travel.
Connecting the system correctly involves using appropriate gauge wiring and connectors to handle the current without overheating, as well as ensuring that all connections are tight and secure to prevent power loss or safety hazards. Following manufacturer guidelines during connection is crucial for optimal performance.
Testing the setup provides peace of mind, allowing you to verify that the system is charging the batteries effectively and that all components are functioning as intended. This step can include checking voltage levels, monitoring battery capacity, and performing a load test on your inverter to ensure it meets your power needs.
What Accessories Can Enhance Your Solar Panel Performance in an RV?
Choosing the right accessories can significantly enhance your solar panel performance for RV battery charging. Here are some essential accessories to consider:
-
Solar Charge Controller: This device regulates the voltage and current coming from the solar panels to the batteries, preventing overcharging and damage. MPPT (Maximum Power Point Tracking) controllers are highly recommended for their efficiency.
-
Battery Monitoring System: Installing a battery monitor provides real-time information about battery voltage, capacity, and charging status. This insight helps in managing power consumption effectively.
-
Fuses and Circuit Breakers: These components protect your wiring and equipment from overloads, ensuring safety in your RV’s electrical system.
-
Solar Panel Mounts: Adjustable mounts enable you to position solar panels optimally for maximum sunlight exposure, increasing energy capture throughout the day.
-
Extension Cables: High-quality cables designed for solar use allow flexible placement of panels and minimize power loss due to resistance over distance.
-
Inverters: For converting DC battery power to AC for household use, a good inverter is vital. Look for a pure sine wave inverter for a clean energy output that’s safe for sensitive electronics.
Incorporating these accessories can substantially boost the efficiency and effectiveness of your solar setup in an RV, ensuring you get the most out of your solar energy system.
How Do Charge Controllers and Inverters Optimize Solar Efficiency?
Charge controllers and inverters play crucial roles in optimizing solar efficiency, especially for RV battery charging systems.
- Charge Controllers: These devices manage the flow of energy from the solar panels to the batteries, preventing overcharging and ensuring optimal battery health.
- MPPT Technology: Maximum Power Point Tracking (MPPT) charge controllers increase the efficiency of solar energy conversion by adjusting the electrical operating point of the panels to maximize power output.
- PWM Technology: Pulse Width Modulation (PWM) charge controllers are simpler and cheaper alternatives that regulate the voltage and current coming from the solar panels to the batteries, but they may not be as efficient as MPPT controllers.
- Inverters: These devices convert the direct current (DC) produced by solar panels into alternating current (AC), which is used by most household appliances, thus expanding the functionality of the solar power system.
- Pure Sine Wave Inverters: These inverters produce a smooth and consistent output that is ideal for sensitive electronics and appliances, ensuring they operate efficiently and without damage.
- Modified Sine Wave Inverters: Though generally less expensive, modified sine wave inverters can cause issues with some appliances, making them less suitable for systems that require optimal efficiency.
Charge controllers are essential for protecting batteries from damage due to overcharging, which can significantly extend their lifespan and maintain their efficiency. MPPT charge controllers utilize advanced algorithms to constantly find the maximum power point of the solar panels, optimizing energy harvest even in varying sunlight conditions. PWM controllers, while less sophisticated, are still effective in simpler systems and are often sufficient for smaller setups.
Inverters enable the use of solar power for a wider range of applications by converting the DC energy stored in batteries to AC power, which can then be used to run appliances. Pure sine wave inverters are the preferred choice for high-efficiency systems, as they provide a cleaner power output that is safe for all types of electrical devices. Modified sine wave inverters can be a cost-effective solution for basic needs, but they may lead to inefficiencies and potential damage in sensitive equipment.
What Maintenance Practices Extend the Lifespan of Your Solar Panels?
To ensure solar panels operate efficiently and last longer, certain maintenance practices should be followed:
- Regular Cleaning: Keeping solar panels clean is essential for optimal performance. Dust, dirt, and debris can accumulate on the surface, blocking sunlight and reducing energy output. Depending on the environment, panels may need to be cleaned every few months, especially in areas with high dust levels or after storms.
- Inspecting for Damage: Periodic inspections help identify any physical damage to the panels, such as cracks or loose connections. Catching these issues early can prevent further deterioration and ensure the panels continue to function effectively. It’s advisable to check the panels after severe weather events to ensure they remain intact.
- Monitoring Performance: Keeping track of the energy production of solar panels is crucial for identifying any declines in efficiency. Installing a monitoring system can help detect issues early on, allowing for timely repairs or adjustments. Regular performance checks also ensure that the panels are generating the expected amount of power.
- Checking Wiring and Connections: Over time, wiring and electrical connections can wear down or become loose, impacting the efficiency of the solar power system. Regularly inspecting and tightening these connections helps maintain optimal performance and prevents potential electrical hazards. It’s important to ensure that all connections are corrosion-free and securely attached.
- Trimming Surrounding Vegetation: Trees or shrubs that grow too close to solar panels can cast shadows, significantly reducing their efficiency. Regularly trimming any vegetation around the panels ensures they receive maximum sunlight throughout the day. This practice is especially important during the growing season when plants can quickly increase in size.
- Professional Maintenance Checks: Scheduling periodic professional inspections can help ensure your solar system is functioning at its best. Professionals can conduct thorough checks that may not be apparent during regular self-inspections, identifying potential issues before they become significant problems. It’s recommended to have these checks done at least once a year to maintain system integrity.
What Steps Should You Take for Regular Cleaning and Inspection?
Regular cleaning and inspection of solar panels are crucial for maintaining their efficiency and longevity. The steps you should take include:
- Visual Inspection: Regularly check the panels for any physical damage, such as cracks or loose wiring. Such issues can significantly reduce their efficiency and may lead to further damage if not addressed promptly.
- Cleaning the Panels: Remove dirt, dust, and debris from the surface of the panels to ensure maximum sunlight absorption. Use a soft cloth or sponge with mild soapy water, and avoid abrasive materials that can scratch the surface.
- Check Connections: Inspect all electrical connections for corrosion or wear. Loose or corroded connections can lead to inefficient power transfer, reducing the overall effectiveness of the solar panel system.
- Monitor Performance: Keep track of the energy output of your solar panels. If you notice a significant drop in performance, it may indicate that cleaning or maintenance is needed, or it could point to a more serious issue with the system.
- Inspect Surrounding Area: Ensure there are no obstructions around the panels, such as overhanging branches or new structures that could block sunlight. Regularly trimming vegetation can help maintain optimal performance.
- Professional Maintenance: Schedule periodic professional inspections and cleanings to catch any potential issues that may not be visible during casual checks. Professionals have the expertise and tools to conduct thorough inspections and maintenance safely.